This is a quick update on my mining experience over the past couple of weeks. As mentioned before, I’ve found PowerPool.io to be the most efficient option. However, rewards have dropped significantly recently, likely due to rising mining difficulty and declining DOGE and LTC prices. Both factors have negatively impacted profitability.
In my case, these changes alone have reduced profitability by about 25%–35%. Previously, I could earn up to €0.20 per hour at best, but now it’s closer to €0.15.
Monitoring
Several other factors also affect profitability, one of which is monitoring. Over the last two weeks, my miner has gone offline multiple times. I can spot this by keeping an eye on the hashrate for my worker on PowerPool.io and then automate a reboot, but that doesn’t really help me understand the root cause.
Initially, I suspected a firmware issue—maybe when it loses the primary pool, it fails to properly connect to the next one in line. However, whenever the miner goes down, it also becomes unreachable via its web interface, indicating something else might be wrong. Since the DG Home1 miner doesn’t provide persistent logs, it’s impossible to diagnose the issue after the fact.
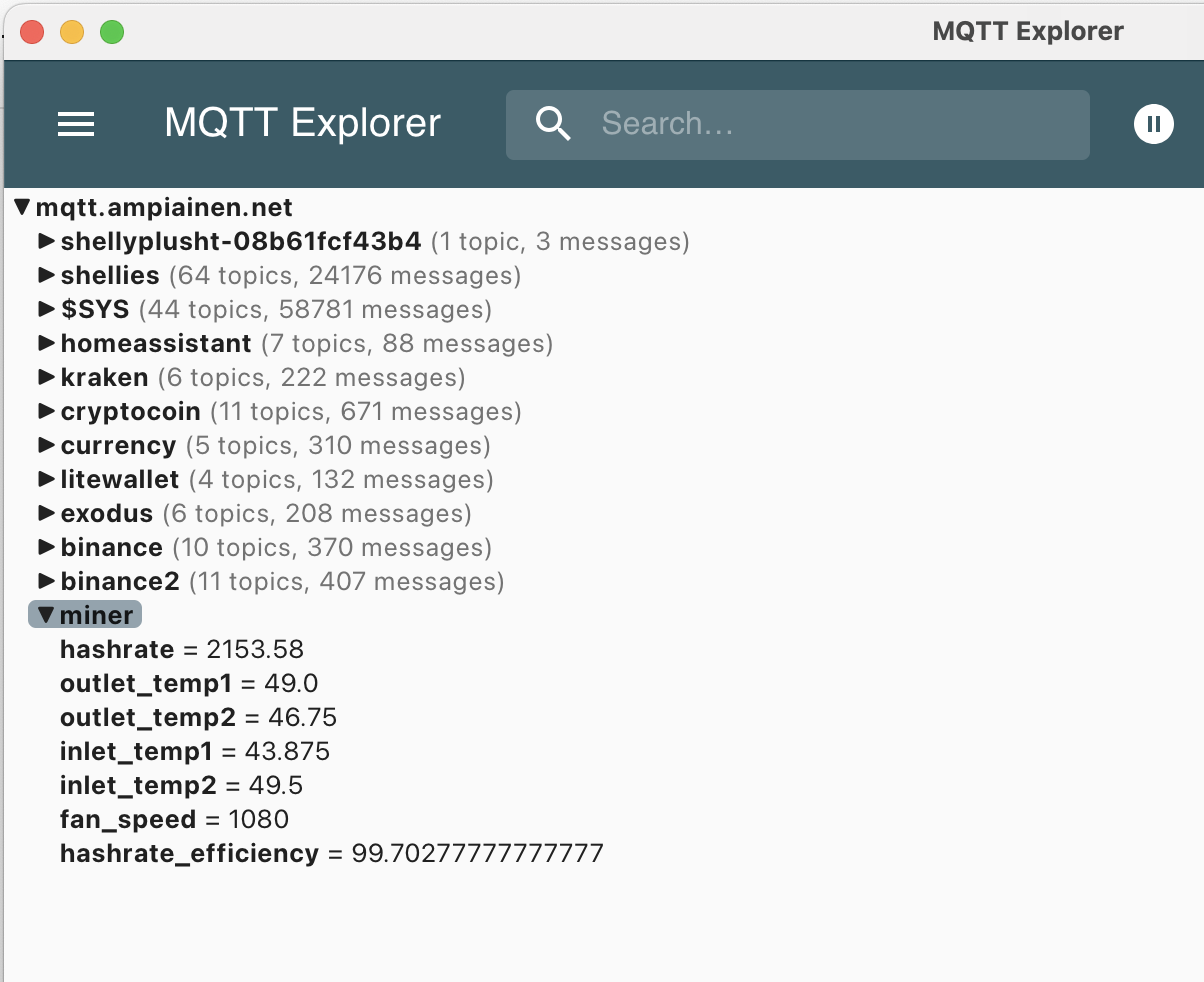
There’s also no straightforward way to monitor the miner remotely, short of writing a custom script. To address this, I created a script called miner_monitor.py that generates a simple log and publishes certain parameters to an MQTT Broker:
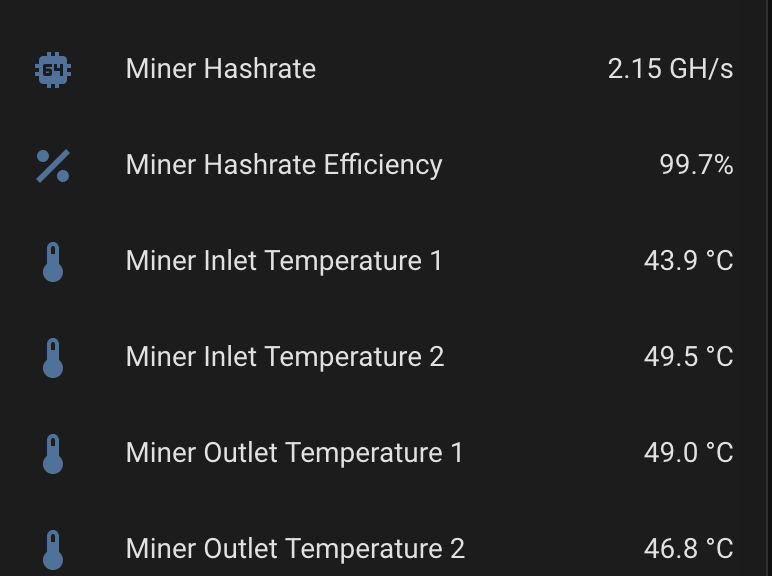
Through my mqtt.yaml, I then create sensor templates and can keep track of these metrics in real time.
Temperatures
One of the most important metrics to watch is temperature. I suspect that if cooling fails, the miner may overheat. According to the documentation, the upper limit is 85°C, at which point the miner shuts down automatically. I’ve set up a system that sends me both email and WhatsApp alerts if any temperature sensor exceeds a specified threshold.
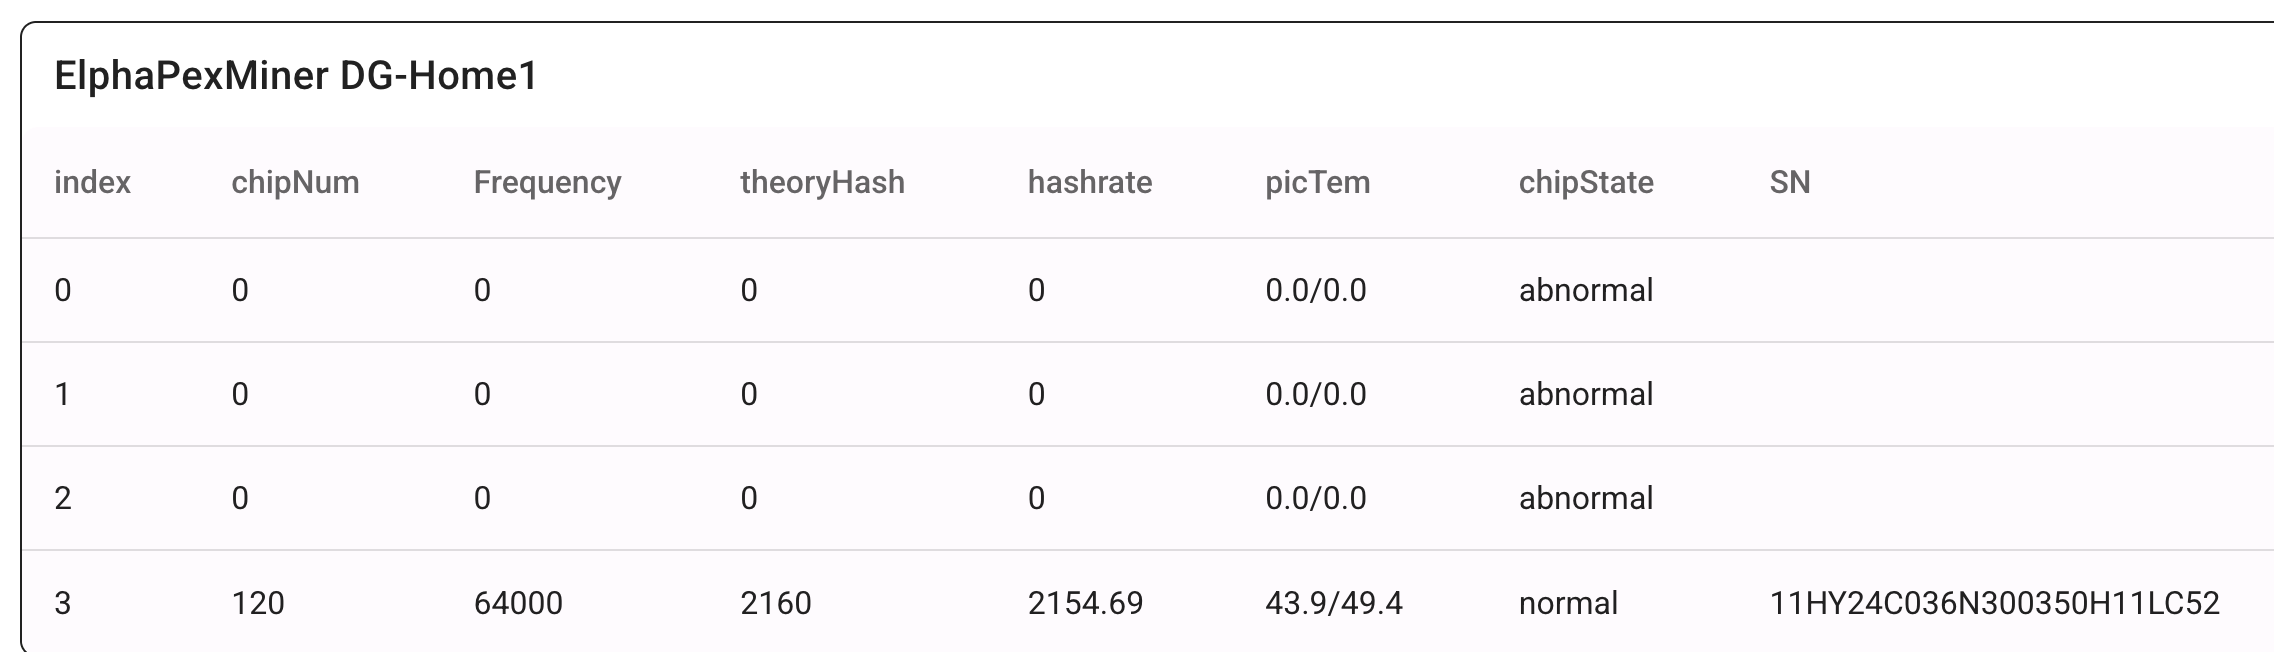
These parameters are similar to the ones shown in the table abowe, plus two additional temperature readings not available through the web interface shown below.
Notifications
With this setup, my miner not only reboots automatically when hashrate drops, but it also sends notifications explaining why it went offline in the first place.
Conclusion
I hope this simple setup helps others as well. My configuration is somewhat messy, but if you develop an easier or more elegant monitoring system, please let me know. As always, my entire configuration is available on my GitHub repository.
I’ve been running a DOGE miner for about a week and a half now. I never really thought DOGE was going to be “the next big thing.” I see a bit more potential in Litecoin, but I’m mostly focused on Bitcoin. However, my miner currently doesn’t mine BTC. The BTC miners earns about one-tenth of the profit compared to mining LTC or DOGE. So I rather mine where the money is and put everything to BTC. To be clear: I mine altcoins and take the profit in bitcoin.
To be honest, I’m skeptical about the future of altcoins—especially meme coins. So why am I mining, given that I don’t see much sense in home BTC mining, and I’m not really sold on other cryptocurrencies either? The main reason is that I want to understand the technology. I’ve decided to only invest in BTC, but I still want to explore how other coins work and whether mining Bitcoin at home can ever be truly profitable.
Lately, I’ve become more interested in decentralized AI. The idea is that many of us—myself, you, and others—have GPUs at home. Instead of using them for crypto mining, we could put them to work on decentralized AI projects. Yes, it still consumes electricity, but at least it could serve a more meaningful purpose. We could even apply the same incentive structure that exists in blockchain to reward participants.
Rather than sending our money to large operations in China or the U.S., we could invest in our own local communities by redirecting home mining capacity to AI development. Let’s break free from the current systems!
I know I’m not the only one thinking this. Let’s collaborate and make it happen!
How to Set Up Litecoin Mining with LitecoinPool and Home Assistant
In this guide, we will walk through setting up a Elphapex DG Home 1 miner on LitecoinPool and integrating it with Home Assistant. You’ll learn how to monitor your miner, track profitability, and automate energy management, making your mining experience efficient and cost-effective.
Above the robovacuum in front showing how small the miner actually is. I decided to move the miner later under the stairs for spreading the heat across the apartment more evenly. The noise level is acceptable – around 50db – and comparable what my heat pump generates. I could live without it but I can also tolerate it. It is noticeable but not disturbingly noticeable. That’s what printing money sounds I guess.
Why Mine LTC and DOGE with LitecoinPool?
No fees: LitecoinPool offers fee-free mining, maximizing your earnings.
Pay-per-Share (PPS): Guaranteed payout per share submitted.
Secure payouts: You can receive rewards directly to your wallet.
Log in to your account and navigate to the “Settings” section to retrieve your worker credentials.
Configure your miner with the following pool details:
URL: stratum+tcp://litecoinpool.org:3333
Username: Your LitecoinPool username
Password: Your chosen worker password
Ensure your miner is online and submitting shares to the pool.
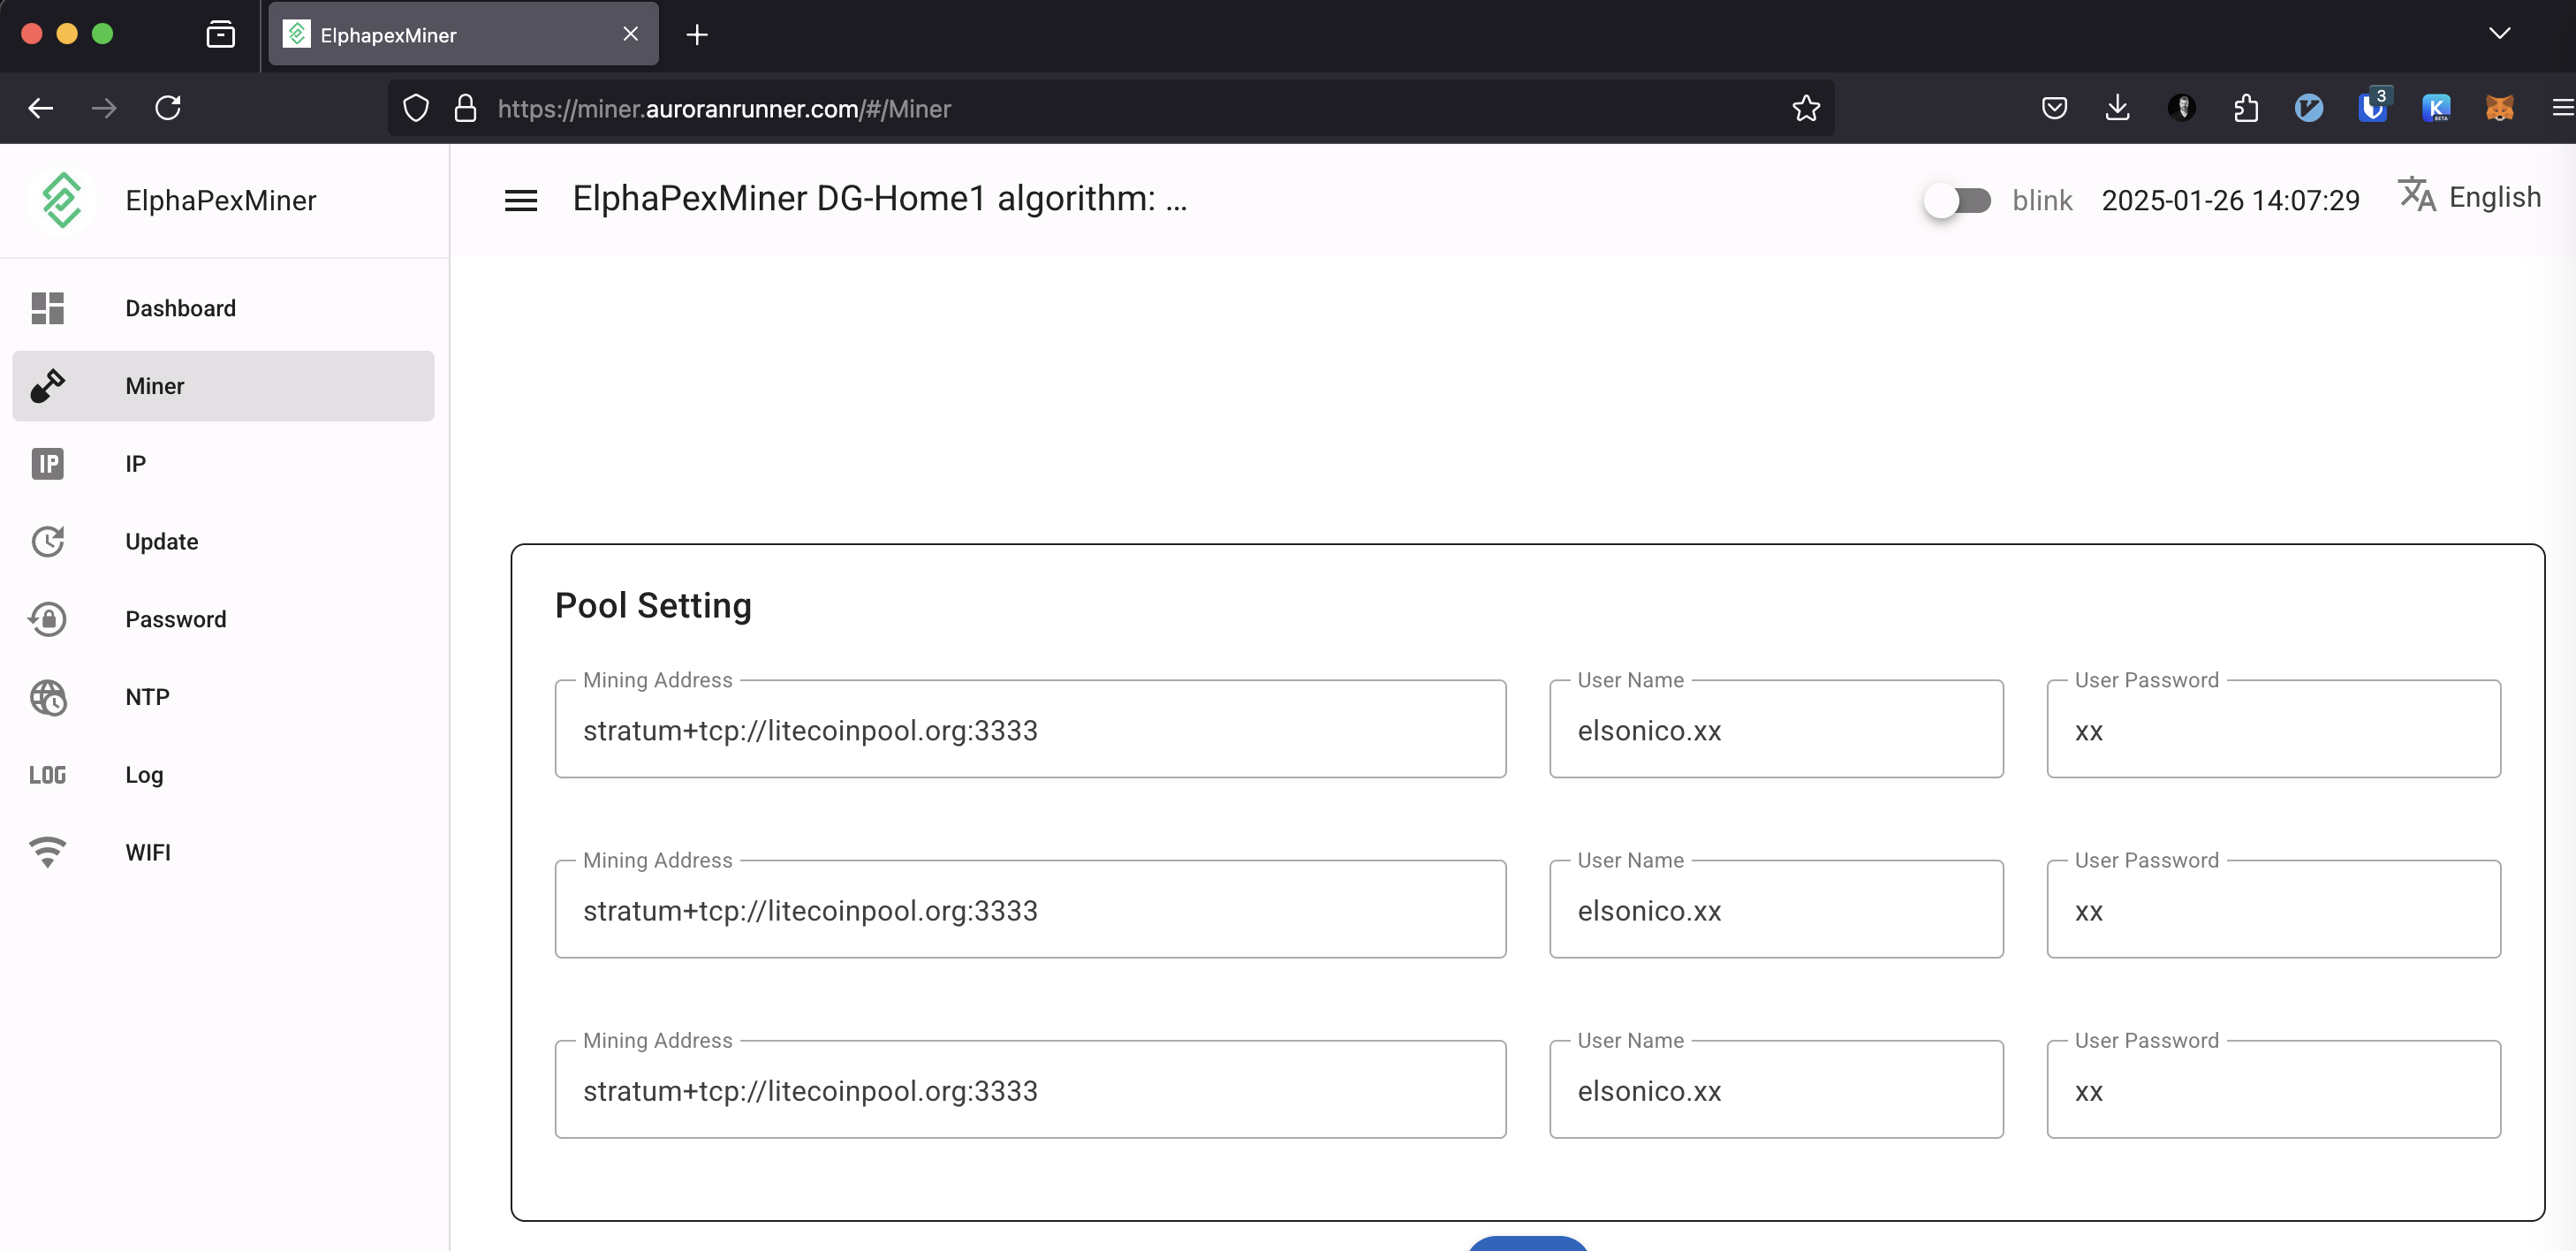
In the end I ended up setting litecoinpool.org thrice on the miner configuration as seen below. The litecoinpool.org resolves to several IPs so there’s high availability through round robin effect on DNS. The default litecoinpool.org is located in Europe AFAIK and I could have used also us.litecoinpool.org as well us2.litecoinpool.org or even other mining pools, but after tinkering with the idea I figured out this is the most reasonable setup. Initially I had only one pool, and when that thread died, I wasn’ä’t mining anything either. I have covered that issue also on my Home Assistant configuration later on.
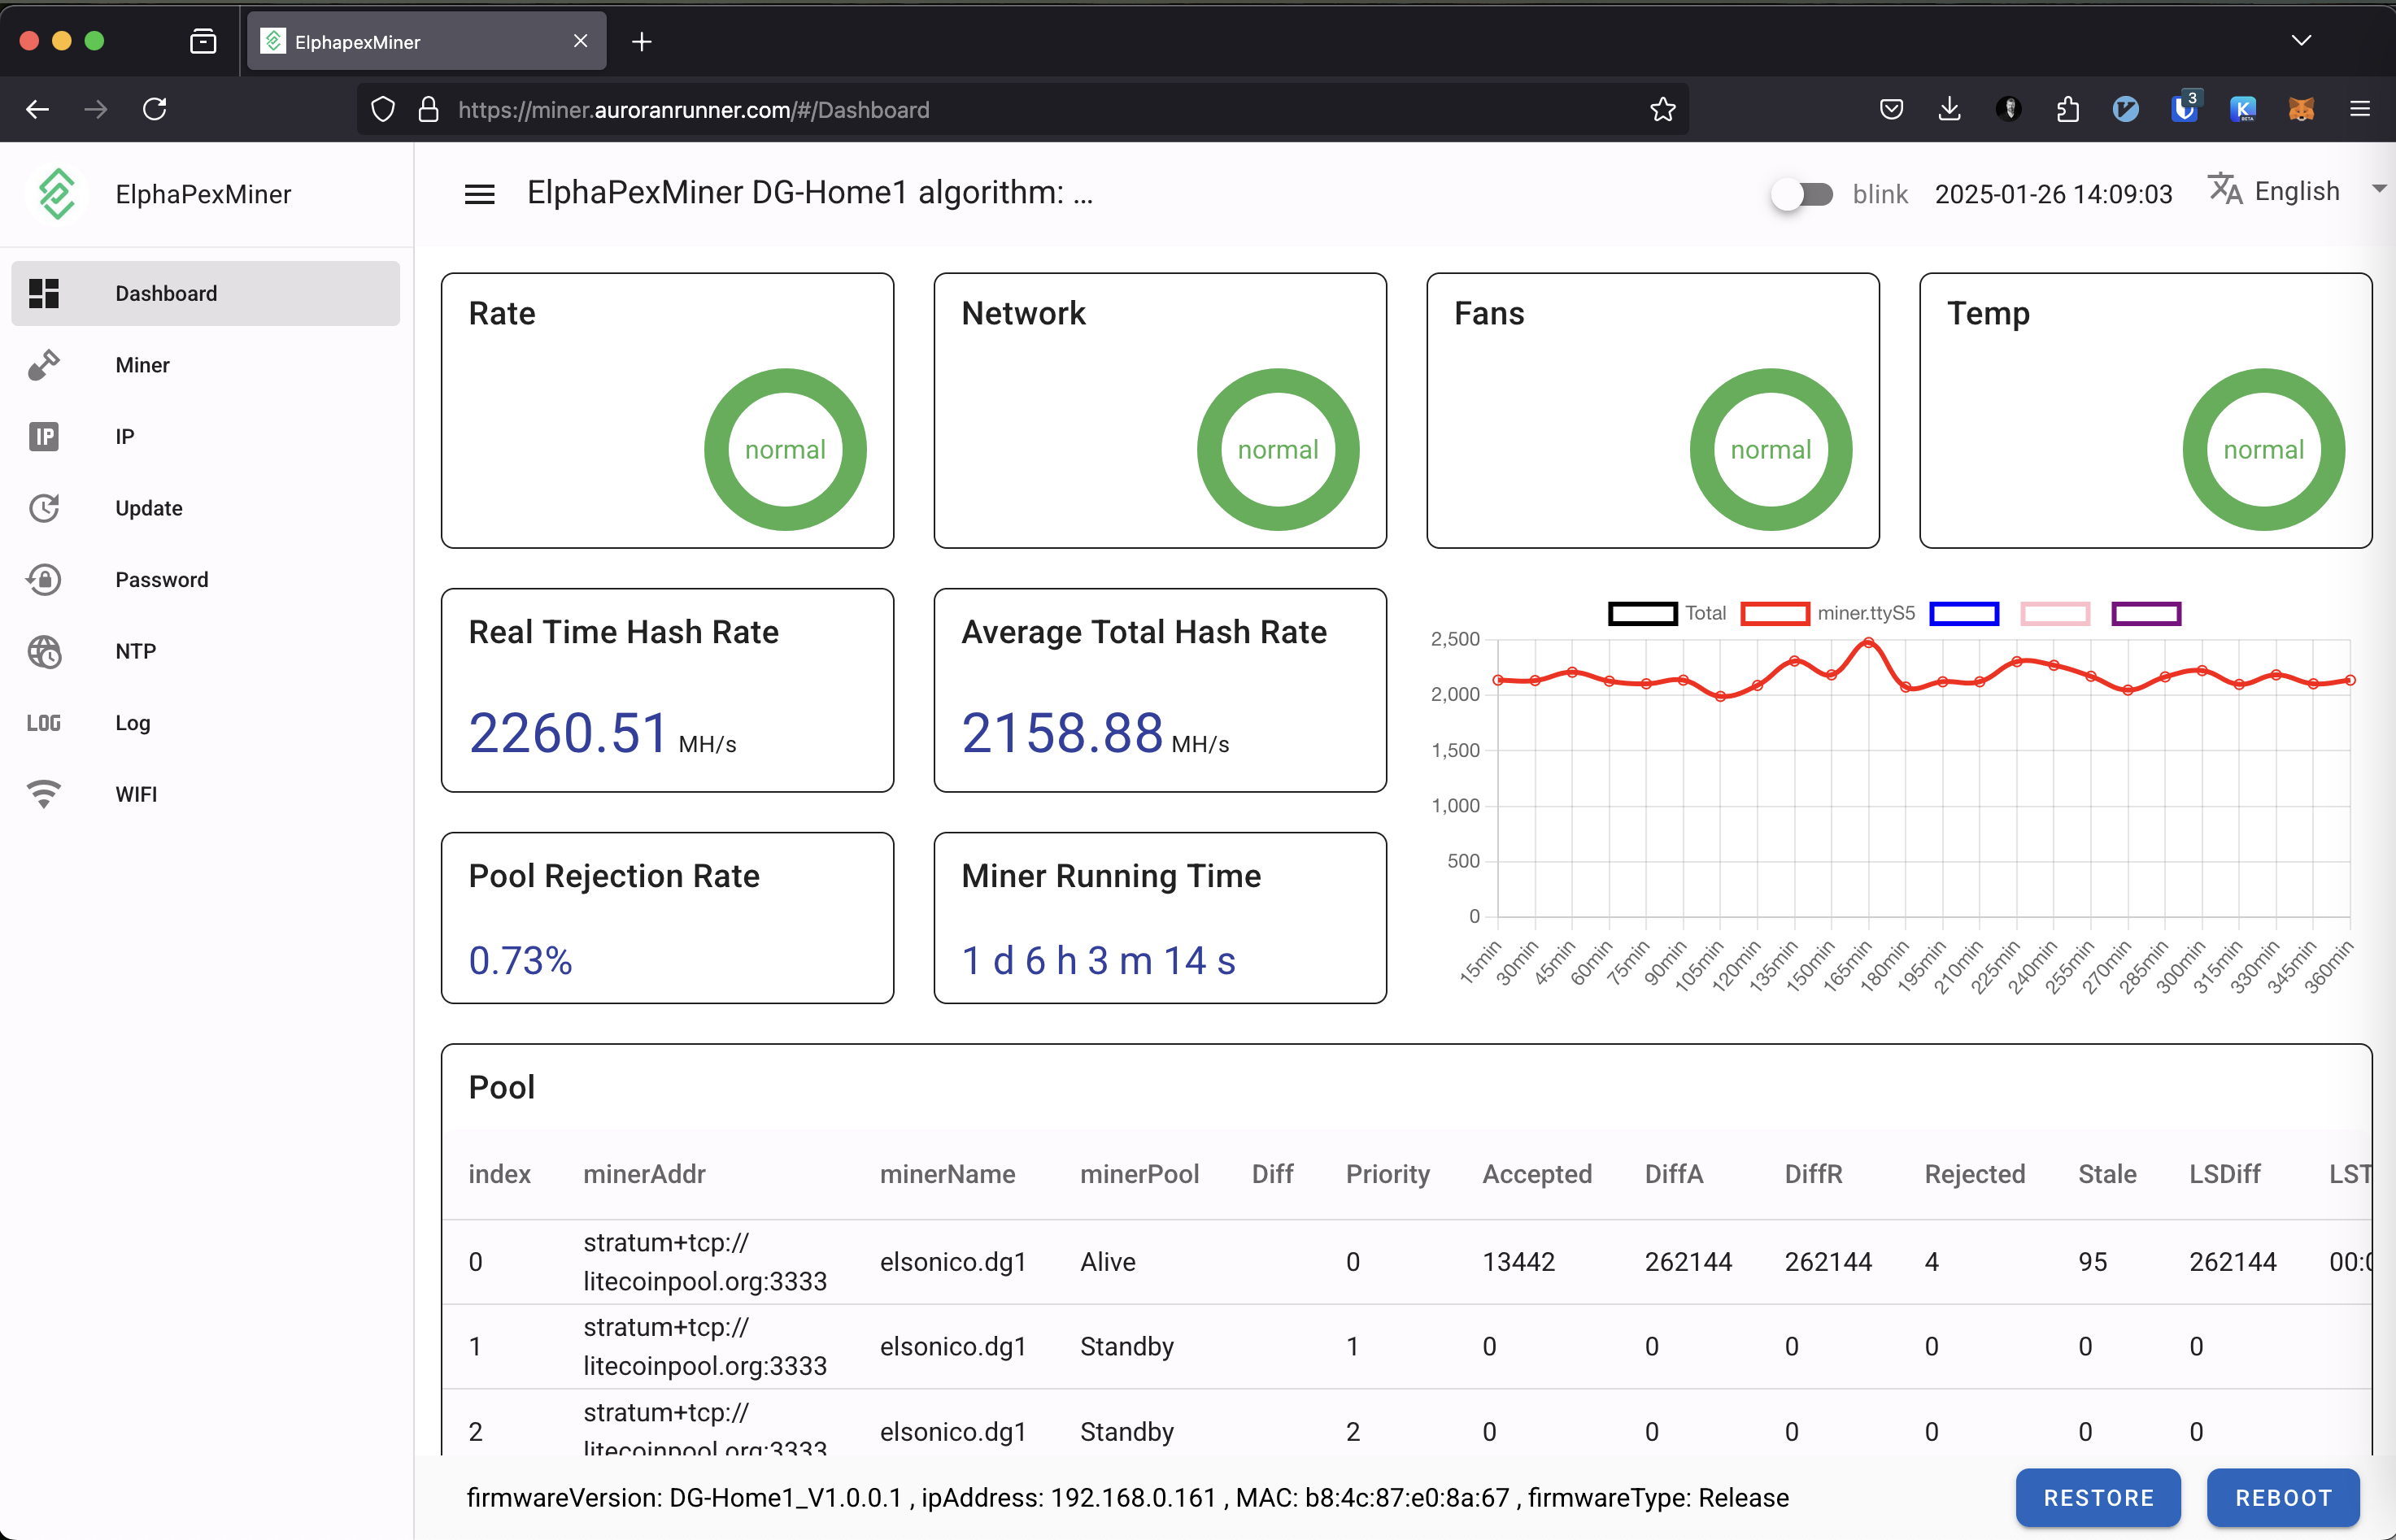
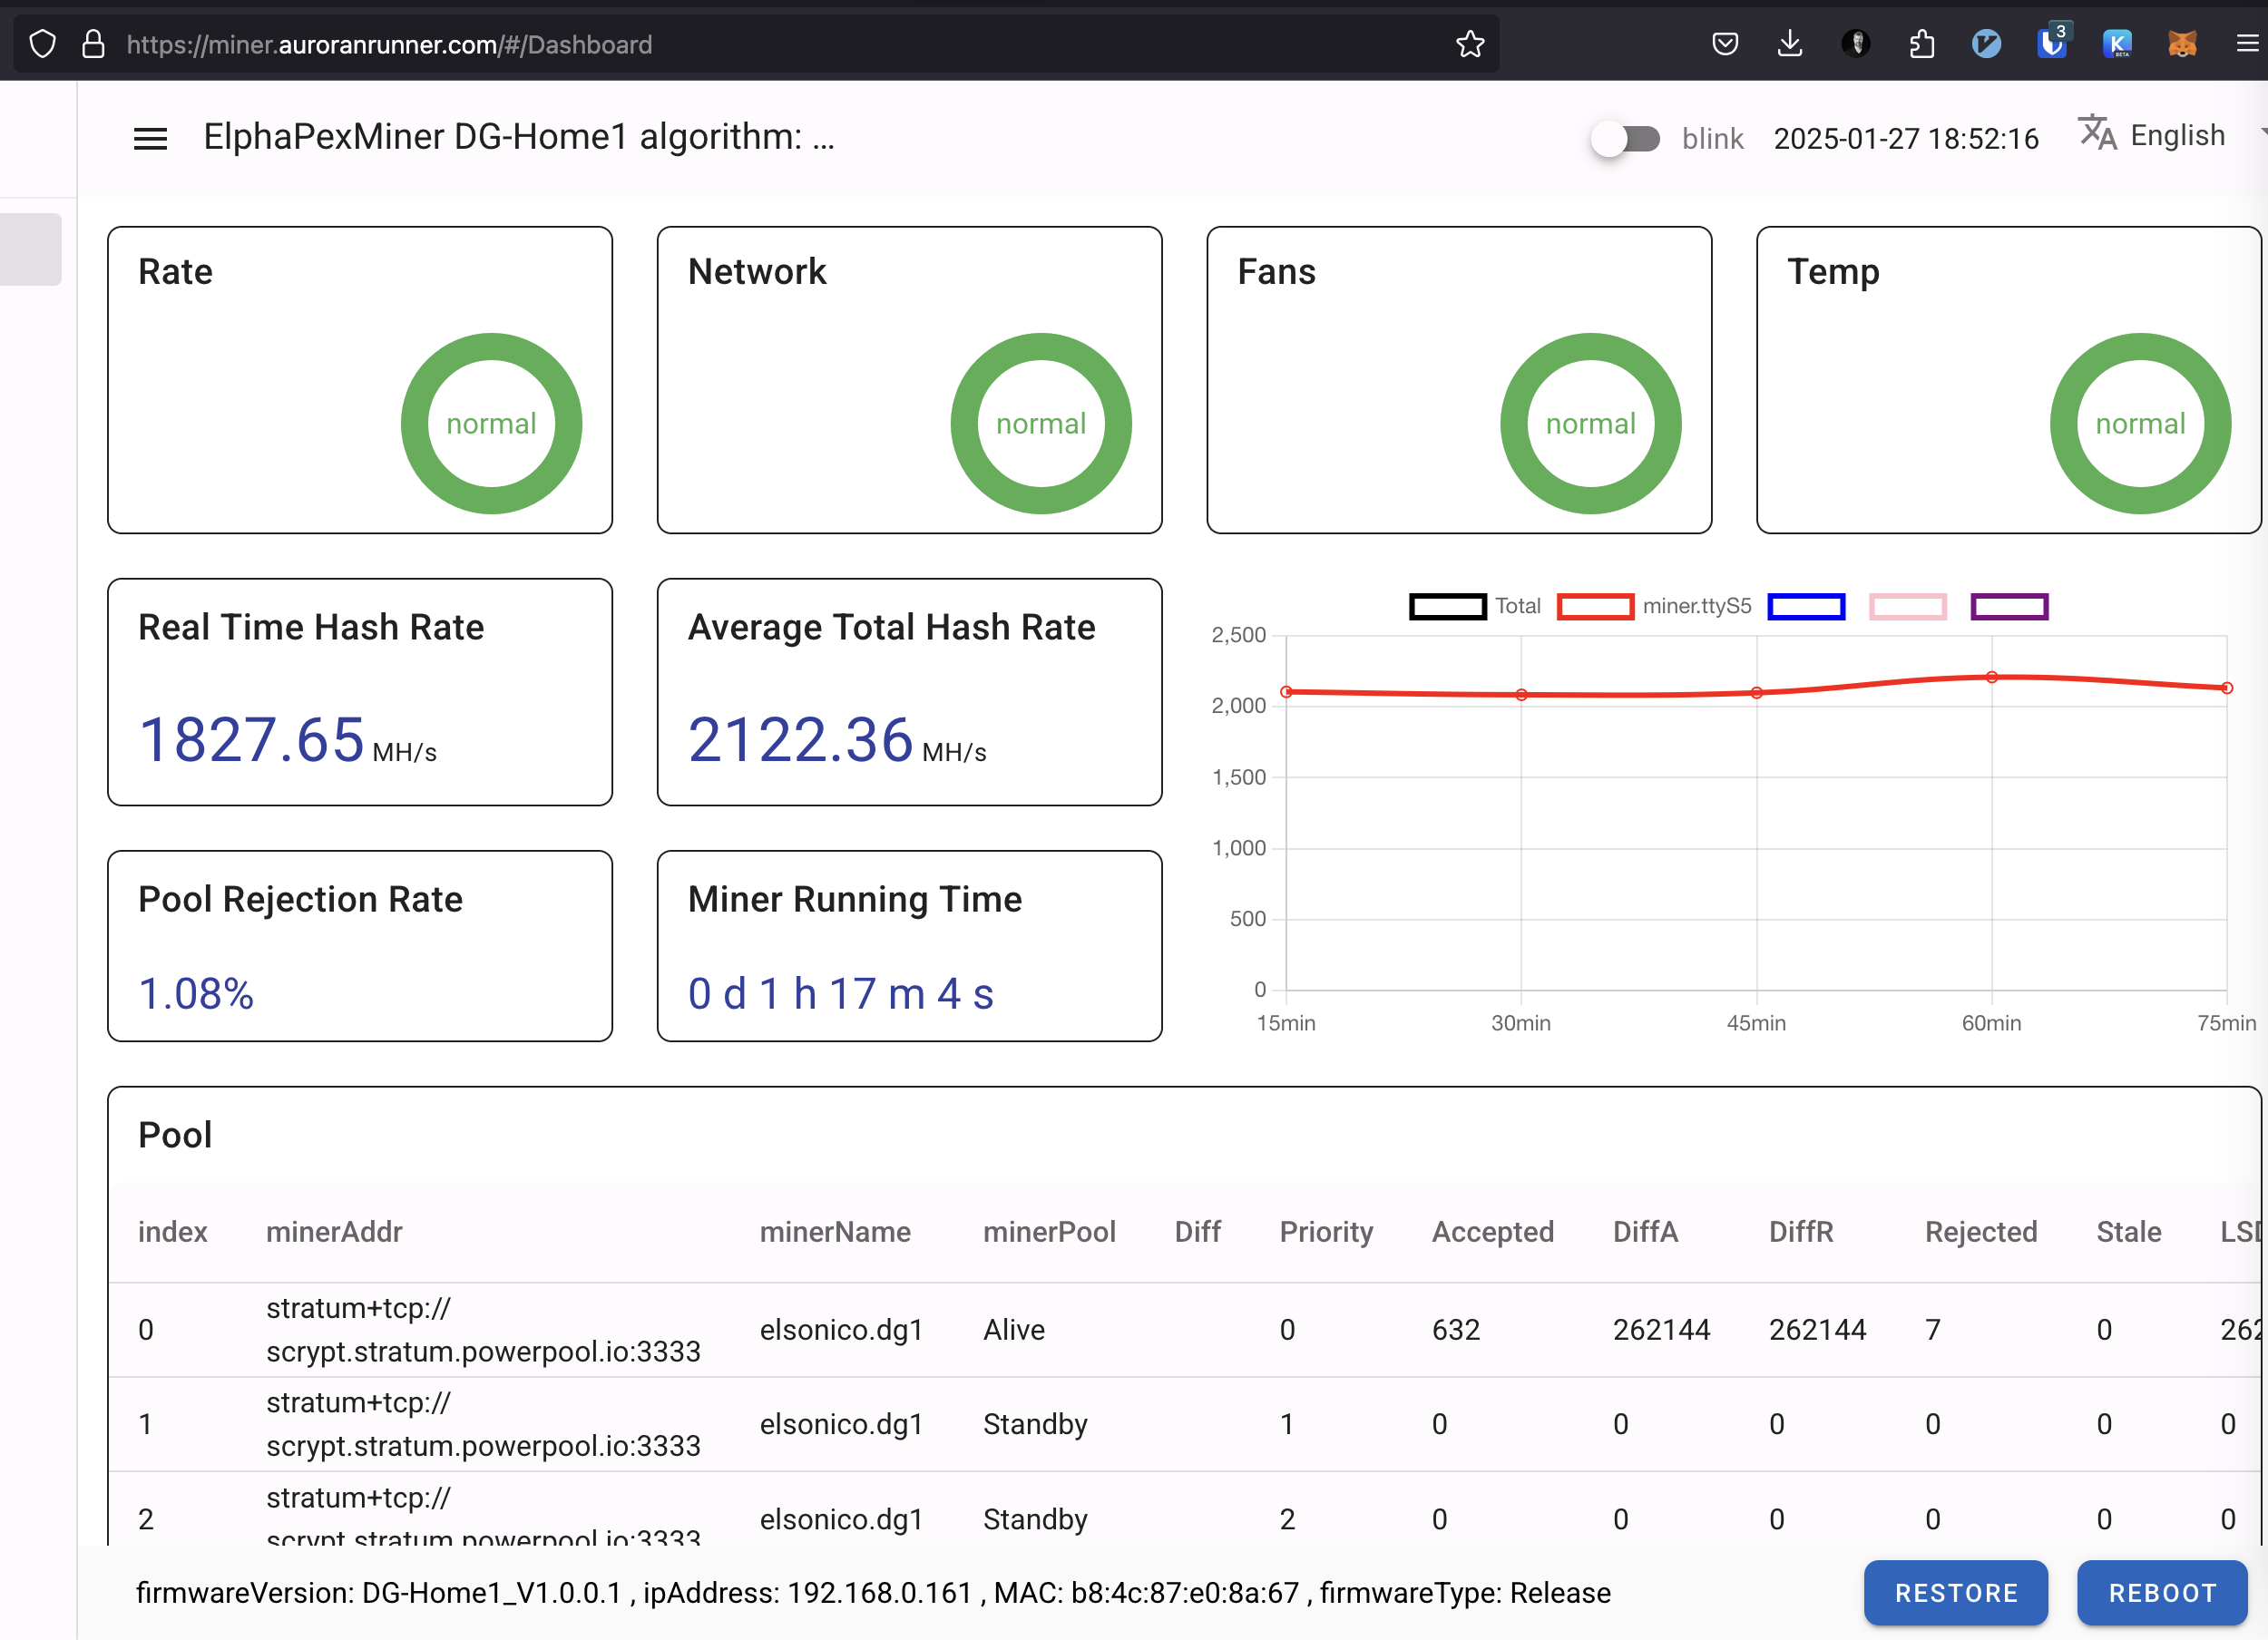
When running the miner the dashboard looks like below on mine setup:
The miner itself is easy to setup so I’m not going much to details here. The default user/password is root/root and I got the IP from my router. It had an issue when using both wireless and wired and I ended up not being able to disable wireless due to that, but I’m ok with it, since I only want to have wireless in the end, although the issue indicates how unfinished the current firmware is.
If you wonder the https URL I’m using above it is because I’ve setup accessing the miner through nginx and I have my own DNS as well. The box is not accessible outside my home network without VPN though.
The box does have ssh daemon listening, but I’m not able to log into it with using root / [web password] which is a bit of a shame. Hopefully that will change with future firmwares.
Step 2: Integrating Your Miner with Home Assistant
Home Assistant provides advanced monitoring and automation capabilities for your mining setup. Here’s how to integrate it:
Requirements
A running instance of Home Assistant
The REST API URL and API key from LitecoinPool
A smart plug for controlling your miner (e.g., Shelly Plug)
Adding LitecoinPool API to Home Assistant
First, add the REST API integration to Home Assistant:
I have also created sensor template for my SPOT electricity price both in €/kWh and c/kWh:
- platform: template
  sensors:
    electricity_cost_per_kwh:
      friendly_name: "Electricity Cost Per kWh"
      unit_of_measurement: "€/kWh"
      value_template: >
        {% set spot_price = (states('sensor.nordpool_kwh_fi_eur_3_10_0255') | float(0)) / 100 %}
        {% set electricity_tax = 0.0283 %}
        {% set transfer_day = 0.0262 %}
        {% set transfer_night = 0.0137 %}
        {% set now = now() %}
        {% set transfer_cost = transfer_night if now.hour >= 22 or now.hour < 7 else transfer_day %}
        {{ (spot_price + electricity_tax + transfer_cost) | round(4) }}
    electricity_cost_in_cents_per_kwh:
      friendly_name: "Electricity Cost in Cents Per kWh"
      unit_of_measurement: "c/kWh"
      value_template: >
        {% set spot_price = (states('sensor.nordpool_kwh_fi_eur_3_10_0255') | float(0)) %}
        {% set electricity_tax = 2.83 %}
        {% set transfer_day = 2.62 %}
        {% set transfer_night = 1.37 %}
        {% set now = now() %}
        {% set transfer_cost = transfer_night if now.hour >= 22 or now.hour < 7 else transfer_day %}
        {{ (spot_price + electricity_tax + transfer_cost) | round(4) }}
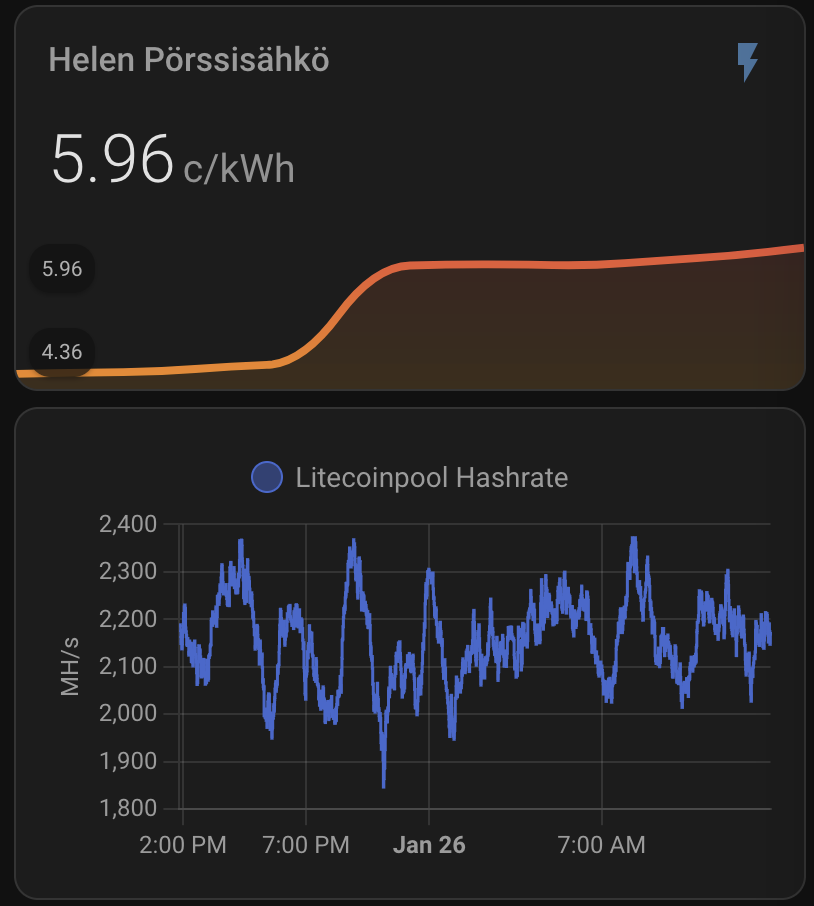
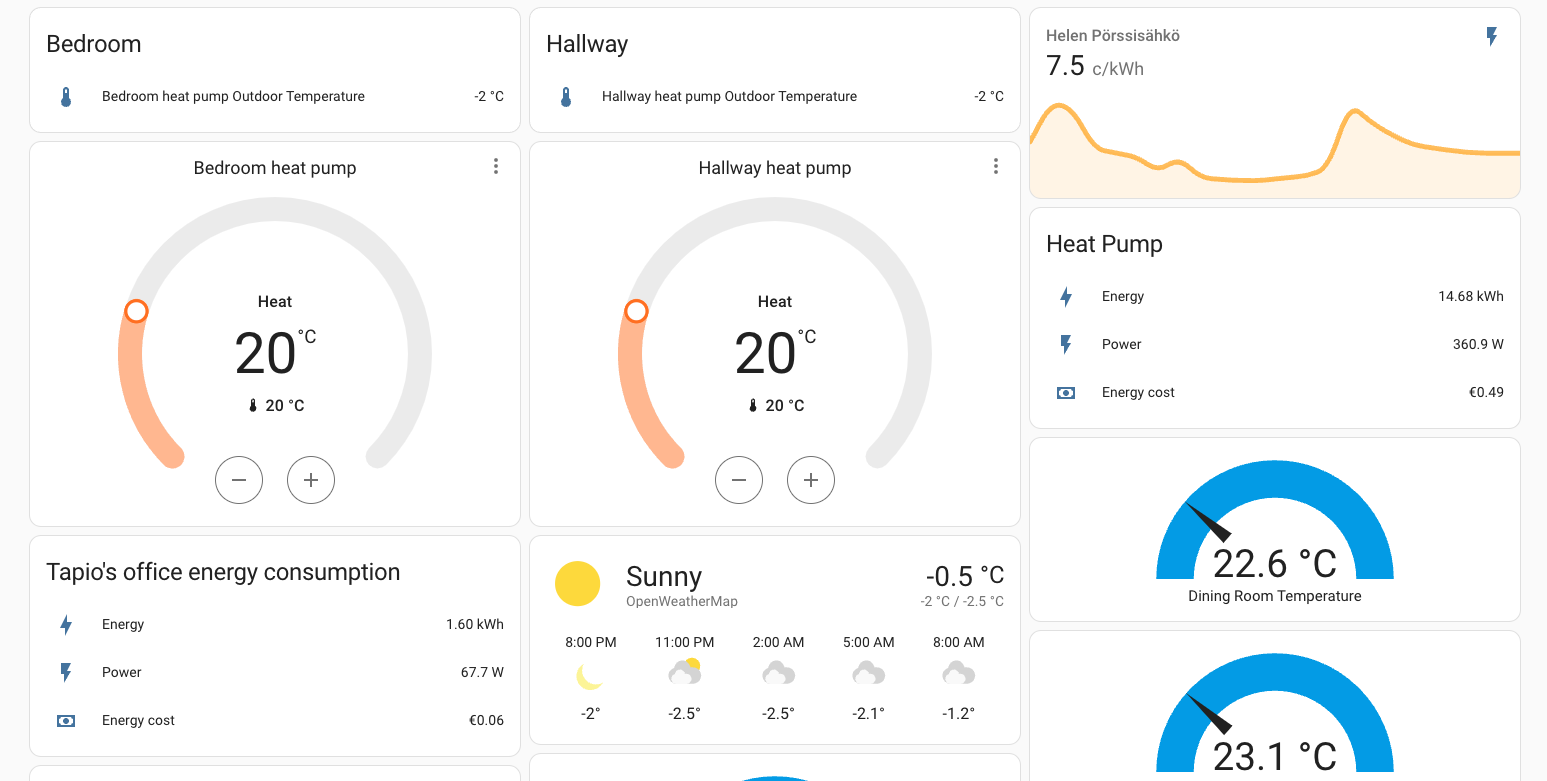
When above are set I get nice graph for my hash rate and real electricity price including taxes and transfer fees:
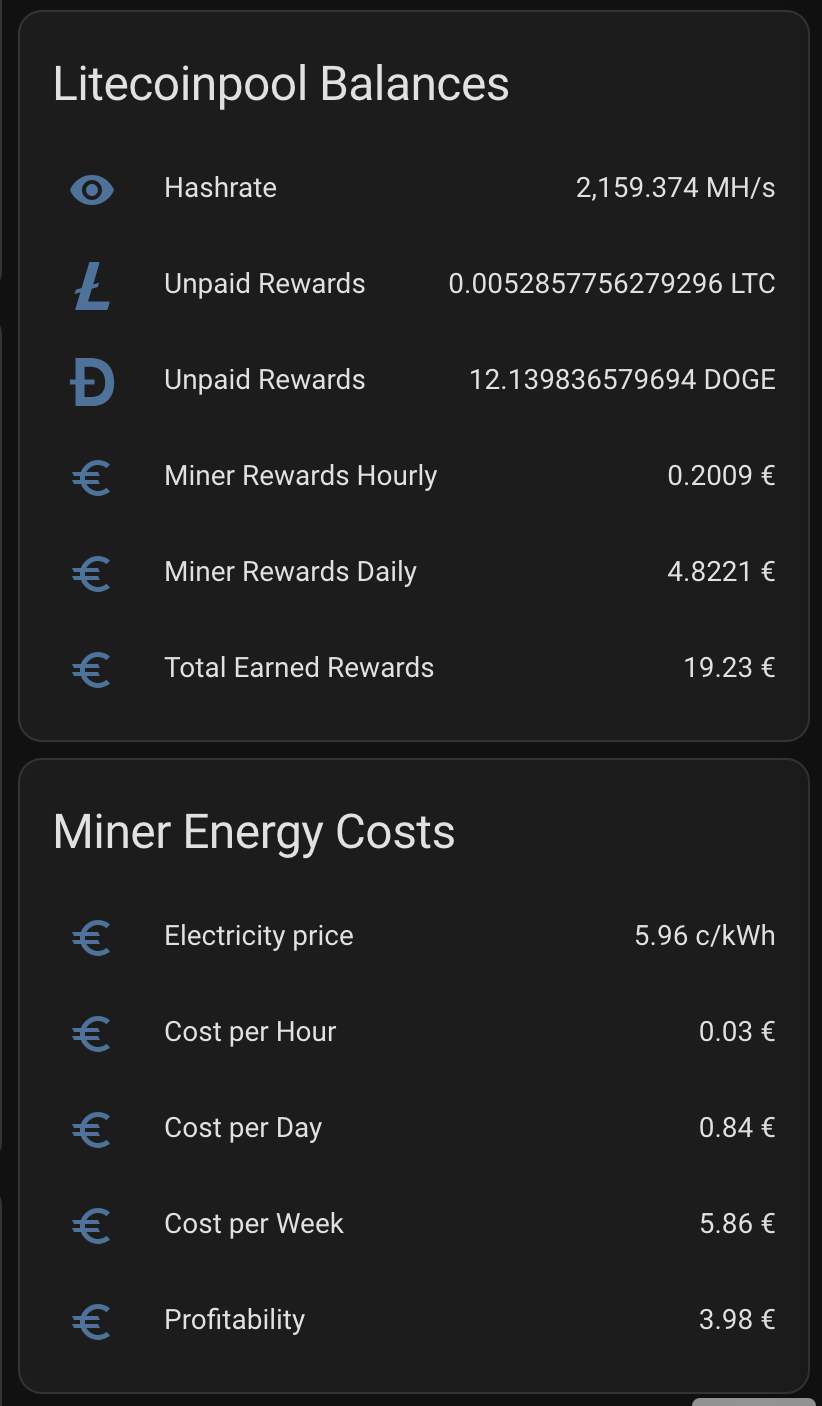
Plus I get daily rewards, paid rewards, profitability, electricity consumption and all key parameters to monitor the appliance.
Automating Miner Power Management and Crash Detection
I created an automation to turn off the miner if electricity prices exceed a threshold when it is not profitable anymore. When electricity price goes lower the miner will be powered on again. I might need to change the threshold, but below is based on current profitability calculation without taking profit generated by heating the house:
 alias: Turn Off Miner When Electricity Price Is High
  description: "Turns off the miner when electricity price goes above 33c/kWh"
  trigger:
    - platform: numeric_state
      entity_id: sensor.electricity_cost_in_cents_per_kwh
      above: 33
  action:
    - service: switch.turn_off
      target:
        entity_id: switch.shellyplug_s_3ce90ee04b97

- alias: Turn On Miner When Electricity Price Is Low
  description: "Turns on the miner when electricity price goes below 33c/kWh"
  trigger:
    - platform: numeric_state
      entity_id: sensor.electricity_cost_in_cents_per_kwh
      below: 33
  action:
    - service: switch.turn_on
      target:
        entity_id: switch.shellyplug_s_3ce90ee04b97
I also wanted to restart the miner if there is no mining detected on Litecoinpool. For this I use hashrate. If hashrate is 0 then I will reboot the miner.
- alias: Reboot or Power Cycle Miner
  description: Reboot the miner on low hash rate, fallback to power cycle if needed
  trigger:
    - platform: state
      entity_id: sensor.litecoinpool_hashrate
      to: "0"
      for: "00:15:00"
  condition: []
  action:
    - service: button.press
      target:
        entity_id: button.shellyplug_s_3ce90ee04b97_reboot
    - delay: "00:10:00"  # Wait 10 minutes to see if reboot resolves the issue
    - condition: state
      entity_id: sensor.litecoinpool_hashrate
      state: "0"  # Hashrate is still 0
    - service: switch.turn_off
      target:
        entity_id: switch.shellyplug_s_3ce90ee04b97
    - delay: "00:00:10"  # Wait 10 seconds
    - service: switch.turn_on
      target:
        entity_id: switch.shellyplug_s_3ce90ee04b97
  mode: single
Benefits of Integrating Mining with Home Assistant
Real-time monitoring: Track hash rate, rewards, and energy consumption.
Profitability tracking: Automatically calculate earnings and costs.
Energy efficiency: Automate miner power based on electricity prices.
Profitability
This is small miner so it will not generate much profit, but at best it is around 4€/day. It also generates a lot of heat which saves me on heating costs. That being said, I have heat pump which is more effective on heating. On the other hand I save on heating more than just the direct cost, since I can deduct the electricity cost from tax return on profit
We will see where the average profit will land – that depends on DOGE price as well as on how the mining rewards will progress in the future. I’d expect the miner not to be gold mine, but I also assume it will generate some profit and capital gain within next five years. It is more of a hobby than real money maker though.
Initial conclusion
By combining LitecoinPool and Home Assistant, you can optimize your mining setup for maximum profitability and efficiency. The integration allows you to monitor rewards, manage costs, and automate operations seamlessly.
Choosing the mining pool
I initially chose LitecoinPool because it has good profitability and easy to setup. LitecoinPool is excellent choice in my opinion but obviously no one should not settle with the first choice. I investigated a bit more. It seems at least if you check from powerpool.io that PowePool has the highest rewards and litecoinpool.org comes 2.4% with less rewards when I checked. Obviously PowerPool is biased on this, so I need to monitor longer to do the final decision.
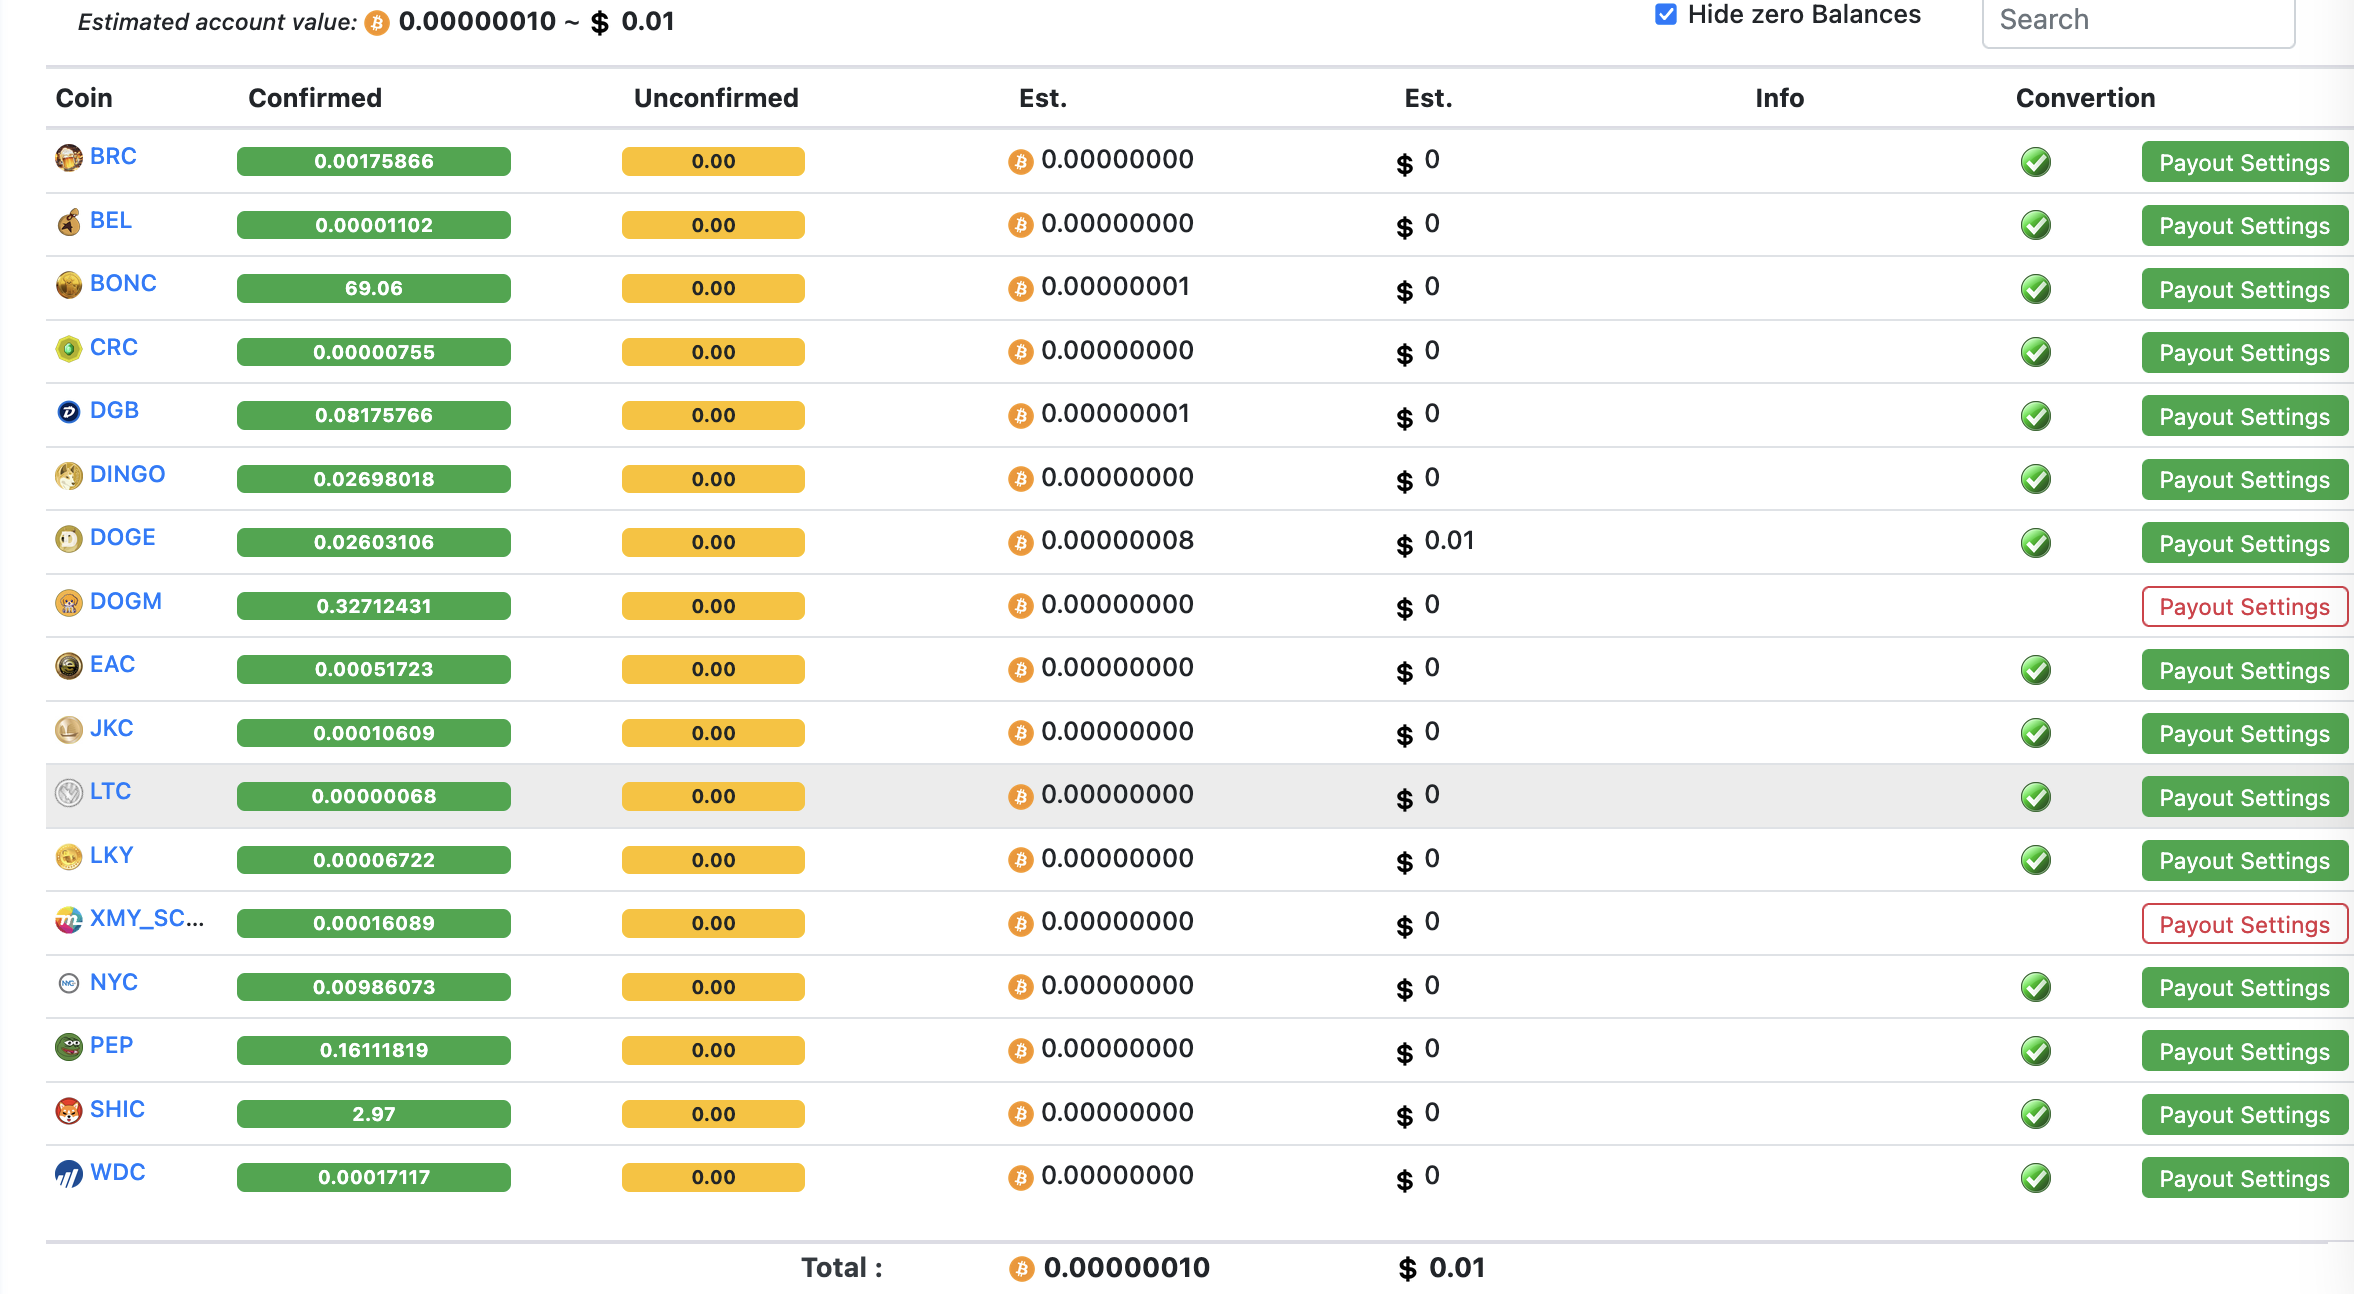
Anyhow since powerpool.io lets choose the crypto currency to get the rewards paid on I decided to give it a try. In my case just getting everything in BTC makes sense, since I have actually planned to convert all the rewards to BTC anyway. I haven’t really decided what my final strategy will be though.
LitecoinPool.org
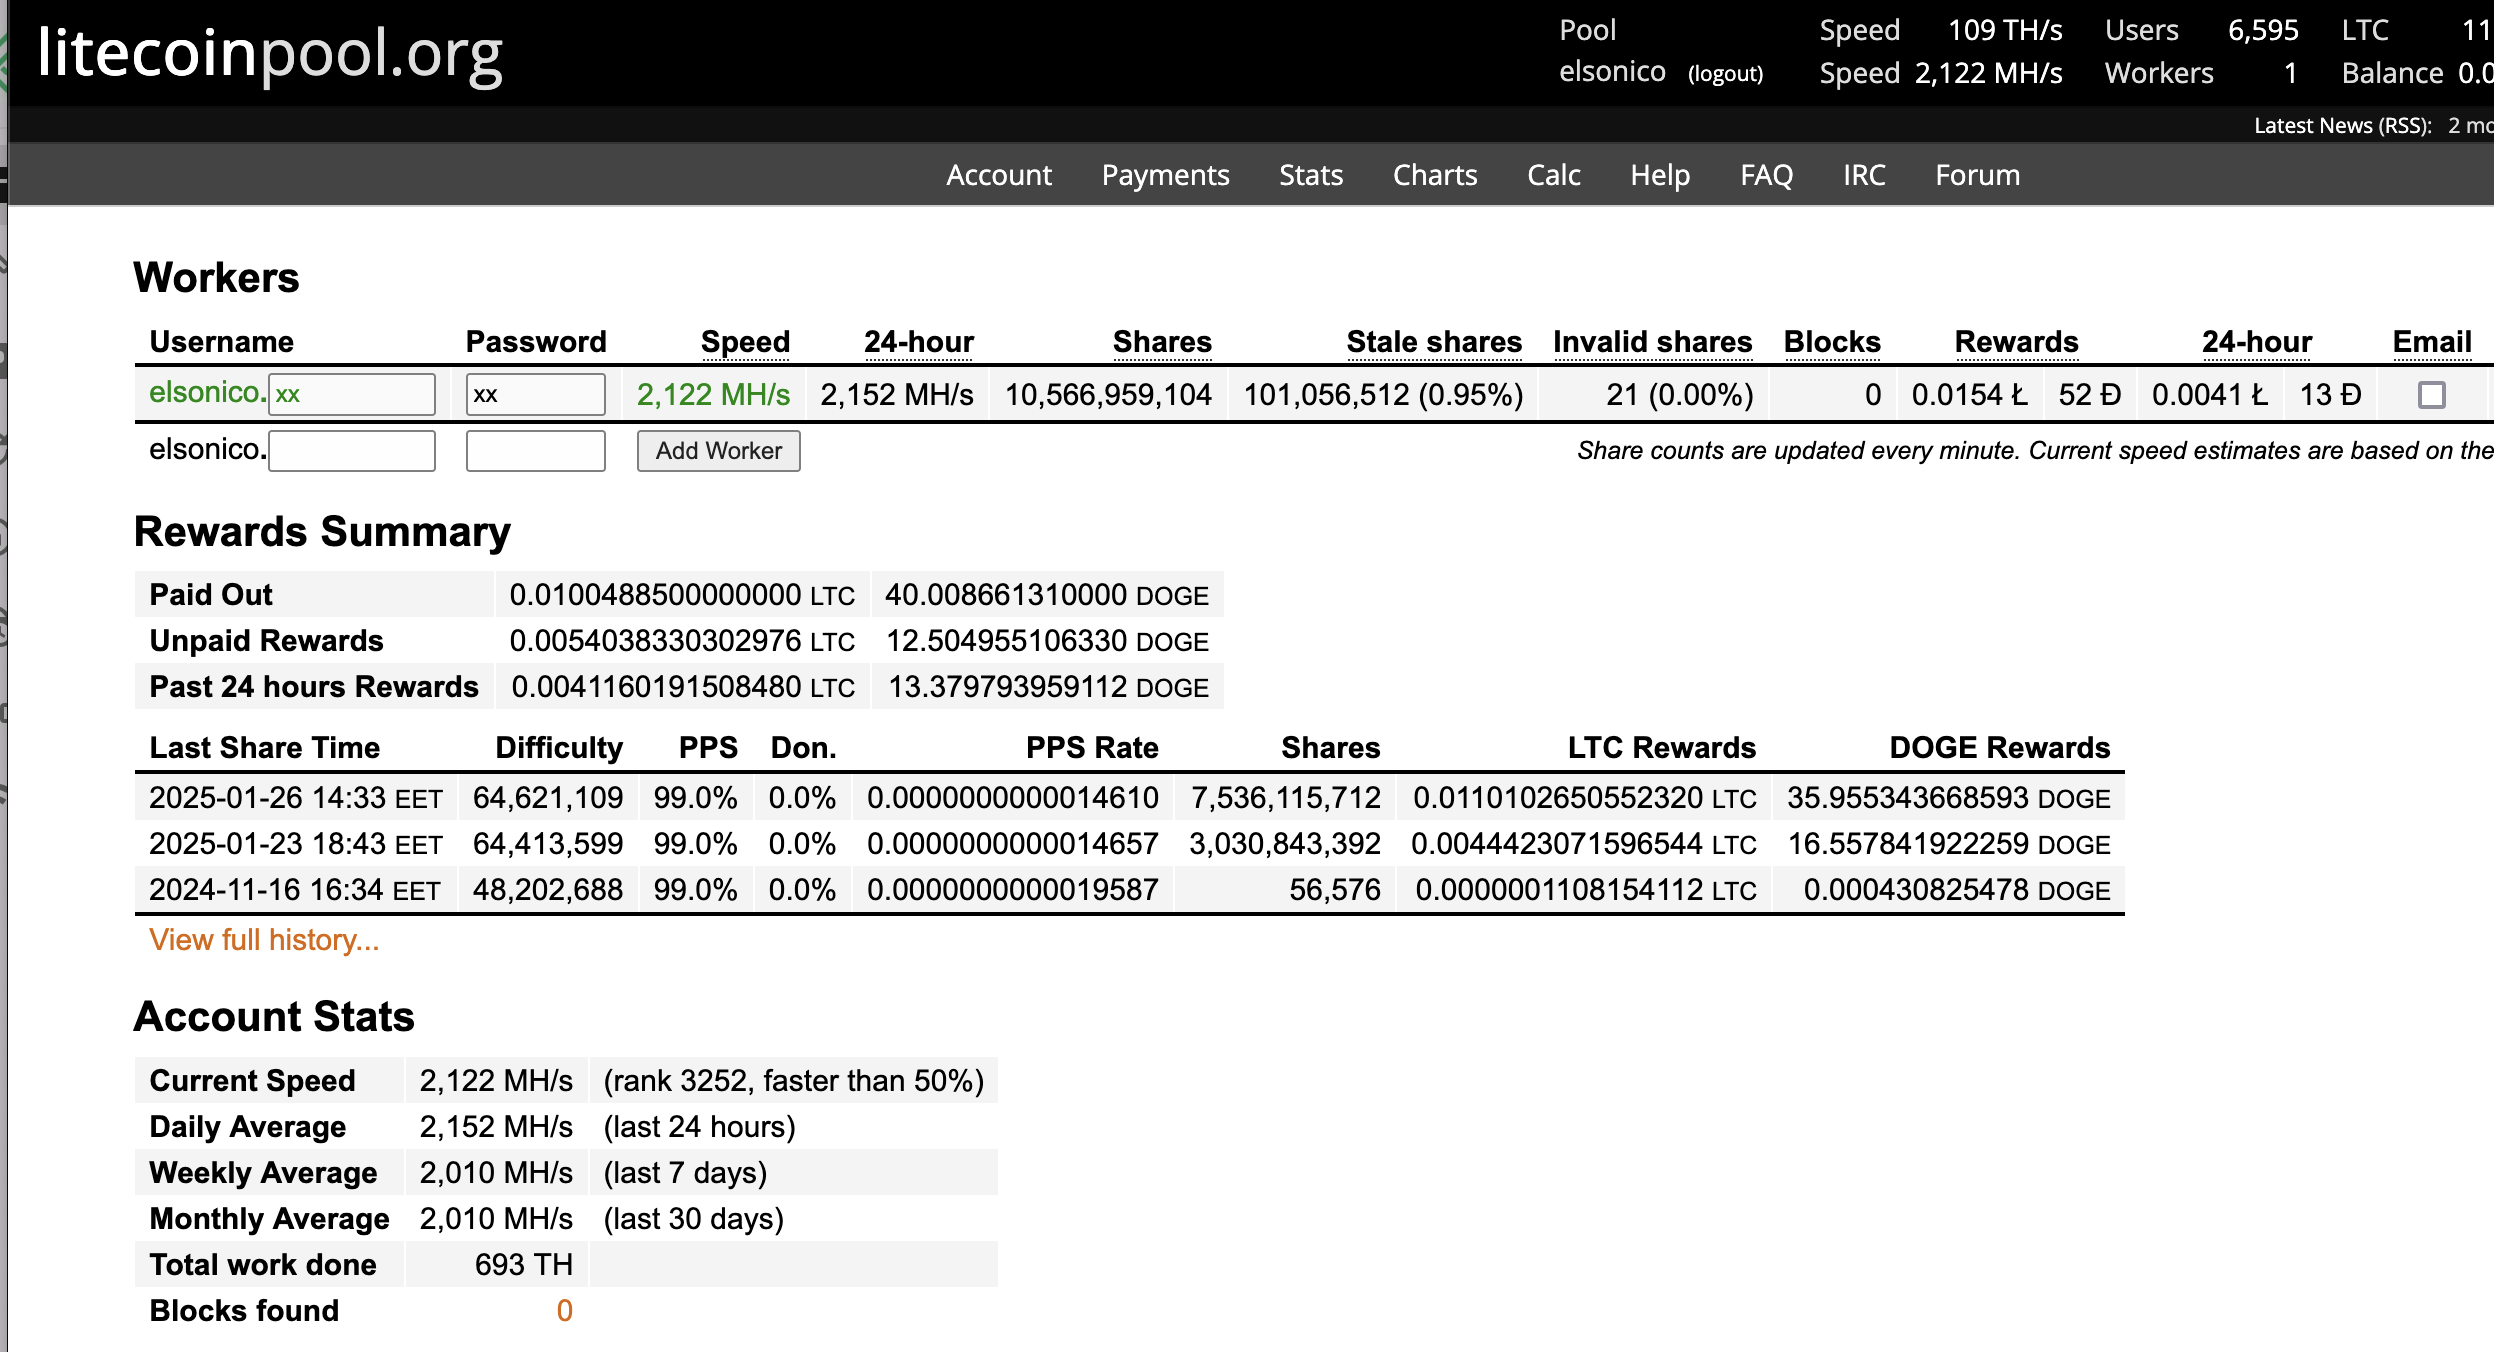
Within my first week of experimenting I started with litecoinpool.org where I ended up earning around 25€ for the few days there. I liked the API options available and how the web page is simple. The reward are payed on both DOGE and LTC and payments are easy to set up. When you set for example payments to 30DOGE and 0,001LTC you get paid almost every second day around 11€.
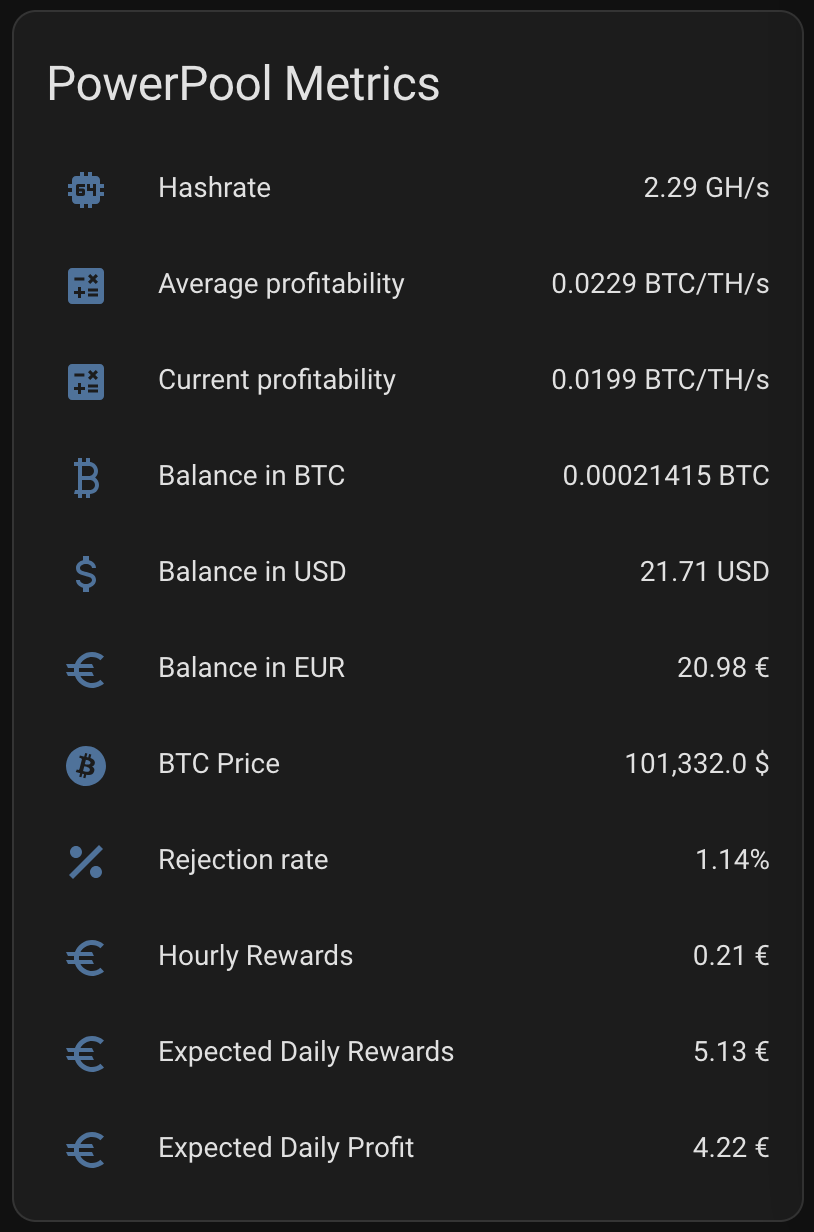
Powerpool.io
Powerpool.io is my cohice for now, since it seems to provide be best profitability and I can get paid everything in BTC so I don’t need to do any conversions which in my country are by the way all taxable operations and needs to be reported on tax return.
mining-dutch.nl
I tried out also mining-dutch.nl. It has the widest selection of options and coins you can get your rewards. The profitability on all these three depends on various factors. I didn’t run on mining-dutch.nl to really receive any rewards. BUt as you can see from below picture, it truly supports several coins in a way miner can see exactly what he or she is mining.
Switching to to a different pool means basically just changing the stratum UR, username and password. These
Elphapex configuration for PowerPool
Since I decided in the end stick on PowerPool here are the few things I did there.
Setting up another pool is as easy as create an account and the new miner URLs on Elphapex miner page and save. Even restart is not necessarily needed.
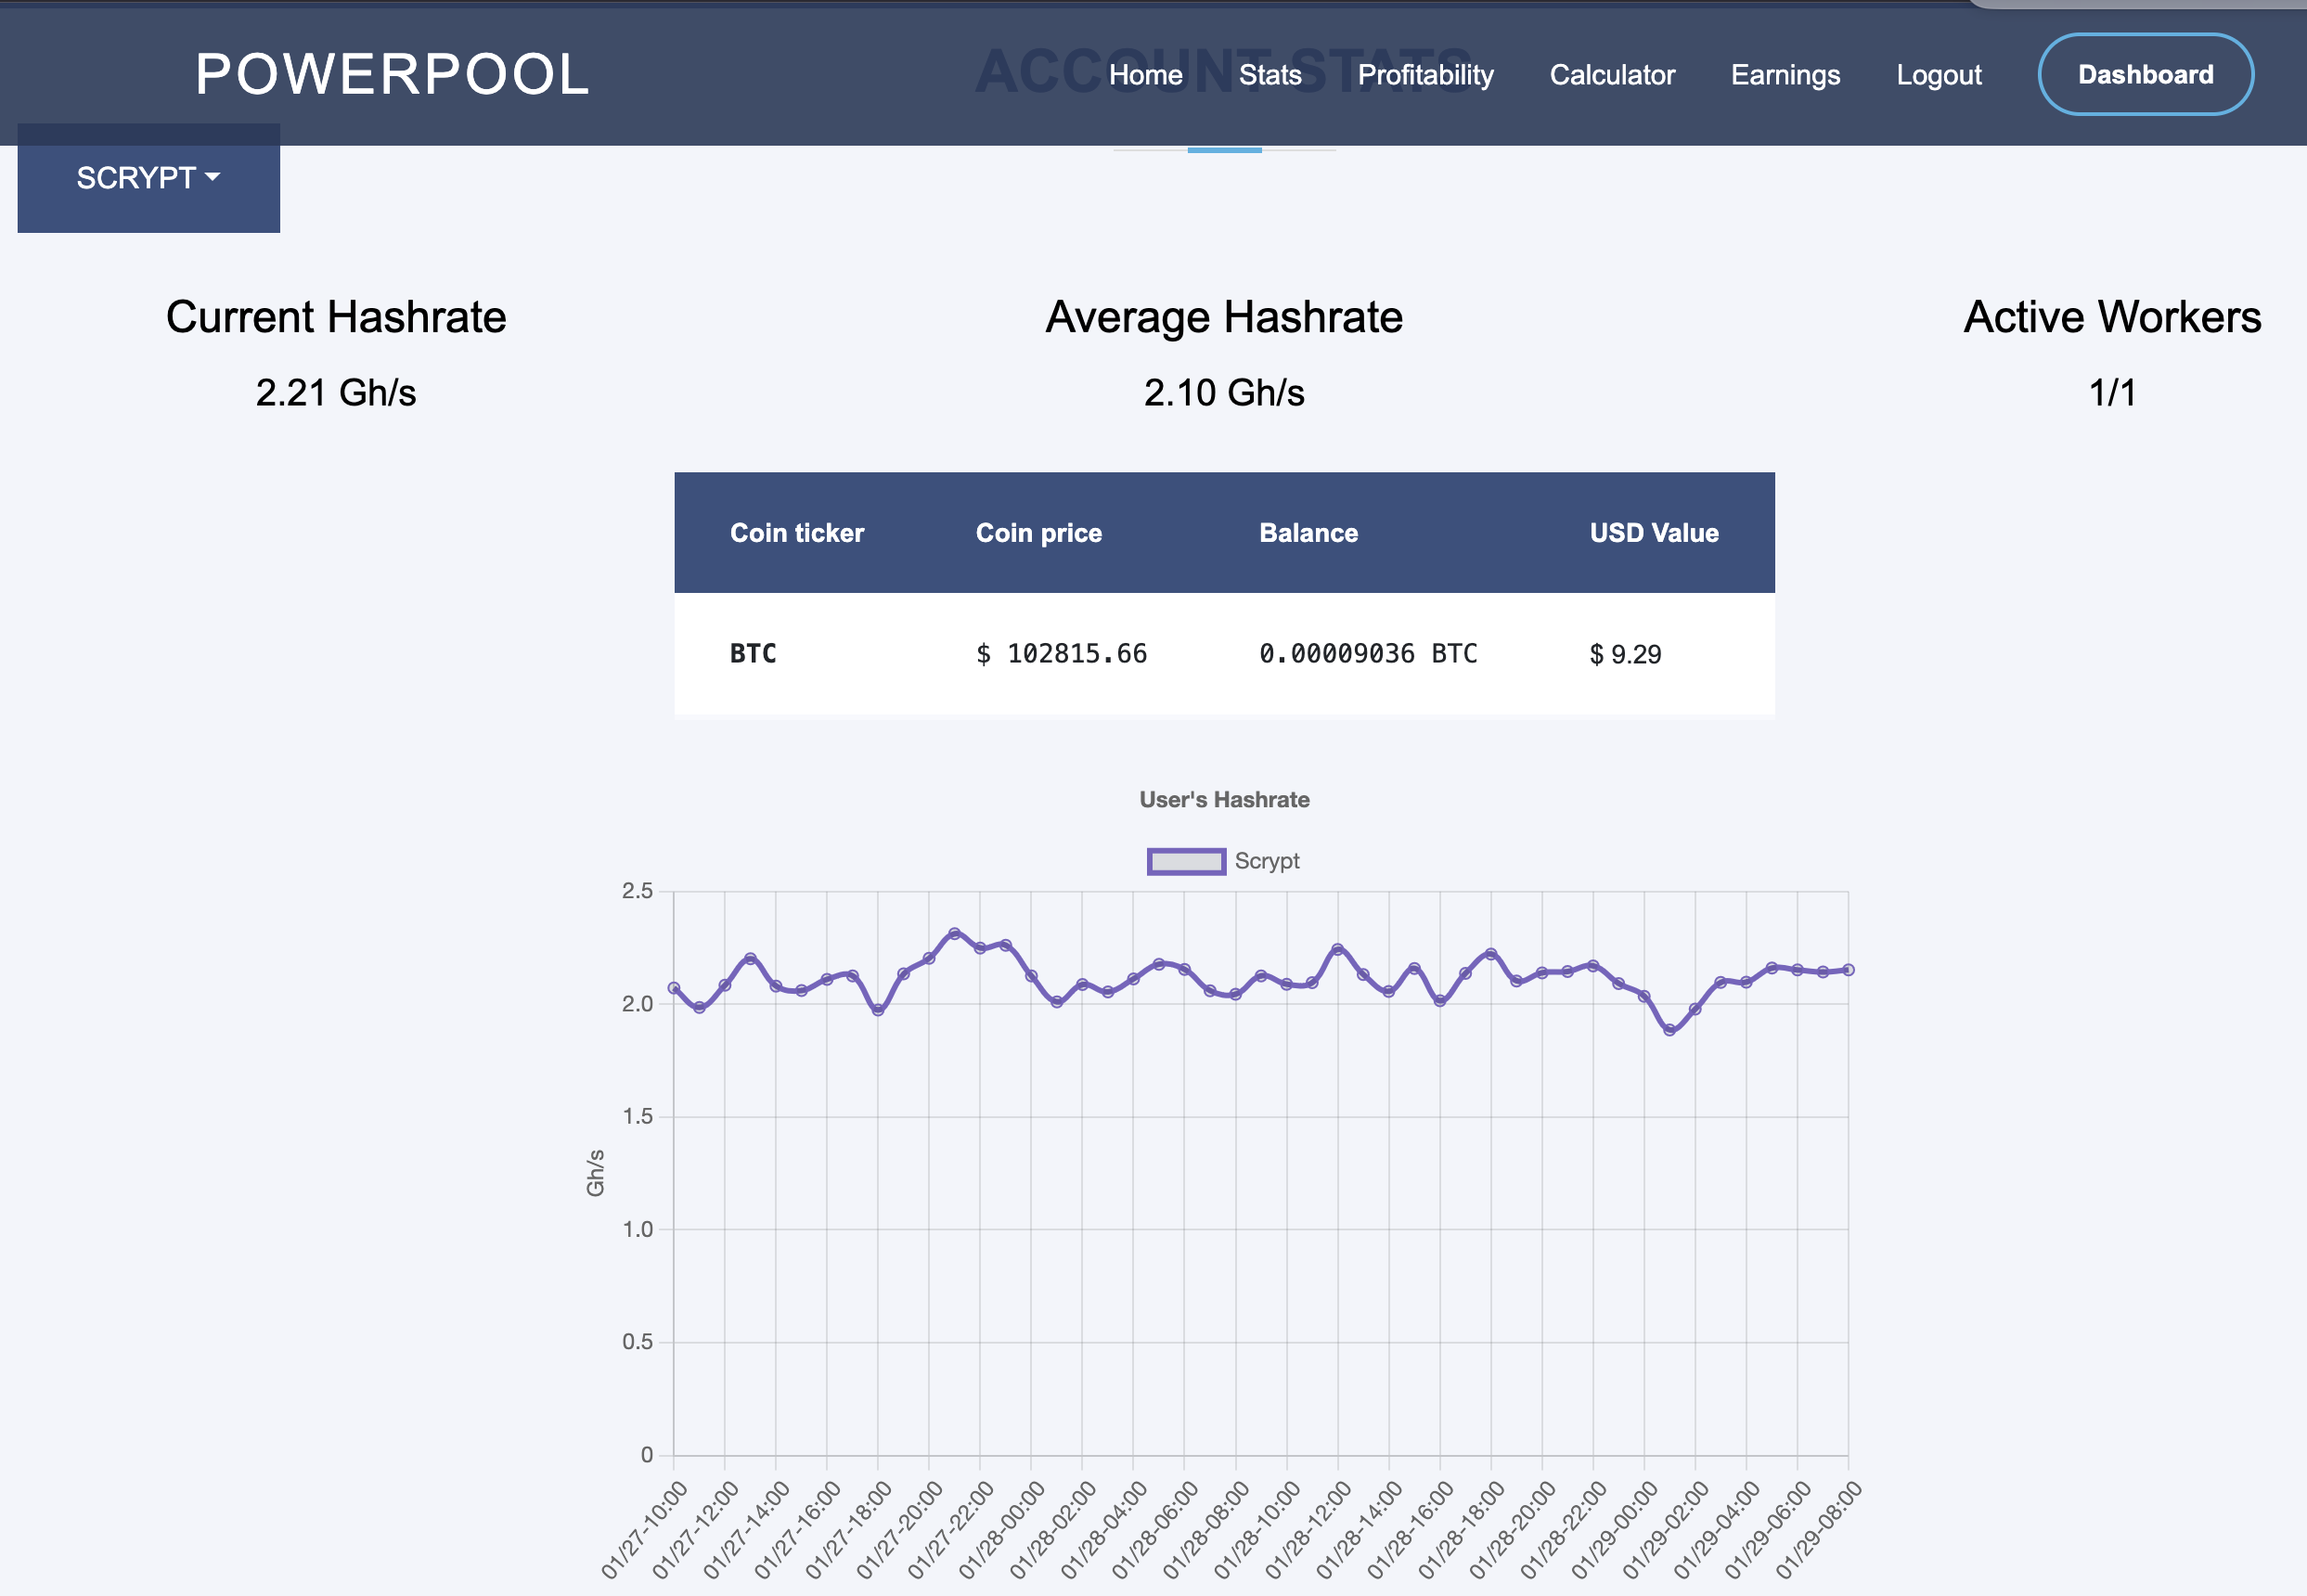
Above pictures illustrates powerpool.io and rewards in about 48 hours after I changed the configuration.
PowerPool HomeAssistant Dashboard
Setting up the Home Asisstant Dashboard with same setup as I have for LitecoinPool is a bit harder, since PowerPool API is missing certain reward data – expected daily rewards for example – which makes it much harder to create similar profitability values as I have setup for LitecoinPool. I have currently following confirguration for PowerPool on my sensors.yaml:
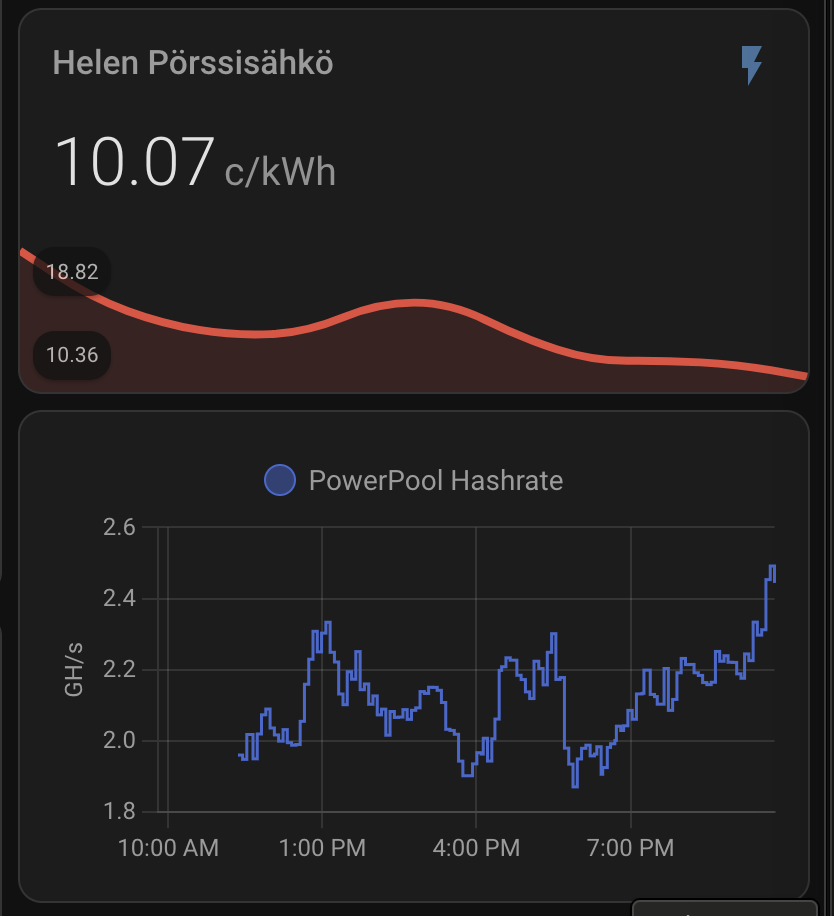
Above card creates something like like below with running about 10 hours:
I spent a whole day figuring out how to get same configuration I had with Litecoinpool done within couple of hours. I ended up getting much more information in the end. The below card has pretty much all I could think of.
The full configuration
The code snippets above does not have my full Home Assistant configuration, but as normal you can check the whole configuration from my GitHub Repo.
Here’s some thrilling updates on the latest iteration from OpenAI: GPT-4o. As we dive deeper into this rapidly-evolving digital landscape, GPT-4o promises to be a game-changer, offering new functionalities and advancements that are set to transform our interactions with AI. Let’s break down these innovations and explore what makes GPT-4o stand out.
Enhanced Contextual Understanding
Context Preservation:
GPT-4o comes equipped with advanced contextual memory, allowing it to maintain more extended and nuanced conversations. The model can remember previous interactions and references, creating a more seamless and human-like interaction. For instance, if you discussed your favorite book two weeks ago, GPT-4o can refer back to that conversation with remarkable accuracy.
Multimodal Capabilities
Text, Image, and Beyond:
One of the most anticipated features is its multimodal capability, which means GPT-4o can process and generate not just text but also images. This opens a plethora of possibilities for applications in e-commerce, digital marketing, content creation, and more. Imagine describing a concept and having GPT-4o generate a detailed image or selecting an image and receiving an elaborate textual description – all with unprecedented fluency!
Real-time Adaptability
Learning on the Fly:
With the real-time adaptability feature, GPT-4o can now learn and adapt from interactions on the go. This allows for a more personalized user experience, as the model fine-tunes its responses based on continuous feedback. This ability to adapt dynamically ensures that each interaction is tailored and optimized for the user.
Enhanced Security and Ethical Considerations
Bias Mitigation and Content Filtering:
In light of growing concerns about AI ethics, GPT-4o places a strong emphasis on bias mitigation and responsible AI usage. OpenAI has implemented rigorous content filtering and bias detection mechanisms to ensure safer and more equitable interactions. The model has been trained to identify potential biases and strives to offer balanced and fair responses.
Developer-friendly Integrations
API Upgrades:
For the developer community, GPT-4o brings a suite of powerful tools and upgrades to its API, making integration smoother and more efficient. Enhanced documentation, more comprehensive support libraries, and example use cases empower developers to leverage GPT-4o’s capabilities swiftly and effectively, fostering innovation across various sectors.
Advanced Emotional Intelligence
Sentiment Analysis and Response:
GPT-4o’s emotional intelligence has seen significant enhancement, enabling it to perform more sophisticated sentiment analysis. Understanding and appropriately responding to a wider range of human emotions – from excitement to concern – makes interactions more meaningful and empathetic, bridging the gap between human and machine communication.
Augmented Creativity Tools
Creative Writing and Beyond:
Whether you’re crafting poetry, drafting an email, or brainstorming ideas, GPT-4o’s augmented creativity tools offer unparalleled assistance. The model can now generate creative content that aligns more closely with specific tones, themes, and styles, providing users with a versatile tool for content creation and ideation.
Language Translation and Localization
Multilingual Mastery:
GPT-4o expands its language capabilities with improved translation and localization features. It can now translate text with greater accuracy and nuance, supporting more languages and dialects than ever before. This paves the way for more inclusive and accessible communication across global audiences.
Conclusion
GPT-4o represents a significant leap forward in the field of artificial intelligence, integrating more advanced features and capabilities that enhance user experience, boost productivity, and prioritize ethical considerations. Whether you are a developer, a business owner, or simply an AI enthusiast, GPT-4o offers a myriad of possibilities to explore and exploit.
I am excited to see the myriad ways in which GPT-4o will be applied across different industries and workflows. Stay tuned to auroranrunner for more updates and deep dives into the latest in tech innovations!
Feel free to share your thoughts, experiences, and predictions about GPT-4o in the comments below.
Kurzweil’s Age of Spiritual Machines: A Contemplation of Future Reality
Today, we delve into an intriguing piece of literature from legendarily futuristic thinker, Ray Kurzweil – “The Age of Spiritual Machines: When Computers Exceed Human Intelligence.”
A Published Marvel from the Past for the Future
First, let’s rewind time back to 1999. At a time when deep fears of Y2K Computer Bug-induced apocalypse were profound, Ray Kurzweil forged a path to the future with his audacious predictions in “The Age of Spiritual Machines”. In this compelling piece, Kurzweil espouses technological singularity, where artificial intelligence (AI) surpasses human understanding and capabilities.
AI: A New Breed of Intelligence
According to Kurzweil, a new breed of intelligence projects our evolution. Think about intelligent machines, the kind that not only perform complex tasks with unparalleled precision but also exhibit consciousness. An age where computers would encapsulate spirituality previously attributed exclusively to humans.
Kurzweil demystifies this concept by detailing a timeframe leading to the ‘singularity’. He argues that technology’s exponential growth will eventually result in machines becoming as intelligent as humans by the 2020s, developing their own emotions and consciousness by the mid-21st century.
The Intersection of Technology and Human Life
One such intersection between technology and human life is the concept of uploading human consciousness into machines. Kurzweil mulls the merging of biological and artificial intelligence, culminating in a future where humans will have the ability to ‘download’ their mentalities into non-biological entities, thus attaining virtual immortality. This ushers in an era where one’s existence continues perpetually, with their consciousness meandering in the virtual realm.
Challenges and Debates
Undoubtedly, Kurzweil’s predictions invite controversies. Critics argue that consciousness is not quantifiable or replicable, considering it an exclusively human phenomenon. The concept of spiritual machines necessitates an overhaul of identity, ethics, reality, and even humanity.
Despite the controversy, Kurzweil’s projections have turned out to be remarkably prescient. Today, advancements in computational capabilities, deep learning, neural networks, and AI are gradually realizing the contours of Kurzweil’s vision, even though we’re yet to witness machines acquire human-level intelligence or spirituality.
Final Thoughts
“The Age of Spiritual Machines” is more than a book about machines. It offers a vision of the future, challenges our understanding of consciousness, and stands as a testament to mankind’s unending quest for progress. Whether you find this vision unnerving or thrilling, there’s no denying that Kurzweil’s work garners contemplation.
As we grapple with the ethical, social, and existential dilemmas brought by our technological trajectories, it is key to engage with works like Kurzweil’s, soaking in their wisdom and ideals to navigate this shared futuristic reality.
And remember, we’re living in an era of rapid discovery and advancement – Tomorrow’s literature could very likely become the future’s reality!
A self-built AI chatbot is crafted entirely by an individual or team from scratch, without relying on pre-existing templates or platforms. This approach gives developers complete autonomy over the coding, features, and functionalities of the chatbot.
Creating a self-built AI chatbot demands a blend of programming expertise, a deep understanding of artificial intelligence, and inventive thinking. Developers can use a variety of programming languages, including Python, Java, or JavaScript, based on their preferences and the chatbot’s intended application.
One of the standout advantages of a self-built AI chatbot is its high level of customization. Developers can fine-tune the chatbot’s responses and functionalities to meet specific needs and objectives. Moreover, they can continually refine and enhance the chatbot on their own timetable, independent of external updates or support.
Getting started
Building a chatbot from scratch might seem daunting, but it’s quite feasible with the right tools. I used the OpenAI API and the Python openai library (version 1.23.2 as of this writing). While GPT-4 typically suggests using openai==0.28, the transition to versions above 1.0 signifies substantial changes and necessitates thoughtful consideration. However, this doesn’t mean that ChatGPT cannot assist in coding—it can, though it requires precise instructions.
Technical setup
For my project, the technical foundation included:
Python 3.9.x or higher: I chose Flask as the application server.
Access to the OpenAI API: Essential for integrating the AI logic into the chatbot
This setup is sufficient to establish a testing environment for the AI logic, connecting the Python code to the OpenAI API.
Advanced configuration
After thorough testing, I moved on to production. I continued using Flask for its simplicity, but also added Gunicorn as a frontend server. The application runs either as a standalone version or embedded within a WordPress blog.
I explored different operational models, including storing interactions in a database and the Bring Your Own Data (BYOD) model, although the latter’s impact on performance is still unclear. Initially, I deployed the gpt-3.5-turbo-instruct model for its speed and contextual retention. However, for superior output quality, I ultimately chose GPT-4 despite its slower response time.
The AI Bot Herself
The embedded ChatBot is utilizing gpt-3.5-turbo-instruct whereas the one on below links is utilizing gpt-4 model. The later needs a bit time to think, but she will get there… You can compare the results.
Conclusions
A self-built AI chatbot can serve myriad purposes—customer support, entertainment, educational assistance, or personal aid, and can be integrated across websites, messaging platforms, or mobile apps.
For me, the project was primarily an exploration of AI technologies and the OpenAI API. It was also an invaluable learning experience in Python, application servers, and container technologies.
Building a self-built AI chatbot is undoubtedly a complex, resource-intensive endeavor that necessitates ongoing updates and maintenance. Yet, the potential for continuous learning and improvement through natural language processing and machine learning algorithms makes it increasingly efficient and precise over time.
From a Friday morning start to a productive Monday evening, my journey with this project underscores the potential and versatility of AI technologies, making a self-built AI chatbot a potent, customizable tool for any tech-driven initiative.
Database migration is a complex process that demands careful assessment to ensure data integrity, application performance, and overall system reliability. The OpenAI API, with its advanced natural language processing capabilities, offers a way to simplify this process by automating assessments and summarizing key points. This guide will walk you through using the AWS Schema Conversion Tool (AWS SCT) for initial assessments, integrating the OpenAI API with Python to generate assessment summaries, and understanding the requirements for connecting with Azure OpenAI API, as well as its differences from ChatGPT OpenAI.
Kickstarting Your Migration: Utilizing AWS SCT for Comprehensive Database Assessment
The Amazon Web Services Schema Conversion Tool (AWS SCT) simplifies database migration from one platform to another. It assesses your existing database schema and generates a detailed report on potential migration issues. Supporting a wide range of source and target databases, AWS SCT is versatile for many migration scenarios.
AWS SCT examines your database schema, identifies non-convertible elements, and produces a comprehensive report. This report, containing potential action items, is crucial for planning your migration, offering an overview of the complexity, potential challenges, and the effort required.
The report, in PDF format, provides a detailed view of your database schema, potential issues, and recommendations. While invaluable for database administrators and engineers, the report’s extensive and complex nature makes OpenAI API a perfect tool for simplification and summarization.
Transforming PDFs into Comprehensive Assessment Summaries
With the AWS SCT report in hand, the next step is to utilize OpenAI API’s sophisticated natural language processing capabilities. By reading and understanding the PDF report, OpenAI can extract key points and summarize the information in a more accessible format.
Using the Python package pymupdf, we scan the PDF and convert its contents to text. This text is then fed to OpenAI API to highlight important sections and summarize the findings, including potential issues and recommended actions.
The Python method process_directory reads each PDF, converts it to text, and then passes this text to another method, generate_summary, which calls the OpenAI API to generate a concise assessment summary.
Method: process_directory()
def process_directory(directory):
    """Processes each PDF file in the given directory to generate a summary."""
    hostname, port_number, database_name = directory.split('_')
    for file in os.listdir(directory):
        if file.endswith('.pdf'):
            file_path = os.path.join(directory, file)
            pdf_text = extract_text_from_pdf(file_path)
            summary = generate_summary(pdf_text)
            print(f"Summary for {file} ({hostname}, {port_number}, {database_name}):\n{summary}\n")
Method: generate_summary()
def generate_summary(text):
    """Generates a summary for the given text using OpenAI's API."""
    response = openai.chat.completions.create(
        model="gpt-4",
        messages=[
            {"role": "system", "content": "You are database \
               reliability engineer providing migration \
               assessment summary."},
            {"role": "user", "content": "Summarise the output \
              of assessment text: \n" + text}
        ],
        temperature=0.4,
        max_tokens=150,
        top_p=1.0,
        frequency_penalty=0.0,
        presence_penalty=0.0
    )
    summary = response.choices[0].message.content.strip()
    return summary
Understanding OpenAI API Parameters
Understanding the role and impact of various OpenAI API parameters is crucial for tailoring your query results. Here’s a brief overview:
temperature (0.4): This parameter controls the level of creativity or randomness in the responses generated by the model. A lower temperature, such as 0.4, results in more predictable and conservative outputs. Conversely, a higher temperature encourages diversity and creativity in the answers.
max_tokens (150): Specifies the maximum length of the generated response measured in tokens (words and characters). Setting this to 150 means the response will not exceed 150 tokens, ensuring concise and to-the-point answers.
top_p (1.0): Also known as “nucleus sampling,” this parameter filters the model’s token generation process. A value of 1.0 means no filtering is applied, allowing any token to be considered. Lowering this value helps in focusing the response generation on more likely token sequences, potentially enhancing relevance and coherence.
frequency_penalty (0.0): Adjusts the likelihood of the model repeating the same line of text. A value of 0.0 implies no penalty on repetition, enabling the model to freely reuse tokens. Increasing this value discourages repetition, fostering more varied and dynamic outputs.
Above python methods generated modest summary from my sandbox environment. Modest at this point – we can take this much further though. I’ve taken small part of whole summary describing migration effort from MS SQL Server 2019 database to RDS for PostgreSQL.
Migration Plan Summary
Source Database
AdventureWorks2019.MSSQL
Microsoft SQL Server 2019 (RTM-CU22-GDR) – 15.0.4326.1 (X64)
Standard Edition (64-bit) on Windows Server 2019 Datacenter
Case sensitivity: OFF
Target Platform:
AWS RDS for PostgreSQL
Assessment Findings:
Storage Objects: 100% can be converted automatically or with minimal changes.
Code Objects: 77% can be converted automatically or with minimal changes.
Estimated 99.9% of code can be converted to AWS RDS for PostgreSQL automatically.
515 conversion actions recommended ranging from simple to complex tasks
OPENAI
Above AI-generated summary can be a significant time saver for database administrators and engineers. Instead of going through pages of detailed reports, they can quickly glance through the summary and understand the key points. It can also be used as a reference guide during the migration process, helping to avoid potential issues and ensuring a smooth transition.
Building a fully automated OpenAI-Powered Python Module for PDF Analysis and Summary Generation
To generate the assessment summary using the OpenAI API, I developed the Python methods described above. These methods are components of a larger assessment framework that I’m currently developing. In this article, we focus exclusively on the integration with the OpenAI API. It’s worth noting that the PDF files used as input are generated through a fully automated process. However, the details of that process are beyond the scope of this blog post.
Python, with its versatility and powerful capabilities, is ideal for integrating with the OpenAI API. It offers libraries for API interactions and processing PDF files, enabling the automation of the entire workflow—from reading PDF files to generating summaries.
For the initial step, libraries such as PyPDF2, PDFMiner, or pymupdf—which I prefer—can be utilized to read the contents of PDF files. After extracting the text, this information can be processed by the OpenAI API. The API is designed to analyze the text, pinpoint the essential information, and compile a concise summary.
Subsequently, this summary can be saved either as a text file or within a database for easy access in the future. Moreover, the module can be configured to insert summaries into a database table, integrating them into a larger assessment data repository. This data can then be leveraged for generating reports, such as Power BI dashboards or other forms of reporting, allowing key stakeholders to stay informed about the migration process’s progress.
Setting Up Azure OpenAI API: Essentials and Differences from ChatGPT
The Azure OpenAI API is a cloud-based service enabling developers to integrate OpenAI’s capabilities into their applications. To utilize the Azure OpenAI API, one must have an Azure account and subscribe to the OpenAI service, in addition to generating an API key for authentication during API requests.
There are notable differences between utilizing ChatGPT and the Azure OpenAI API.
For ChatGPT, your Python module only requires the openai.api_key to be set, along with specifying the model, such as “gpt-4” in my example code. However, integrating with the Azure OpenAI API necessitates additional configuration:
It’s important to note that when using Azure OpenAI, Python OpenAI API parameter model corresponds to your specific deployment name instead of “gpt-4” as it was for ChatGPT model in my examples earlier.
The Azure OpenAI API and ChatGPT OpenAI both offer advanced natural language processing capabilities, albeit tailored to different use cases. The Azure OpenAI API is specifically designed for embedding AI functionalities into applications, whereas ChatGPT OpenAI excels in conversational AI, facilitating human-like text interactions within applications.
Choosing between the two for summarizing database migration assessments hinges on your project’s unique needs. Azure OpenAI API is the preferable option for projects requiring deep AI integration. On the other hand, if your application benefits from conversational AI features, ChatGPT OpenAI is the way to go.
In summary, utilizing the OpenAI API can drastically streamline the database migration assessment process. The AWS Schema Conversion Tool yields a thorough report on your database schema and potential issues, which can efficiently be condensed using the OpenAI API. By developing a Python module, this summarization process becomes automated, thus conserving both time and resources. Regardless of whether Azure OpenAI API or ChatGPT OpenAI is chosen, each offers potent AI capabilities to facilitate your database migration endeavors.
Finland has been part of Nord Pool, a pan-European power exchange, since 1998. Meaning, when you sign your power contract with electricity supplier, you can choose a contract utilising the power stock exchange prices.
The prices for the next day are announced every day around 1pm CET. You can combine this information for example with weather forecast to plan your electricity usage for the cheapest hours where applicable.
Home Assistant on the other hand has Nord Pool integration which enables you to optimise the electricity SPOT pricing. There is a lot of articles on how to do that to help you to get started. This articles goes through my current setup and my own experience with both Home Assistant and electricity stock pricing. And how I made everything working with GitHub Copilot vim plugin.
Typical claim is, that normal user cannot really utilise the power stock pricing since it is too much work, warming up the house takes constant amount of energy so there is no way to optimise or it is too much work to do the automation in he first place. The latter might be true, but if you take building a smart home as a hobby, then even that is not true. The more time it takes, the more fun it is.
Home Assistant is a hobby anyway. It’s non commercial product and it is Cloud independent: Meaning, you set it your yourself and you maintain it yourself in your own server. That being said, it is fairly easy to set up. You just need to have a server to install it. That can be dedicated server or mini computer like Raspberry Pi, old PC you have no other use or something that can run Linux.
My choice was to to use my Asus PN41 mini PC I already had running Ubuntu which I had set up earlier to run as my sandbox having several virtual machines running in it. Instead of adding another virtual machine I decided to setup Home Assistant as Docker Container. Installation and set up did not really take too long time. Once I installed mobile app to my phone I already had working setup.
The reason why I wanted to have Home Assistant in the first place though is, that I had two Toshiba Shorai Edge heat pump internal units installed, and Toshiba’s mobile app is installable only with European apple id. I have North American apple id and I really cannot change that, since although living most of the time in Europe, I have close ties to North America. After some googling I figured out that I can get around the limitation with this totally new thing for me at the time called Home Assistant.
After I had Home Assistant container running, Toshiba AC integration installed and mobile app on my phone, I was good to go. Setup up is really fast to do as long as one is familiar with the related technology it really doesn’t take more than an hour. My initial aim was just to be able to manage the internal heating units through my phone. Then later I noticed that ok, it is also much easier, for example, to schedule the heat pumps to different temperatures different times with Home Assistant than with extremely cumbersome Toshiba remote.
On the other hand, I noticed Home Assistant itself had plenty of other interesting features I could utilise while building a smart home gradually. I got four Shelly H&T and one Shelly Plus H&T thermometers I could have on my Home Assistant dashboard. Three Shelly Plugs to monitor electricity usage for the Heat Pump and other appliances.
Automation
Just having Home Assistant Mobile App running enabled me being able to control heat pump units, follow room temperatures, current weather and forecast, electricity consumption and price is of course nice, but everything is still done manually. I felt I’m missing at least half of the benefits and nothing really changed anything yet.
Then I found this blog post on how to automate device for cheapest hours and it was pretty much all I was looking for. At least on idea level it was. It grabs the next days cheapest electricity prices and one can schedule heat pump to increase temperature when the electricity is on it’s cheapest. This happens typically at night – it is just after midnight almost always. I wasn’t very familiar with yaml and I still find the syntax cumbersome to get anything working – anything working easily at least. There’s plenty of scheduling solution with GUI based forms, but for me understanding those was even more difficult. I got this solution for getting next day’s cheapest hours and increase heating during them to work fine except for one thing. Once it started, it did not stop without manually stopping it.
I decided to create a schedule which set the heating back from 24C to 20C at 5am. With Home Assistant of course. If the cheapest hours are at day time, that does not work though. But it worked well enough almost for a year. Then I got more involved with yaml while learning Ansible and writing Pipelines for Azure with yaml. I also utilised yaml syntax highlighting on vim, so it all started to get easier.
Why write own code when there’s Github Copilot
Completing the first idea
The biggest motivator I found was Github Copilot. I started to use it while writing Python code, but noticed it helps quite a lot with yaml too. I only wanted to change my automations.yaml slightly. I wanted to get the part working, where the heating should stop. And I don’t want any heating blowing full 24C during day time either. Copilot does not write it to you, but it makes it easier to get it done.
So I did this: added the time conditions with after and before.
# Set temp to 24C when the SPOT price is at it's cheapest.
- id: '1663399614818'
  alias: Increase heating
  description: 'Cheap energy time set heating to 24C'
  trigger:
  - platform: time
    at: input_datetime.device_start_time
  condition:
    condition: and
    conditions:
      - condition: time
        after: '00:00'
        before: '04:00'
  action:
  - service: climate.set_temperature
    data:
      temperature: 24
    target:
      entity_id: climate.ac_12494102
  mode: single
The code without timing conditions are available from the blog post link above, so I’m not writing it here, although you can check my full automations.yaml from my GitHub repo – not that I expect it to help anyone or to be perfect, but there it is. Then next thing is to stop the increased heating. To be noted, I constantly work on my automations, so the code in repo does not necessarily reflect what I have demonstrated here.
# Set temp to 20C at end of cheap hours
- id: '1663399614821'
  alias: Hallway AC temp to 20
  description: 'Cheap energy end time set temp to 20'
  trigger:
  - platform: time
    at: input_datetime.device_end_time
  condition:
    condition: and
    conditions:
      - condition: time
        after: '03:00'
        before: '06:00'
  action:
  - service: climate.set_temperature
    data:
      temperature: 20
    target:
      entity_id: climate.ac_12494102
  mode: single
I didn’t have time conditions there as time of writing this, but I added them later once I had verified everything works correctly. With Home Assistant it’s better to build things gradually. Then you know easier what does not work and what does.
I also wanted to have things like: If electricity is more expensive than 15c/kWh, decrease heating by 1C:
# If SPOT price is above average let's set heating 1C lower
- id: hallway_ac_fan_expensive_spot
  alias: If spot price above average cents set heat 1C lower
  description: ''
  trigger:
  - platform: numeric_state
    entity_id: sensor.nordpool_kwh_fi_eur_3_10_024
    above: sensor.energy_spot_average_price
  condition:
    condition: and
    conditions:
      - condition: time
        after: '08:00'
        before: '22:00'
  action:
  - service: climate.set_temperature
    data:
      temperature: "{{ state_attr('climate.ac_12494102', 'temperature') - 1 }}"  # Decrease temperature by 1 degree
    target:
      entity_id: climate.ac_12494102
  mode: single
The above is partly written by ChatGPT, but it typically generates code, which needs a lot of tweaking to get it to work for real, but some of it is usable.
I also often turn heater off when outside is a bit warmer and don’t necessarily remember to put it on before going to sleep. At least in theory this could lead to situation where it gets really cold at night, and then the heater is off when temperature is way below 0C. Then one should really not turn it on anymore before it gets warmer, since it decreases the life of the outside unit some what. If not significantly even.
# If outdoor temp is below 1C turn on hallway AC
- id: hallway_ac_fan_on_low_temp
  alias: If temp below 1 set on
  description: ''
  trigger:
  - platform: numeric_state
    entity_id: sensor.ac_12488762_outdoor_temperature
    below: 1
  condition: []
  action:
  - service: climate.turn_on
    target:
      entity_id: climate.ac_12494102
  mode: single
Expanding the ideas
Above was just first step though. I wanted to have more. Simple things though. I struggled a day with getting my next idea to work. The idea is simple:
Increase heat, when spot price is above daily average.
Decrease heat, when spot price is below daily average.
I had everything working with fixed values. But daily average spot price varies a lot, so I’m not ok with fixed value. I tried to use something like state_attr('sensor.nordpool_kwh_fi_eur_3_10_024', 'average'). Looks valid to me, but when I tried to use it, it just didn’t work. I tried to “cast” since I always got error “could not convert string to float” no matter what I trid.
Then I figured out just by myself with no Github Copilot, that if I put above to sensors.yaml and create a sensor having the daily average, I might be able to use that. Bingo!
Above I have created sensor: sensor.energy_spot_average_price on sensors.yaml. That I can use on automations.yaml as shown below:
# If outdoor temp is below 1C turn on hallway AC
- id: hallway_ac_fan_on_low_temp
alias: If temp below 1 set on
description: ''
trigger:
- platform: numeric_state
entity_id: sensor.ac_12488762_outdoor_temperature
below: 1
condition: []
action:
- service: climate.turn_on
target:
entity_id: climate.ac_12494102
mode: single
Since I’m increasing heat above I want to do it only when it’s relatively cold outside. Also I want to do it only during day, when the prior cheapest prices logic is not active. That is why I have set this to do following:
Between 10am and 5pm:
When outside temperature is below +2C and spot price is below daily average:
Lower the heat on Hallway AC by 1 degree celcius
Then I have another entry for decreasing the heat, when spot price goes above daily average. For that I don’t use the requirement for outside temperature, since if it’s warmer than that, I’m always ok to decrease the temperature.
Purpose
The goal for me is to heat a bit more when electricity is cheaper and then heat a bit less when it’s more expensive. Air is not very good on preserving the heat, but it does it a bit. Also, when I go to sleep, I don’t need to heat. My house colder at least till midnight since there’s almost no heating. The after midnight there’s typically the cheapest hours in hand and my system starts to overheat a bit. Pretty normal pattern is, that when I wake up, the electricity price starts to go up during the normal morning hours when other people wake up as well. My heating system isn’t really needed by then and the temperature starts going down gradually till it is needed gain.
Rest of the day my system follows the strategy to lower heat slightly if price goes above average and heat a bit more when it the price goes below average
This will optimize the heating the way, that most of the time the average price I pay for electricity is bit lower than the average spot price, which is my intention.
Below pictures shows, how the heating takes in place at midnight. The stops at 4am. Next hike is around 6am, when the upstairs heat pump in bedroom is turned on after waking up. The bedroom heating is never on during night and most of the automation is only for Hallway AC.
The yaml code needed
The examples here are pretty much copy/pasted from Toni’s blog post so credits to him.
configuration.yaml
Home Assistant needs a configuration file configuration.yaml and there you need following to get the cheapest hours utilized.
# Helper to keep the start time
input_datetime:
device_start_time:
name: Device Start Time
has_time: true
has_date: false
device_end_time:
name: Device End Time
has_time: true
has_date: false
# Include automations.yaml and sensors.yaml
automation: !include automations.yaml
sensor: !include sensors.yaml
sensors.yaml
On sensors.yaml you need following. Note that sensor.nordpool_kwh_fi_eur_3_10_024 must be replaced with the sensor you have for Nord Pool integration.
- platform: template
sensors:
energy_spot_average_price:
      friendly_name: "Nordpool Average Spot Price"
      unit_of_measurement: 'c/kWh'
      value_template: "{{ state_attr('sensor.nordpool_kwh_fi_eur_3_10_024', 'average') | float | round(2) }}"
cheapest_hours_energy_tomorrow:
device_class: timestamp
friendly_name: Cheapest sequential electricity hours
value_template: >
{%- set numberOfSequentialHours = 3 -%}
{%- set lastHour = 23 -%}
{%- set firstHour = 0 -%}
{%- if state_attr('sensor.nordpool_kwh_fi_eur_3_10_024', 'tomorrow_valid') == true -%}
{%- set ns = namespace(counter=0, list=[], cheapestHour=today_at("00:00") + timedelta( hours = (24)), cheapestPrice=999.00) -%}
{%- for i in range(firstHour + numberOfSequentialHours, lastHour+1) -%}
{%- set ns.counter = 0.0 -%}
{%- for j in range(i-numberOfSequentialHours, i) -%}
{%- set ns.counter = ns.counter + state_attr('sensor.nordpool_kwh_fi_eur_3_10_024', 'tomorrow')[j] -%}
{%- endfor -%}
{%- set ns.list = ns.list + [ns.counter] -%}
{%- if ns.counter < ns.cheapestPrice -%}
{%- set ns.cheapestPrice = ns.counter -%}
{%- set ns.cheapestHour = today_at("00:00") + timedelta( hours = (24 + i - numberOfSequentialHours)) -%}
{%- endif -%}
{%- endfor -%}
{{ ns.cheapestHour }}
{%- set ns.cheapestPrice = ns.cheapestPrice / numberOfSequentialHours -%}
{%- endif -%}
automations.yaml
Now Here are the triggers I have created in automations.yaml. I have three triggers for pumping up the heat with each one different action for cheap hours. Combining actions with one trigger seem not to work, or I don’t know correct syntax. I decrease the heat after four hours, but since I don’t need to stop heater, when the heating gets decreased. I have only two actions.
First I need to create the input_date times to use later:
# Set device start time: Needs cheapest_hours_energy_tomorrow in sensor.yaml
- id: '1663398489357'
  alias: 'Set device start time'
  description: ''
  trigger:
  - platform: time
    at: '23:10:00'
  condition:
  - condition: not
    conditions:
    - condition: state
      entity_id: sensor.cheapest_hours_energy_tomorrow
      state: unknown
  action:
  - service: input_datetime.set_datetime
    data:
      time: '{{ as_timestamp(states(''sensor.cheapest_hours_energy_tomorrow'')) | timestamp_custom(''%H:%M'') }}'
    target:
      entity_id: input_datetime.device_start_time


# Set device end time 4 hours after start time: Needs cheapest_hours_energy_tomorrow in sensor.yaml
- id: '1663398489358'
  alias: 'Set device end time'
  description: ''
  trigger:
  - platform: time
    at: '23:15:00'
  condition:
  - condition: not
    conditions:
    - condition: state
      entity_id: sensor.cheapest_hours_energy_tomorrow
      state: unknown
  action:
  - service: input_datetime.set_datetime
    data:
      time: '{{ ((as_timestamp(states(''sensor.cheapest_hours_energy_tomorrow'')) + (3600*4)) | timestamp_custom(''%H:%M'')) }}'
    target:
      entity_id: input_datetime.device_end_time
  mode: single
Then the actual triggers:
# Do the actions when time trigger is hit.
# Each action separately: Turn on, set temp, set fan mode
# Make sure AC is on before setting temp or fan mode
- id: '1663399614817'
  alias: Turn on Hallway AC
  description: 'Cheap energy time turn on hallway AC'
  trigger:
  - platform: time
    at: input_datetime.device_start_time
  condition:
    condition: and
    conditions:
      - condition: time
        after: '00:00'
        before: '05:00'
  action:
  - service: climate.turn_on
    target:
      entity_id: climate.ac_12494102
  mode: single

# Set temp to 24C
- id: '1663399614818'
  alias: Increase heating
  description: 'Cheap energy time set heating to 24C'
  trigger:
  - platform: time
    at: input_datetime.device_start_time
  condition:
    condition: and
    conditions:
      - condition: time
        after: '00:00'
        before: '05:00'
  action:
  - service: climate.set_temperature
    data:
      temperature: 24
    target:
      entity_id: climate.ac_12494102
  mode: single
# Set fan mode to high
- id: '1663399614819'
  alias: Hallway AC fan to high
  description: 'Cheap energy time set fan to high'
  trigger:
  - platform: time
    at: input_datetime.device_start_time
  condition:
    condition: and
    conditions:
      - condition: time
        after: '00:00'
        before: '05:00'
  action:
  - service: climate.set_fan_mode
    data:
      fan_mode: "High"
    target:
      entity_id: climate.ac_12494102
  mode: single

# Lower fan from High to Auto four hours after start time
- id: '1663399614820'
  alias: Hallway AC fan to Auto
  description: 'Cheap energy time set fan to Auto'
  trigger:
  - platform: time
    at: input_datetime.device_end_time
  condition:
    condition: and
    conditions:
      - condition: time
        after: '04:00'
        before: '09:00'
  action:
  - service: climate.set_fan_mode
    data:
      fan_mode: "Auto"
    target:
      entity_id: climate.ac_12494102
  mode: single
# Set temp to 20C four hours after start time
- id: '1663399614821'
  alias: Hallway AC temp to 20
  description: 'Cheap energy time set temp to 20'
  trigger:
  - platform: time
    at: input_datetime.device_end_time
  condition:
    condition: and
    conditions:
      - condition: time
        after: '04:00'
        before: '09:00'
  action:
  - service: climate.set_temperature
    data:
      temperature: 20
    target:
      entity_id: climate.ac_12494102
  mode: single
# If SPOT price is below average we can increase heating by 1C during day time
- id: hallway_ac_fan_low_spot
  alias: If spot price below 7 cents increase heat
  description: 'With low price increase heat by 1'
  trigger:
  - platform: numeric_state
    entity_id: sensor.nordpool_kwh_fi_eur_3_10_024
    below: sensor.energy_spot_average_price
  - platform: numeric_state
    entity_id: sensor.ac_12488762_outdoor_temperature
    below: 2
  condition:
    condition: and
    conditions:
      - condition: time
        after: '10:00'
        before: '17:00'
  action:
  - service: climate.set_temperature
    data:
      temperature: "{{ state_attr('climate.ac_12494102', 'temperature') + 1 }}"  # Increase temperature by 1 degree
    target:
      entity_id: climate.ac_12494102
  mode: single
# If SPOT price is above average let's set heating 1C lower.
- id: hallway_ac_fan_expensive_spot
  alias: If spot price above 7 cents set heat 1C lower
  description: ''
  trigger:
  - platform: numeric_state
    entity_id: sensor.nordpool_kwh_fi_eur_3_10_024
    above: sensor.energy_spot_average_price
  condition:
    condition: and
    conditions:
      - condition: time
        after: '10:00'
        before: '17:00'
  action:
  - service: climate.set_temperature
    data:
      temperature: "{{ state_attr('climate.ac_12494102', 'temperature') - 1 }}"  # Decrease temperature by 1 degree
    target:
      entity_id: climate.ac_12494102
  mode: single
Full examples
My full yaml files are also in my personal GitHub repo:
Home Assistant is useful tool to make some simple home automations. Obviously getting the heat pump itself have saved me plenty on electricity bills, but Home Assistant takes me one step further.
Although Home Assistant does provide nice GUI for creating schedules, I do prefer editing the text based yaml files. yaml itself is error prone format and for that good editor is a must. My choice of editor has been vim for last 20 years at least and I see no reason to switch away from it. Although I have tried to switch to Eclipse, Pycharm, VS Code – yet I always go back to vim. I even tried neovim but couldn’t find any difference compared to vim (I do not use lua).
When I found Github Pilot plugin for vim I found it to be a game changer. Not only for writing Python and Azure Pipelines with yaml, but especially for Home Assistant configuration yaml files. I also feel GitHub Copilot extremely addictive. The way it provides suggestions makes me chuckle once in a while and I really miss it almost everywhere – almost. It really would need to write my commit messages with vim fugitive. Feature suggestion for Tim.