
Table of Contents
Introduction
Finland has been part of Nord Pool, a pan-European power exchange, since 1998. Meaning, when you sign your power contract with electricity supplier, you can choose a contract utilising the power stock exchange prices.
The prices for the next day are announced every day around 1pm CET. You can combine this information for example with weather forecast to plan your electricity usage for the cheapest hours where applicable.
Home Assistant on the other hand has Nord Pool integration which enables you to optimise the electricity SPOT pricing. There is a lot of articles on how to do that to help you to get started. This articles goes through my current setup and my own experience with both Home Assistant and electricity stock pricing. And how I made everything working with GitHub Copilot vim plugin.
Typical claim is, that normal user cannot really utilise the power stock pricing since it is too much work, warming up the house takes constant amount of energy so there is no way to optimise or it is too much work to do the automation in he first place. The latter might be true, but if you take building a smart home as a hobby, then even that is not true. The more time it takes, the more fun it is.
Home Assistant is a hobby anyway. It’s non commercial product and it is Cloud independent: Meaning, you set it your yourself and you maintain it yourself in your own server. That being said, it is fairly easy to set up. You just need to have a server to install it. That can be dedicated server or mini computer like Raspberry Pi, old PC you have no other use or something that can run Linux.
My choice was to to use my Asus PN41 mini PC I already had running Ubuntu which I had set up earlier to run as my sandbox having several virtual machines running in it. Instead of adding another virtual machine I decided to setup Home Assistant as Docker Container. Installation and set up did not really take too long time. Once I installed mobile app to my phone I already had working setup.
The reason why I wanted to have Home Assistant in the first place though is, that I had two Toshiba Shorai Edge heat pump internal units installed, and Toshiba’s mobile app is installable only with European apple id. I have North American apple id and I really cannot change that, since although living most of the time in Europe, I have close ties to North America. After some googling I figured out that I can get around the limitation with this totally new thing for me at the time called Home Assistant.
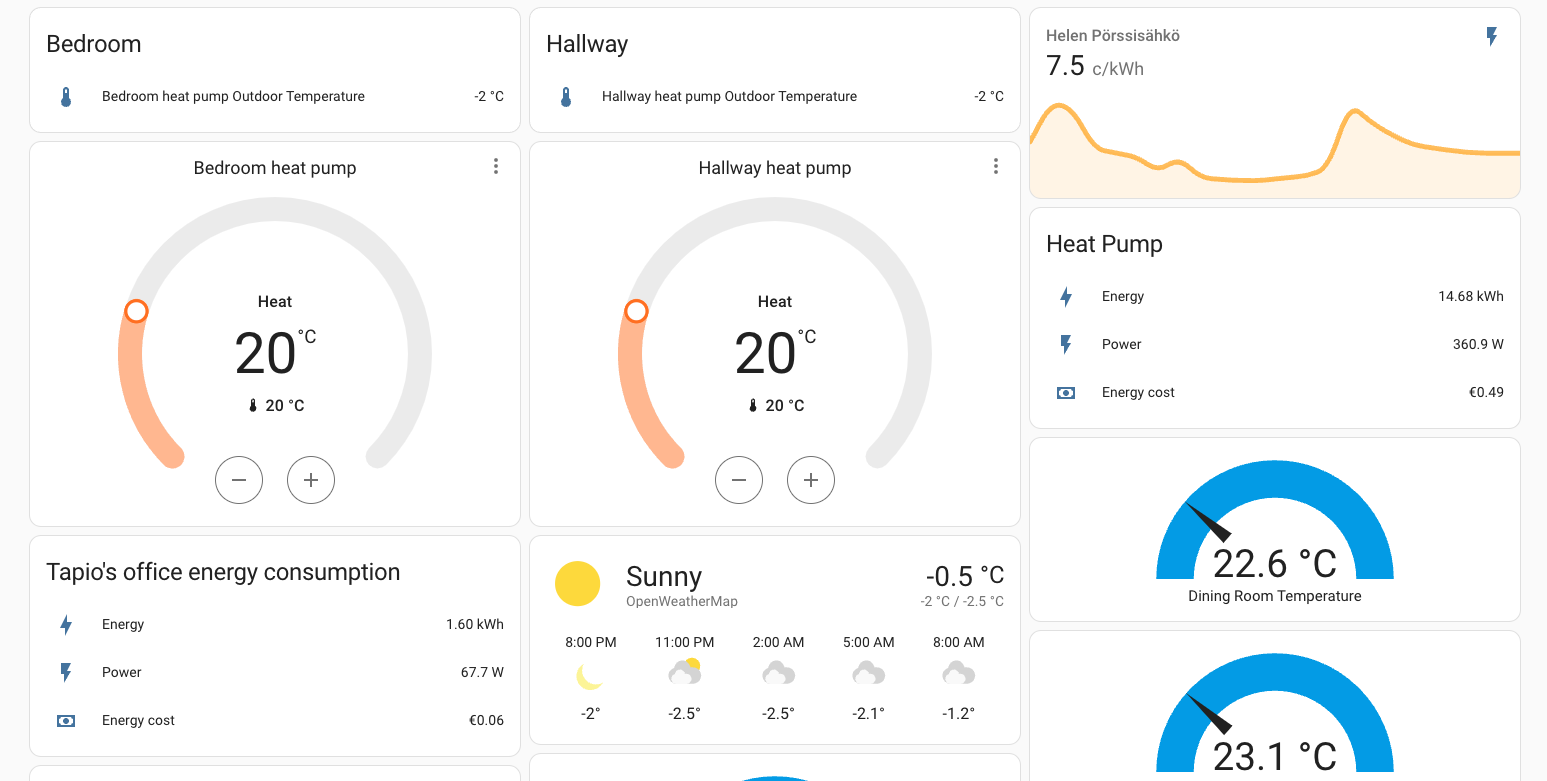
Not only did I get the heat pump controls work with Toshiba AC integration I also got the Nord Pool spot prices available on nice ApexCharts and even predict for Nord Pool prices relying on Random forest machine learning algorithms as illustrated below.

After I had Home Assistant container running, Toshiba AC integration installed and mobile app on my phone, I was good to go. Setup up is really fast to do as long as one is familiar with the related technology it really doesn’t take more than an hour. My initial aim was just to be able to manage the internal heating units through my phone. Then later I noticed that ok, it is also much easier, for example, to schedule the heat pumps to different temperatures different times with Home Assistant than with extremely cumbersome Toshiba remote.
On the other hand, I noticed Home Assistant itself had plenty of other interesting features I could utilise while building a smart home gradually. I got four Shelly H&T and one Shelly Plus H&T thermometers I could have on my Home Assistant dashboard. Three Shelly Plugs to monitor electricity usage for the Heat Pump and other appliances.
Automation
Just having Home Assistant Mobile App running enabled me being able to control heat pump units, follow room temperatures, current weather and forecast, electricity consumption and price is of course nice, but everything is still done manually. I felt I’m missing at least half of the benefits and nothing really changed anything yet.
Then I found this blog post on how to automate device for cheapest hours and it was pretty much all I was looking for. At least on idea level it was. It grabs the next days cheapest electricity prices and one can schedule heat pump to increase temperature when the electricity is on it’s cheapest. This happens typically at night – it is just after midnight almost always. I wasn’t very familiar with yaml and I still find the syntax cumbersome to get anything working – anything working easily at least. There’s plenty of scheduling solution with GUI based forms, but for me understanding those was even more difficult. I got this solution for getting next day’s cheapest hours and increase heating during them to work fine except for one thing. Once it started, it did not stop without manually stopping it.
I decided to create a schedule which set the heating back from 24C to 20C at 5am. With Home Assistant of course. If the cheapest hours are at day time, that does not work though. But it worked well enough almost for a year. Then I got more involved with yaml while learning Ansible and writing Pipelines for Azure with yaml. I also utilised yaml syntax highlighting on vim, so it all started to get easier.
Why write own code when there’s Github Copilot
Completing the first idea
The biggest motivator I found was Github Copilot. I started to use it while writing Python code, but noticed it helps quite a lot with yaml too. I only wanted to change my automations.yaml slightly. I wanted to get the part working, where the heating should stop. And I don’t want any heating blowing full 24C during day time either. Copilot does not write it to you, but it makes it easier to get it done.
So I did this: added the time conditions with after and before.
# Set temp to 24C when the SPOT price is at it's cheapest.
- id: '1663399614818'
  alias: Increase heating
  description: 'Cheap energy time set heating to 24C'
  trigger:
  - platform: time
    at: input_datetime.device_start_time
  condition:
    condition: and
    conditions:
      - condition: time
        after: '00:00'
        before: '04:00'
  action:
  - service: climate.set_temperature
    data:
      temperature: 24
    target:
      entity_id: climate.ac_12494102
  mode: single
The code without timing conditions are available from the blog post link above, so I’m not writing it here, although you can check my full automations.yaml from my GitHub repo – not that I expect it to help anyone or to be perfect, but there it is. Then next thing is to stop the increased heating. To be noted, I constantly work on my automations, so the code in repo does not necessarily reflect what I have demonstrated here.
# Set temp to 20C at end of cheap hours
- id: '1663399614821'
  alias: Hallway AC temp to 20
  description: 'Cheap energy end time set temp to 20'
  trigger:
  - platform: time
    at: input_datetime.device_end_time
  condition:
    condition: and
    conditions:
      - condition: time
        after: '03:00'
        before: '06:00'
  action:
  - service: climate.set_temperature
    data:
      temperature: 20
    target:
      entity_id: climate.ac_12494102
  mode: single
I didn’t have time conditions there as time of writing this, but I added them later once I had verified everything works correctly. With Home Assistant it’s better to build things gradually. Then you know easier what does not work and what does.
I also wanted to have things like: If electricity is more expensive than 15c/kWh, decrease heating by 1C:
# If SPOT price is above average let's set heating 1C lower
- id: hallway_ac_fan_expensive_spot
  alias: If spot price above average cents set heat 1C lower
  description: ''
  trigger:
  - platform: numeric_state
    entity_id: sensor.nordpool_kwh_fi_eur_3_10_024
    above: sensor.energy_spot_average_price
  condition:
    condition: and
    conditions:
      - condition: time
        after: '08:00'
        before: '22:00'
  action:
  - service: climate.set_temperature
    data:
      temperature: "{{ state_attr('climate.ac_12494102', 'temperature') - 1 }}"  # Decrease temperature by 1 degree
    target:
      entity_id: climate.ac_12494102
  mode: single
The above is partly written by ChatGPT, but it typically generates code, which needs a lot of tweaking to get it to work for real, but some of it is usable.
I also often turn heater off when outside is a bit warmer and don’t necessarily remember to put it on before going to sleep. At least in theory this could lead to situation where it gets really cold at night, and then the heater is off when temperature is way below 0C. Then one should really not turn it on anymore before it gets warmer, since it decreases the life of the outside unit some what. If not significantly even.
# If outdoor temp is below 1C turn on hallway AC
- id: hallway_ac_fan_on_low_temp
  alias: If temp below 1 set on
  description: ''
  trigger:
  - platform: numeric_state
    entity_id: sensor.ac_12488762_outdoor_temperature
    below: 1
  condition: []
  action:
  - service: climate.turn_on
    target:
      entity_id: climate.ac_12494102
  mode: single
Expanding the ideas
Above was just first step though. I wanted to have more. Simple things though. I struggled a day with getting my next idea to work. The idea is simple:
- Increase heat, when spot price is above daily average.
- Decrease heat, when spot price is below daily average.
I had everything working with fixed values. But daily average spot price varies a lot, so I’m not ok with fixed value. I tried to use something like state_attr('sensor.nordpool_kwh_fi_eur_3_10_024', 'average'). Looks valid to me, but when I tried to use it, it just didn’t work. I tried to “cast” since I always got error “could not convert string to float” no matter what I trid.
Then I figured out just by myself with no Github Copilot, that if I put above to sensors.yaml and create a sensor having the daily average, I might be able to use that. Bingo!
energy_spot_average_price:
      friendly_name: "Nordpool Average Spot Price"
      unit_of_measurement: 'c/kWh'
      value_template: "{{ state_attr('sensor.nordpool_kwh_fi_eur_3_10_024', 'average') | float | round(2) }}"
Above I have created sensor: sensor.energy_spot_average_price on sensors.yaml. That I can use on automations.yaml as shown below:
# If outdoor temp is below 1C turn on hallway AC
- id: hallway_ac_fan_on_low_temp
  alias: If temp below 1 set on
  description: ''
  trigger:
  - platform: numeric_state
    entity_id: sensor.ac_12488762_outdoor_temperature
    below: 1
  condition: []
  action:
  - service: climate.turn_on
    target:
      entity_id: climate.ac_12494102
  mode: single
Since I’m increasing heat above I want to do it only when it’s relatively cold outside. Also I want to do it only during day, when the prior cheapest prices logic is not active. That is why I have set this to do following:
- Between 10am and 5pm:
- When outside temperature is below +2C and spot price is below daily average:
- Lower the heat on Hallway AC by 1 degree celcius
- When outside temperature is below +2C and spot price is below daily average:
Then I have another entry for decreasing the heat, when spot price goes above daily average. For that I don’t use the requirement for outside temperature, since if it’s warmer than that, I’m always ok to decrease the temperature.
Purpose
The goal for me is to heat a bit more when electricity is cheaper and then heat a bit less when it’s more expensive. Air is not very good on preserving the heat, but it does it a bit. Also, when I go to sleep, I don’t need to heat. My house colder at least till midnight since there’s almost no heating. The after midnight there’s typically the cheapest hours in hand and my system starts to overheat a bit. Pretty normal pattern is, that when I wake up, the electricity price starts to go up during the normal morning hours when other people wake up as well. My heating system isn’t really needed by then and the temperature starts going down gradually till it is needed gain.
Rest of the day my system follows the strategy to lower heat slightly if price goes above average and heat a bit more when it the price goes below average
This will optimize the heating the way, that most of the time the average price I pay for electricity is bit lower than the average spot price, which is my intention.
Below pictures shows, how the heating takes in place at midnight. The stops at 4am. Next hike is around 6am, when the upstairs heat pump in bedroom is turned on after waking up. The bedroom heating is never on during night and most of the automation is only for Hallway AC.

The yaml code needed
The examples here are pretty much copy/pasted from Toni’s blog post so credits to him.
configuration.yaml
Home Assistant needs a configuration file configuration.yaml and there you need following to get the cheapest hours utilized.
# Helper to keep the start time
input_datetime:
  device_start_time:
    name: Device Start Time
    has_time: true
    has_date: false
  device_end_time:
    name: Device End Time
    has_time: true
    has_date: false
# Include automations.yaml and sensors.yaml
automation: !include automations.yaml
sensor: !include sensors.yaml
sensors.yaml
On sensors.yaml you need following. Note that sensor.nordpool_kwh_fi_eur_3_10_024 must be replaced with the sensor you have for Nord Pool integration.
- platform: template
  sensors:
    energy_spot_average_price:
      friendly_name: "Nordpool Average Spot Price"
      unit_of_measurement: 'c/kWh'
      value_template: "{{ state_attr('sensor.nordpool_kwh_fi_eur_3_10_024', 'average') | float | round(2) }}"

    cheapest_hours_energy_tomorrow:
      device_class: timestamp
      friendly_name: Cheapest sequential electricity hours
      value_template: >
        {%- set numberOfSequentialHours = 3 -%}
        {%- set lastHour = 23 -%}
        {%- set firstHour = 0 -%}

        {%- if state_attr('sensor.nordpool_kwh_fi_eur_3_10_024', 'tomorrow_valid') == true -%}
          {%- set ns = namespace(counter=0, list=[], cheapestHour=today_at("00:00") + timedelta( hours = (24)), cheapestPrice=999.00) -%}
          {%- for i in range(firstHour + numberOfSequentialHours, lastHour+1) -%}
            {%- set ns.counter = 0.0 -%}
            {%- for j in range(i-numberOfSequentialHours, i) -%}
              {%- set ns.counter = ns.counter + state_attr('sensor.nordpool_kwh_fi_eur_3_10_024', 'tomorrow')[j] -%}
            {%- endfor -%}
            {%- set ns.list = ns.list + [ns.counter] -%}
            {%- if ns.counter < ns.cheapestPrice -%}
              {%- set ns.cheapestPrice = ns.counter -%}
              {%- set ns.cheapestHour = today_at("00:00") + timedelta( hours = (24 + i - numberOfSequentialHours)) -%}
            {%- endif -%}
          {%- endfor -%}
          {{ ns.cheapestHour }}
          {%- set ns.cheapestPrice = ns.cheapestPrice / numberOfSequentialHours -%}
        {%- endif -%}
automations.yaml
Now Here are the triggers I have created in automations.yaml. I have three triggers for pumping up the heat with each one different action for cheap hours. Combining actions with one trigger seem not to work, or I don’t know correct syntax. I decrease the heat after four hours, but since I don’t need to stop heater, when the heating gets decreased. I have only two actions.
First I need to create the input_date times to use later:
# Set device start time: Needs cheapest_hours_energy_tomorrow in sensor.yaml
- id: '1663398489357'
  alias: 'Set device start time'
  description: ''
  trigger:
  - platform: time
    at: '23:10:00'
  condition:
  - condition: not
    conditions:
    - condition: state
      entity_id: sensor.cheapest_hours_energy_tomorrow
      state: unknown
  action:
  - service: input_datetime.set_datetime
    data:
      time: '{{ as_timestamp(states(''sensor.cheapest_hours_energy_tomorrow'')) | timestamp_custom(''%H:%M'') }}'
    target:
      entity_id: input_datetime.device_start_time


# Set device end time 4 hours after start time: Needs cheapest_hours_energy_tomorrow in sensor.yaml
- id: '1663398489358'
  alias: 'Set device end time'
  description: ''
  trigger:
  - platform: time
    at: '23:15:00'
  condition:
  - condition: not
    conditions:
    - condition: state
      entity_id: sensor.cheapest_hours_energy_tomorrow
      state: unknown
  action:
  - service: input_datetime.set_datetime
    data:
      time: '{{ ((as_timestamp(states(''sensor.cheapest_hours_energy_tomorrow'')) + (3600*4)) | timestamp_custom(''%H:%M'')) }}'
    target:
      entity_id: input_datetime.device_end_time
  mode: single
Then the actual triggers:
# Do the actions when time trigger is hit.
# Each action separately: Turn on, set temp, set fan mode
# Make sure AC is on before setting temp or fan mode
- id: '1663399614817'
  alias: Turn on Hallway AC
  description: 'Cheap energy time turn on hallway AC'
  trigger:
  - platform: time
    at: input_datetime.device_start_time
  condition:
    condition: and
    conditions:
      - condition: time
        after: '00:00'
        before: '05:00'
  action:
  - service: climate.turn_on
    target:
      entity_id: climate.ac_12494102
  mode: single

# Set temp to 24C
- id: '1663399614818'
  alias: Increase heating
  description: 'Cheap energy time set heating to 24C'
  trigger:
  - platform: time
    at: input_datetime.device_start_time
  condition:
    condition: and
    conditions:
      - condition: time
        after: '00:00'
        before: '05:00'
  action:
  - service: climate.set_temperature
    data:
      temperature: 24
    target:
      entity_id: climate.ac_12494102
  mode: single
# Set fan mode to high
- id: '1663399614819'
  alias: Hallway AC fan to high
  description: 'Cheap energy time set fan to high'
  trigger:
  - platform: time
    at: input_datetime.device_start_time
  condition:
    condition: and
    conditions:
      - condition: time
        after: '00:00'
        before: '05:00'
  action:
  - service: climate.set_fan_mode
    data:
      fan_mode: "High"
    target:
      entity_id: climate.ac_12494102
  mode: single

# Lower fan from High to Auto four hours after start time
- id: '1663399614820'
  alias: Hallway AC fan to Auto
  description: 'Cheap energy time set fan to Auto'
  trigger:
  - platform: time
    at: input_datetime.device_end_time
  condition:
    condition: and
    conditions:
      - condition: time
        after: '04:00'
        before: '09:00'
  action:
  - service: climate.set_fan_mode
    data:
      fan_mode: "Auto"
    target:
      entity_id: climate.ac_12494102
  mode: single
# Set temp to 20C four hours after start time
- id: '1663399614821'
  alias: Hallway AC temp to 20
  description: 'Cheap energy time set temp to 20'
  trigger:
  - platform: time
    at: input_datetime.device_end_time
  condition:
    condition: and
    conditions:
      - condition: time
        after: '04:00'
        before: '09:00'
  action:
  - service: climate.set_temperature
    data:
      temperature: 20
    target:
      entity_id: climate.ac_12494102
  mode: single
# If SPOT price is below average we can increase heating by 1C during day time
- id: hallway_ac_fan_low_spot
  alias: If spot price below 7 cents increase heat
  description: 'With low price increase heat by 1'
  trigger:
  - platform: numeric_state
    entity_id: sensor.nordpool_kwh_fi_eur_3_10_024
    below: sensor.energy_spot_average_price
  - platform: numeric_state
    entity_id: sensor.ac_12488762_outdoor_temperature
    below: 2
  condition:
    condition: and
    conditions:
      - condition: time
        after: '10:00'
        before: '17:00'
  action:
  - service: climate.set_temperature
    data:
      temperature: "{{ state_attr('climate.ac_12494102', 'temperature') + 1 }}"  # Increase temperature by 1 degree
    target:
      entity_id: climate.ac_12494102
  mode: single
# If SPOT price is above average let's set heating 1C lower.
- id: hallway_ac_fan_expensive_spot
  alias: If spot price above 7 cents set heat 1C lower
  description: ''
  trigger:
  - platform: numeric_state
    entity_id: sensor.nordpool_kwh_fi_eur_3_10_024
    above: sensor.energy_spot_average_price
  condition:
    condition: and
    conditions:
      - condition: time
        after: '10:00'
        before: '17:00'
  action:
  - service: climate.set_temperature
    data:
      temperature: "{{ state_attr('climate.ac_12494102', 'temperature') - 1 }}"  # Decrease temperature by 1 degree
    target:
      entity_id: climate.ac_12494102
  mode: single
Full examples
My full yaml files are also in my personal GitHub repo:
Summary
Home Assistant is useful tool to make some simple home automations. Obviously getting the heat pump itself have saved me plenty on electricity bills, but Home Assistant takes me one step further.
Although Home Assistant does provide nice GUI for creating schedules, I do prefer editing the text based yaml files. yaml itself is error prone format and for that good editor is a must. My choice of editor has been vim for last 20 years at least and I see no reason to switch away from it. Although I have tried to switch to Eclipse, Pycharm, VS Code – yet I always go back to vim. I even tried neovim but couldn’t find any difference compared to vim (I do not use lua).
When I found Github Pilot plugin for vim I found it to be a game changer. Not only for writing Python and Azure Pipelines with yaml, but especially for Home Assistant configuration yaml files. I also feel GitHub Copilot extremely addictive. The way it provides suggestions makes me chuckle once in a while and I really miss it almost everywhere – almost. It really would need to write my commit messages with vim fugitive. Feature suggestion for Tim.
 |  |  |

Thanks for the nicely written article, will try this too! There are multiple companies selling some kind of functionality for quite a bit of money (of course more advanced)