Introduction
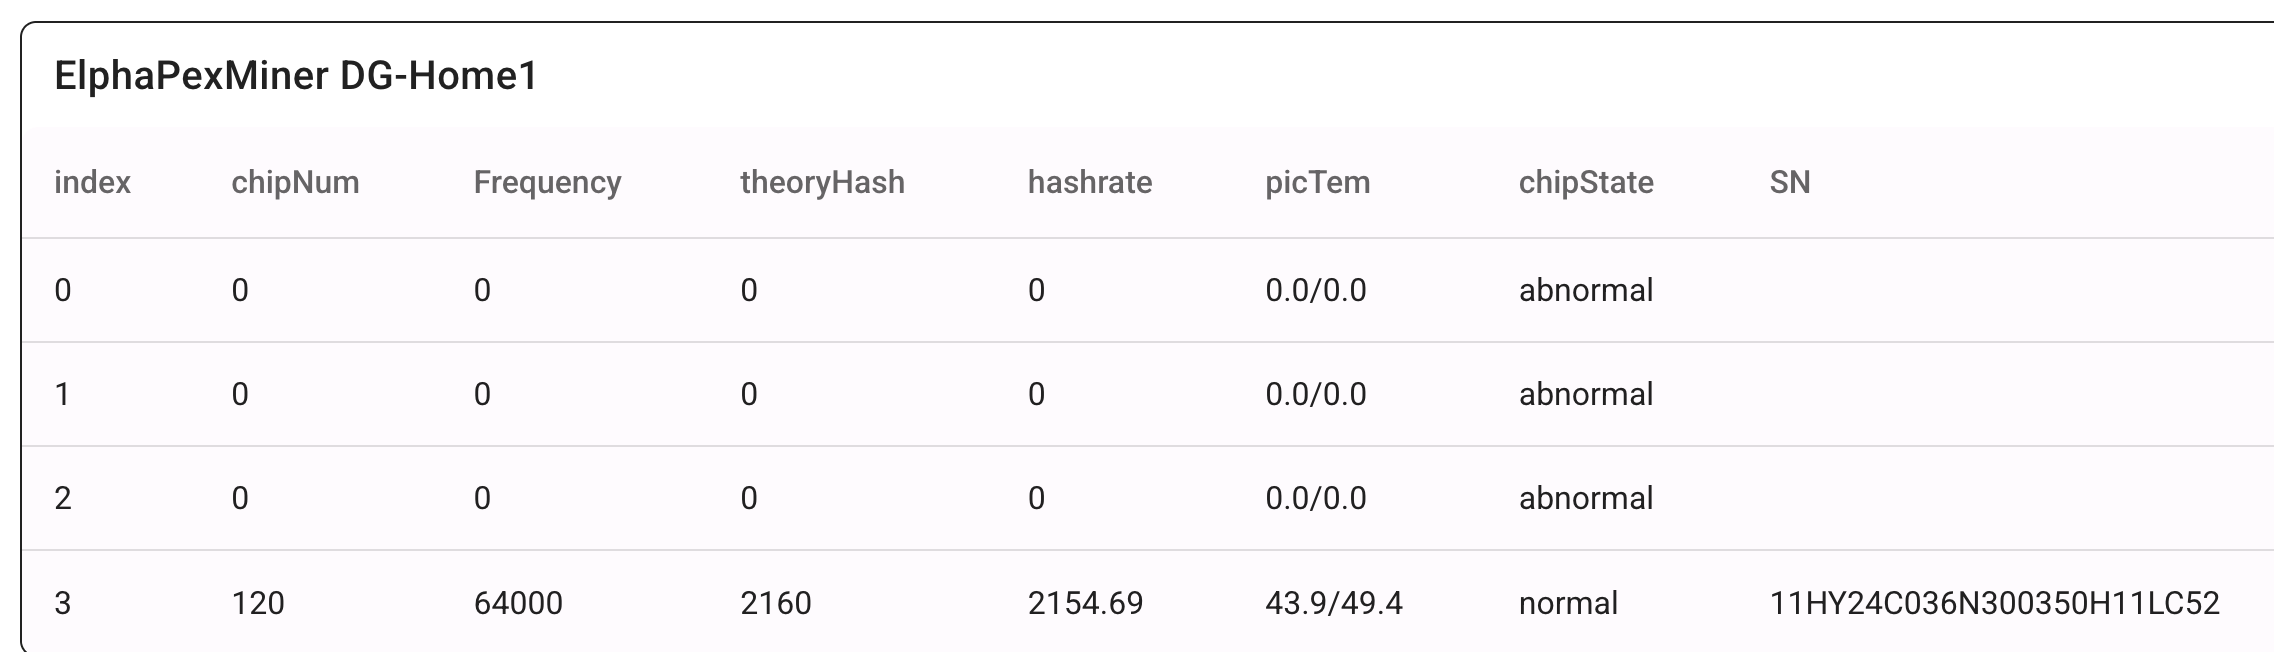
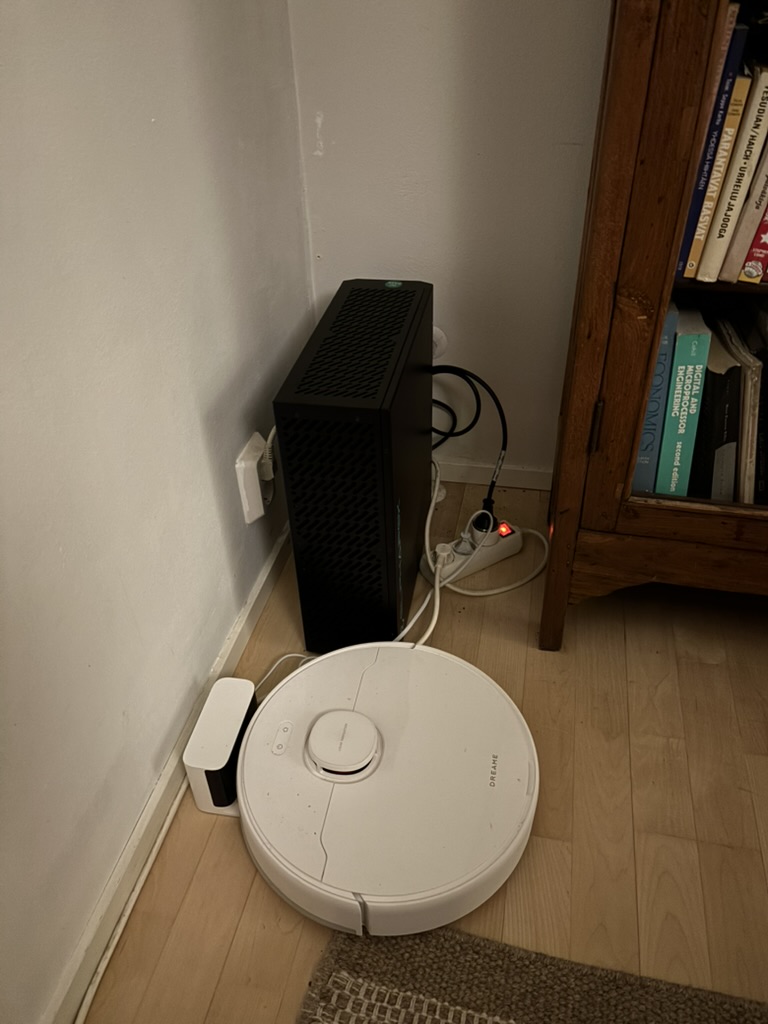
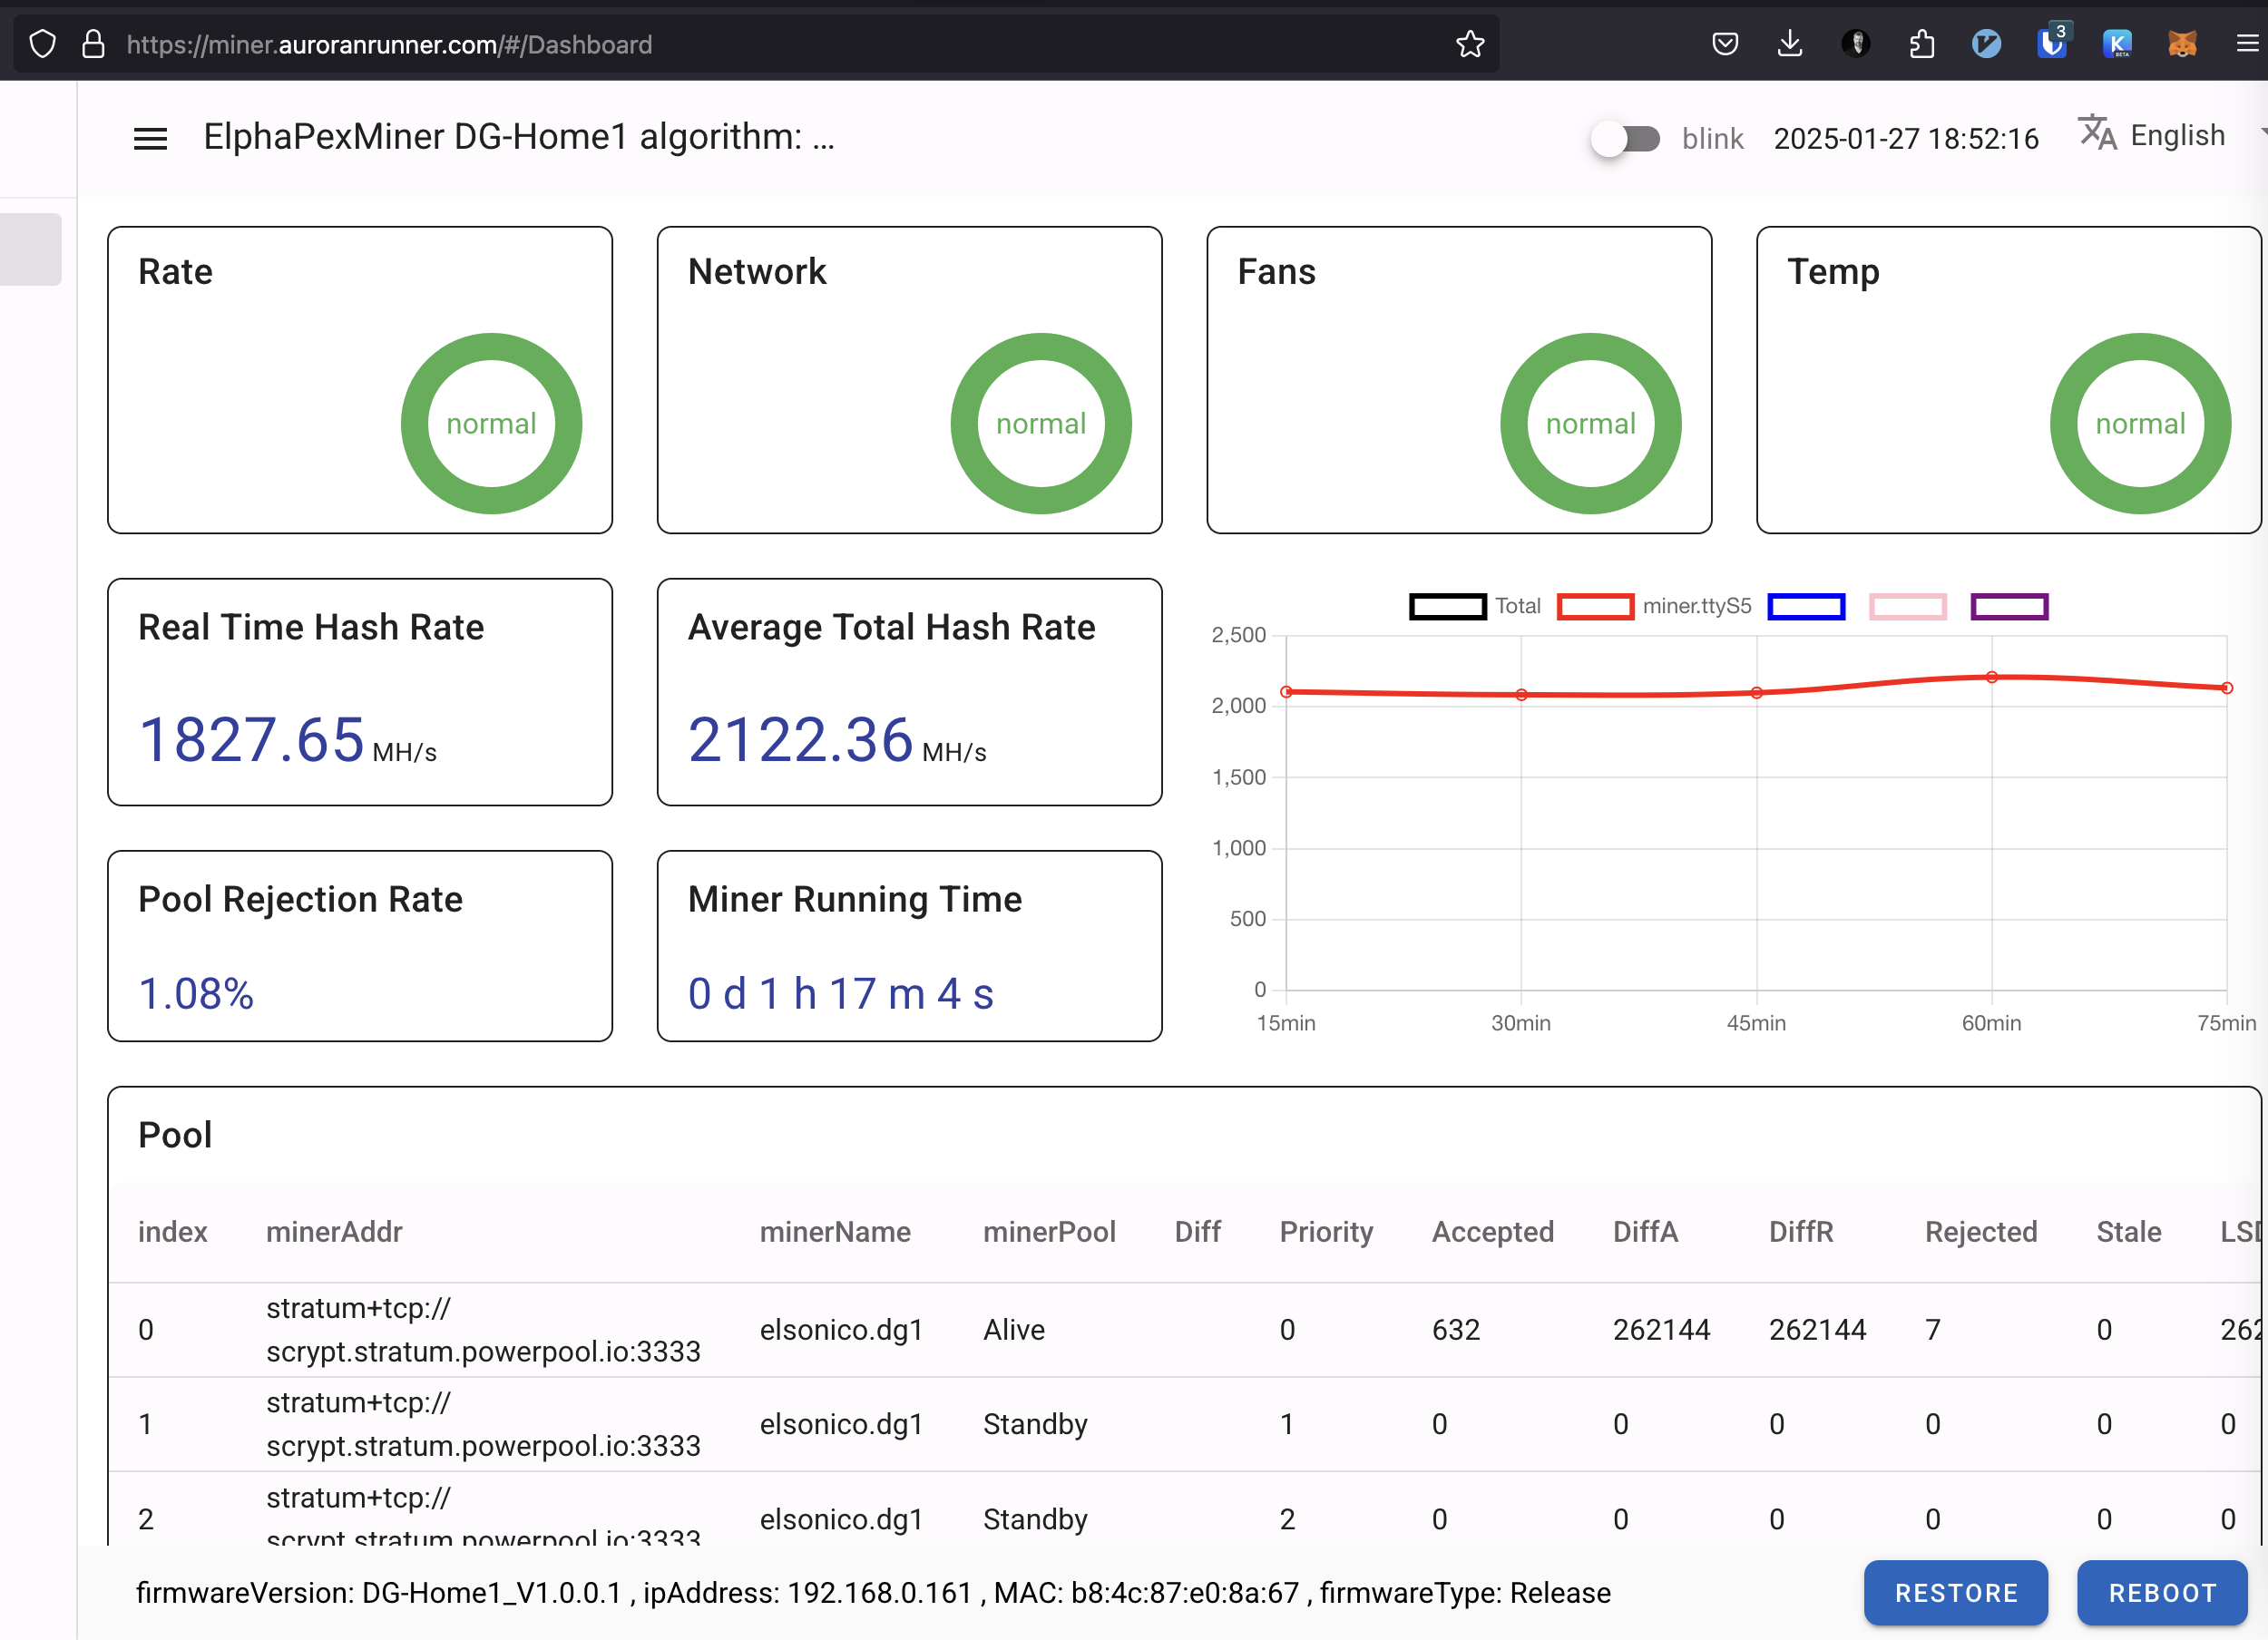
Home Assistant is an excellent tool for monitoring the ElphaPex DG Home1 miner. This post covers my observations on optimizing its setup for maximum efficiency with minimal downtime.
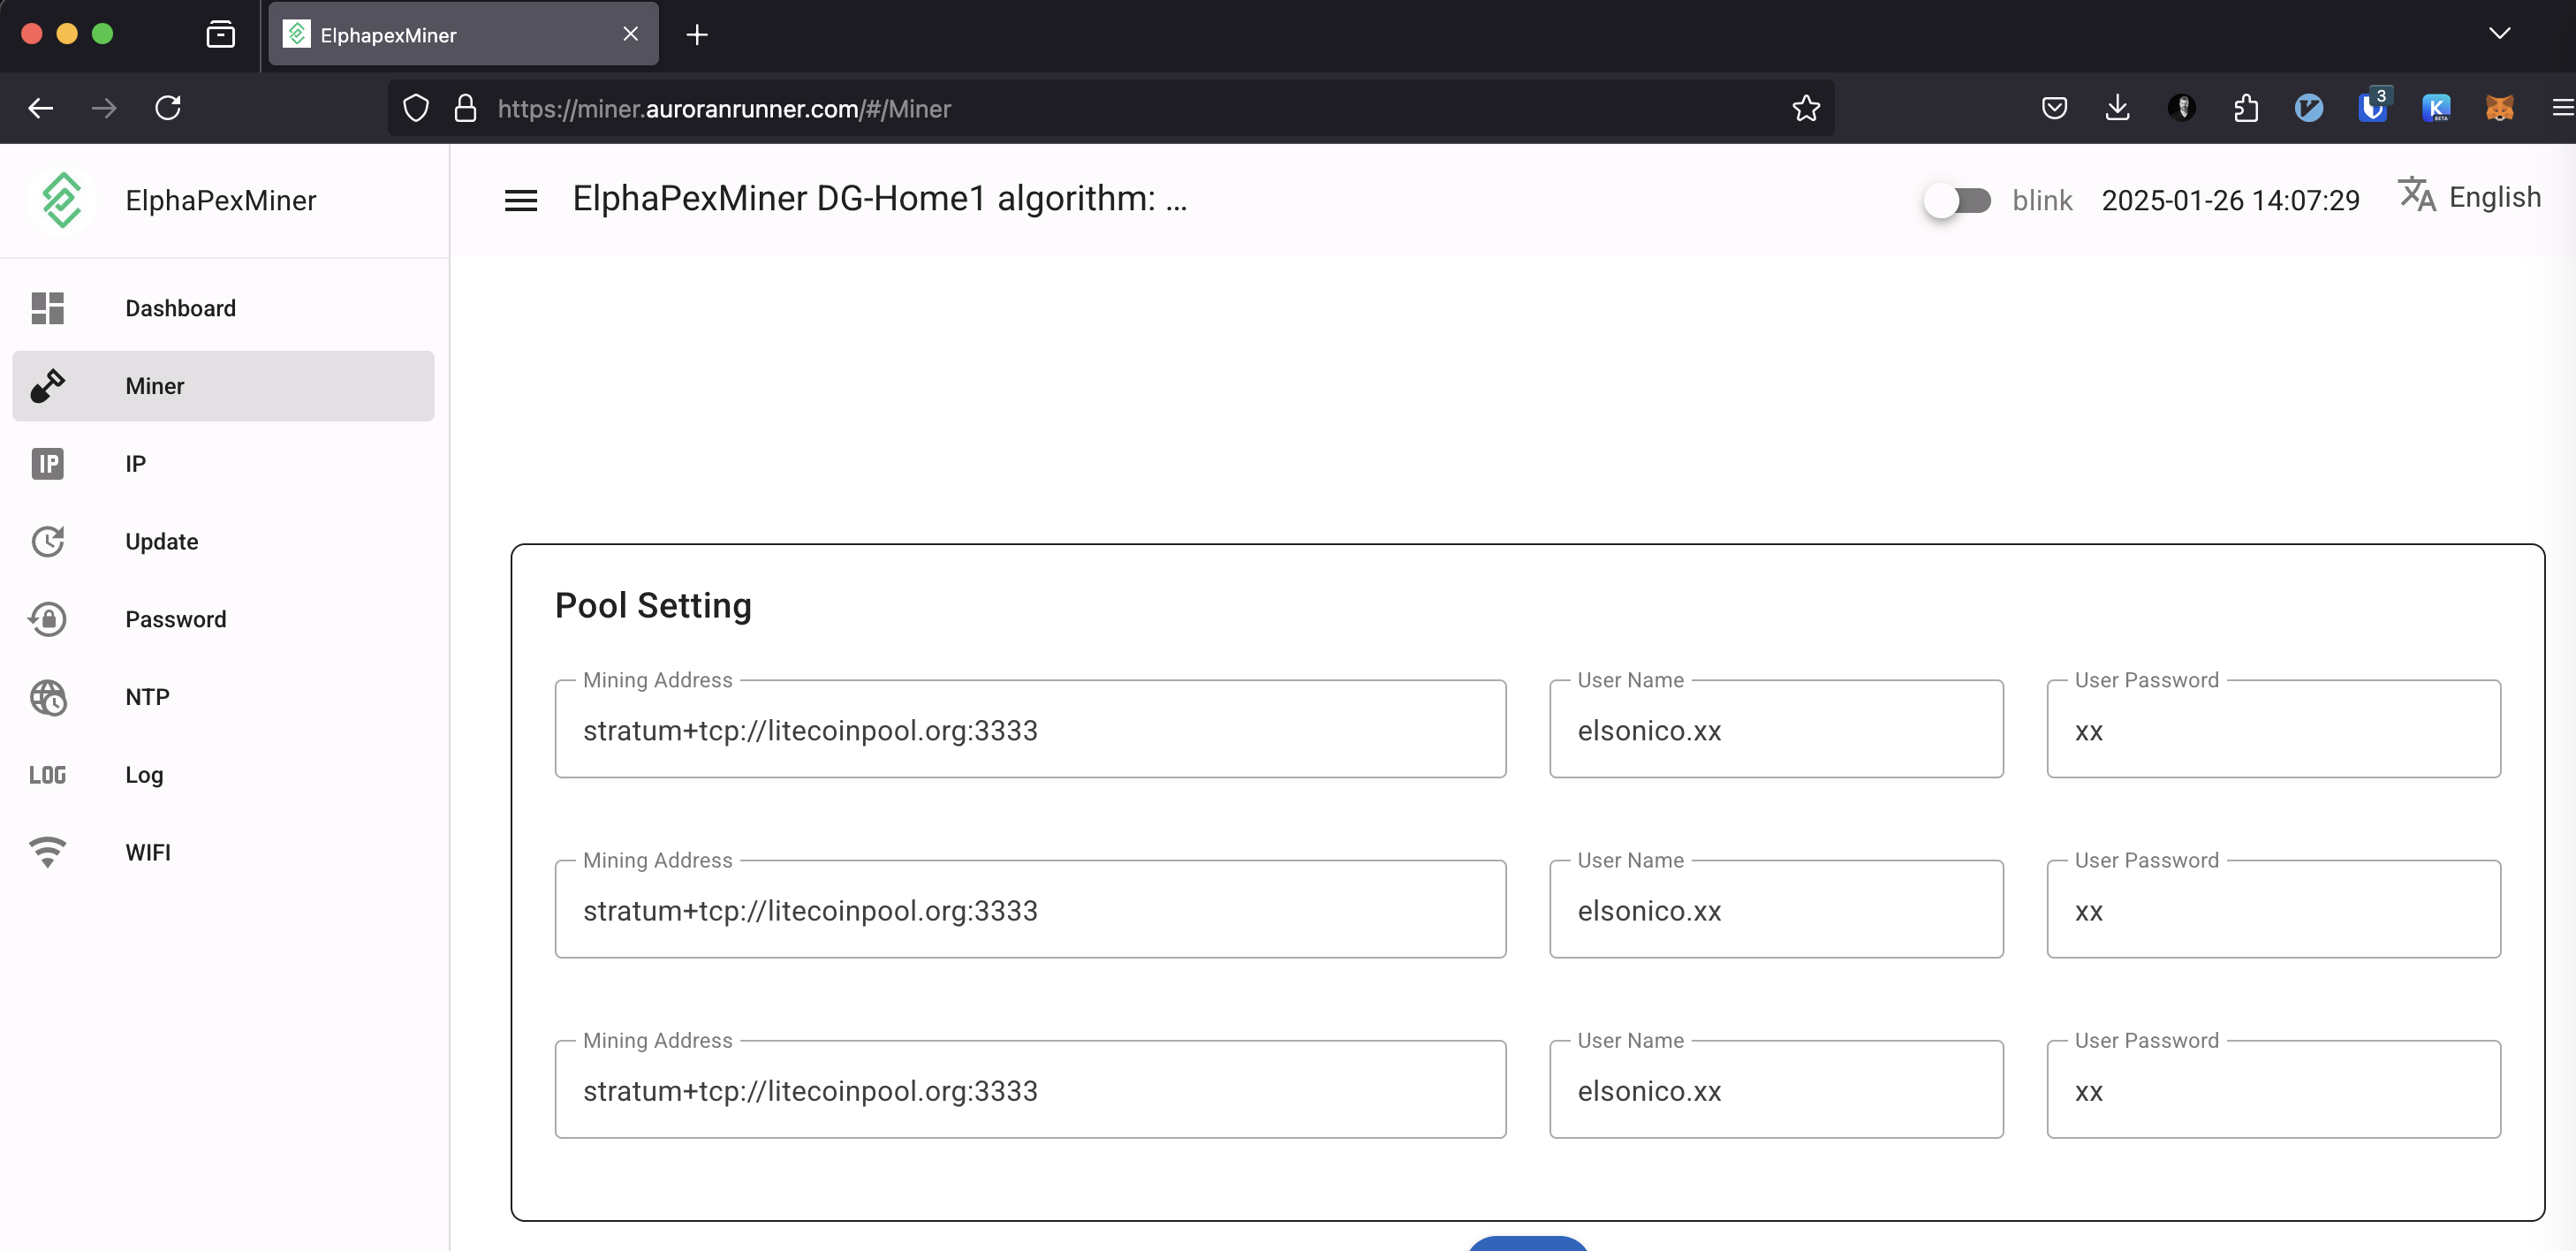
PowerPool Configuration
Setting up PowerPool is straightforward. You need to enter the PowerPool stratum address three times. This works because PowerPool addresses have multiple DNS entries. If one connection fails, the miner automatically connects to the next available address.
Configuration Example
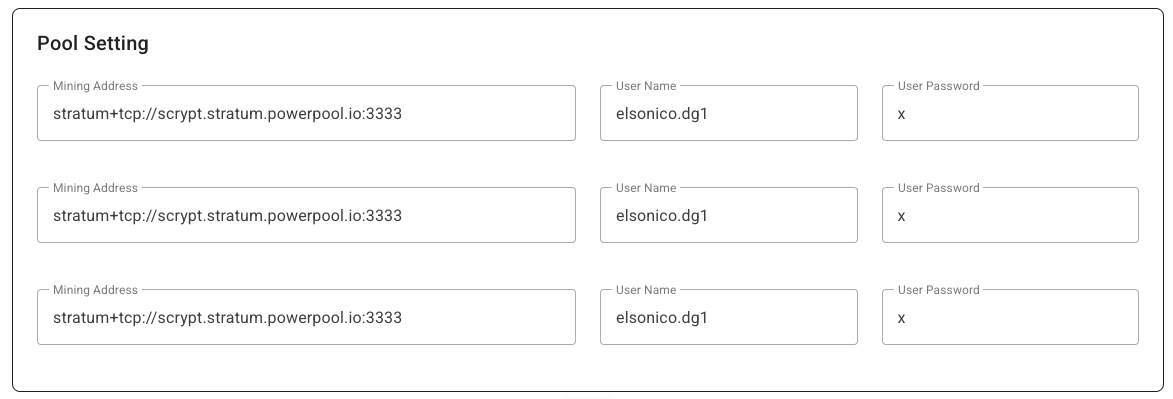
When the first active entry fails, the miner switches to the next, as shown in the ElphaPex logs:
Feb 17 08:49:34 DG-Home1 user.info health: min = 44250 max = 49812
Feb 17 08:49:49 DG-Home1 user.err cpuminer[1682]: [ttyS5][Stratum connection timed out]
Feb 17 08:49:49 DG-Home1 user.notice cpuminer[1682]: [ttyS5][current pool: stratum+tcp://scrypt.stratum.powerpool.io:3333, user: elsonico.dg1, pass: x]
Feb 17 08:49:49 DG-Home1 user.err cpuminer[1682]: [ttyS5][Stratum connection interrupted]
Feb 17 08:49:49 DG-Home1 user.info cpuminer[1682]: [ttyS5][Starting Stratum on stratum+tcp://scrypt.stratum.powerpool.io:3333]
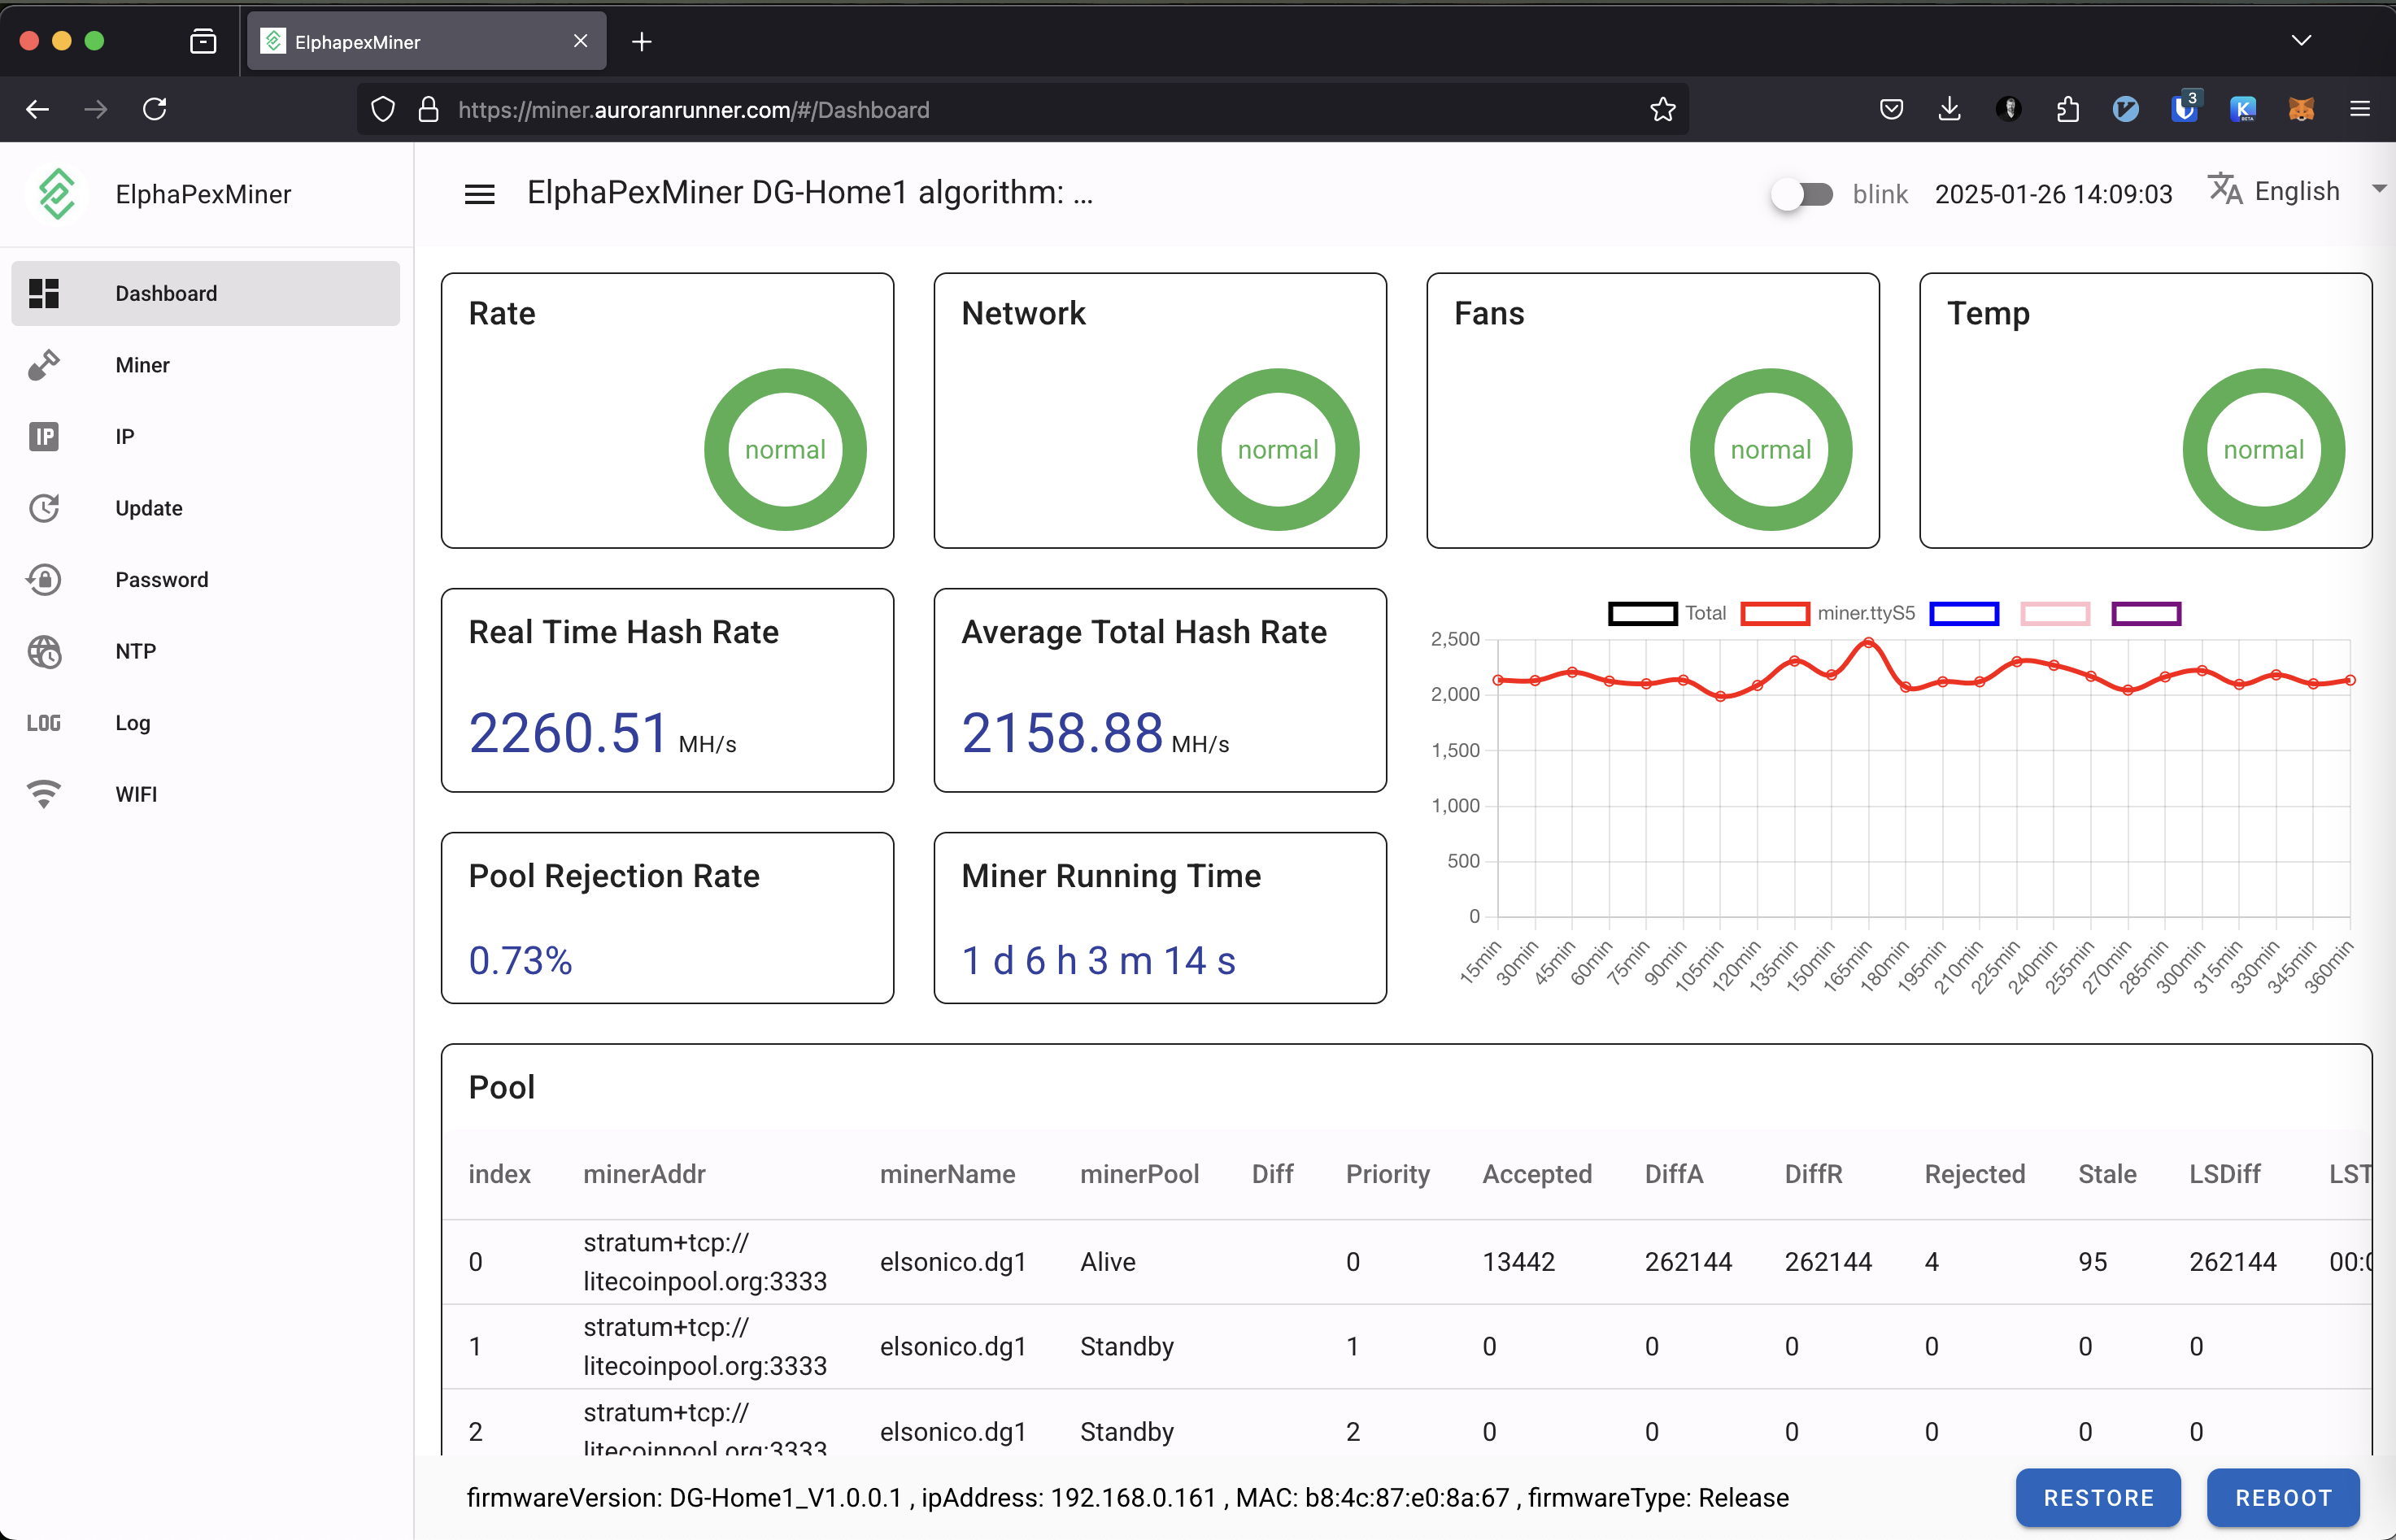
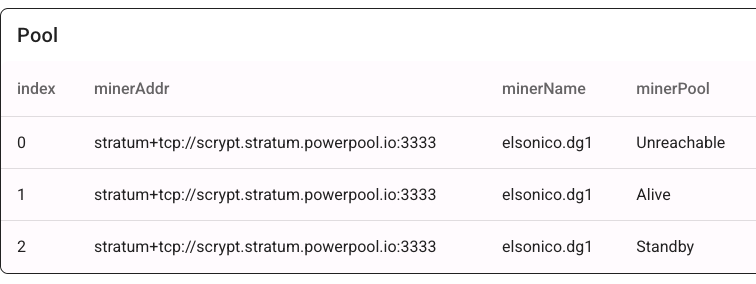
When a connection fails, the previous pool becomes “Unreachable,” the second “Alive,” and the third remains “Standby.”
This setup works with any mining pool that has multiple resolvable IP addresses. You can verify DNS resolution using:
🕙 11:07:57 ❯ nslookup scrypt.stratum.powerpool.io
Server: 192.168.0.210
Address: 192.168.0.210#53
Non-authoritative answer:
scrypt.stratum.powerpool.io canonical name = scrypt.powerpool.cloud.
Name: scrypt.powerpool.cloud
Address: 161.97.162.191
Name: scrypt.powerpool.cloud
Address: 149.102.159.179
Name: scrypt.powerpool.cloud
Address: 75.119.136.155
Name: scrypt.powerpool.cloud
Address: 158.220.80.69Monitoring
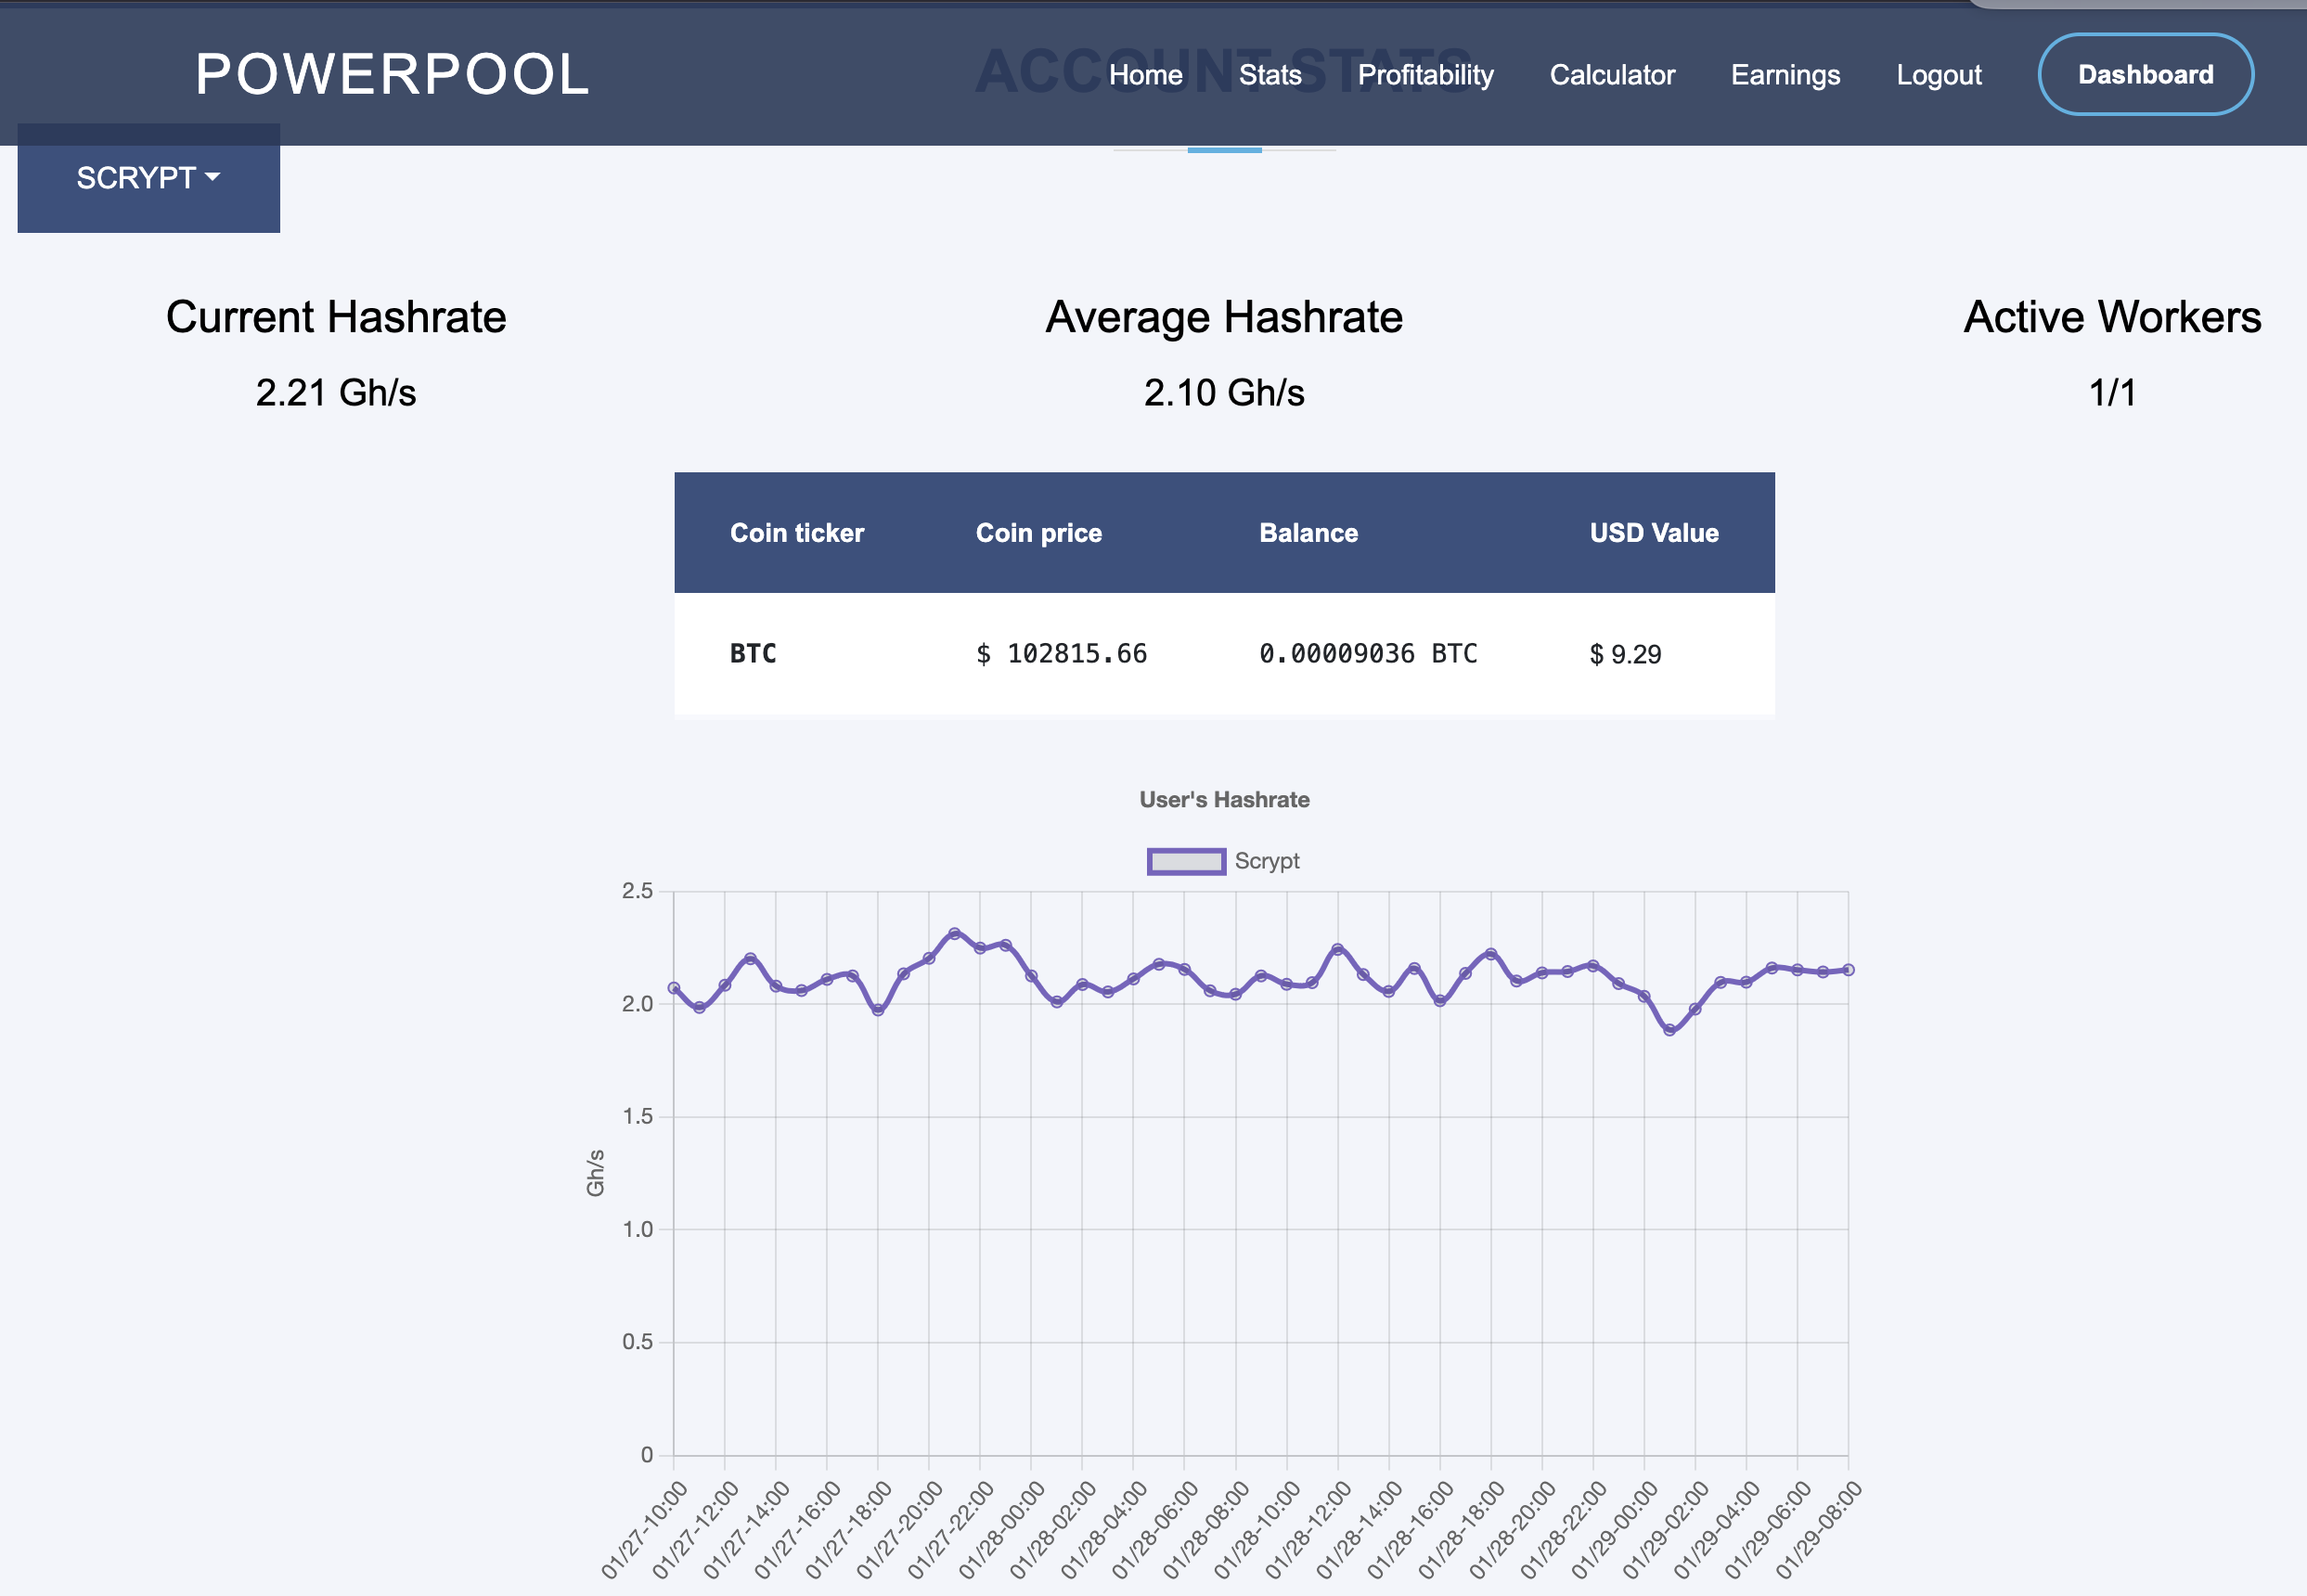
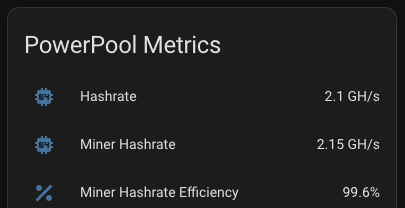
Hash Rate Monitoring
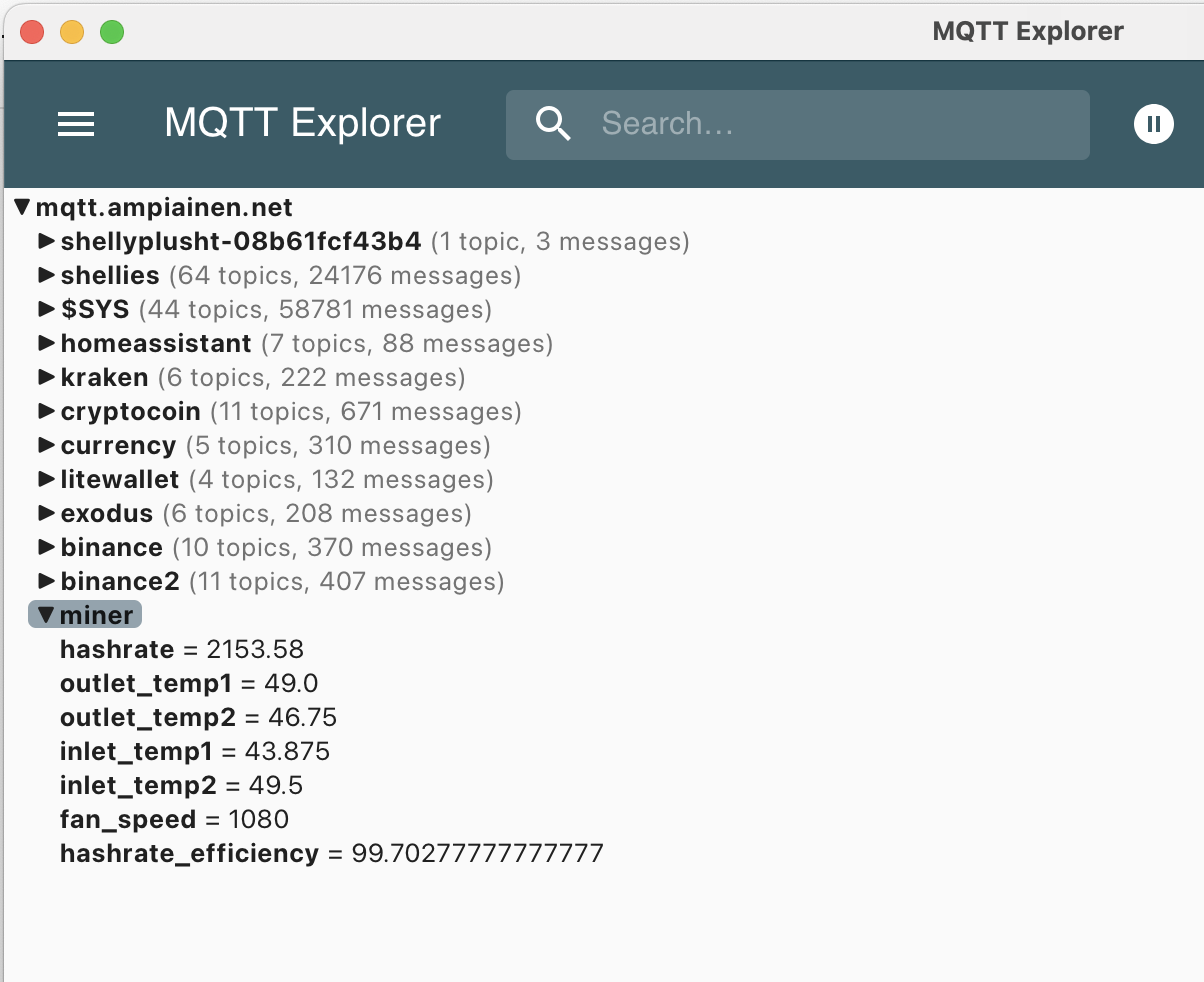
A low hash rate over an extended period indicates a malfunction. Initially, I monitored the hash rate via PowerPool’s API but noticed occasional inaccuracies. To address this, I now monitor the miner’s own reported hash rate alongside PowerPool’s API data.
If the hash rate stays at 0.0 for 15 minutes, Home Assistant automatically reboots the miner using the following automation:
- id: 28077b7f639644688b946f35ccf0127b
  alias: Reboot or Power Cycle Miner
  description: Reboot the miner on low hash rate, fallback to power cycle if needed
  triggers:
  - entity_id: sensor.miner_hashrate_gh
    to: '0.0'
    for:
      minutes: 15
    trigger: state
  - minutes: /15
    trigger: time_pattern
  conditions:
  - condition: numeric_state
    entity_id: sensor.miner_hashrate_gh
    below: 0.1
  - condition: numeric_state
    entity_id: sensor.electricity_cost_in_cents_per_kwh
    below: 62
  actions:
  - target:
      entity_id: switch.shellyplug_s_3ce90ee04b97
    action: switch.turn_off
    data: {}
  - delay:
      seconds: 10
  - target:
      entity_id: switch.shellyplug_s_3ce90ee04b97
    action: switch.turn_on
    data: {}
  mode: single
Note that I only do this when the electricity price is below 62c/kWh. I will go into details later why that has been set the way it has.
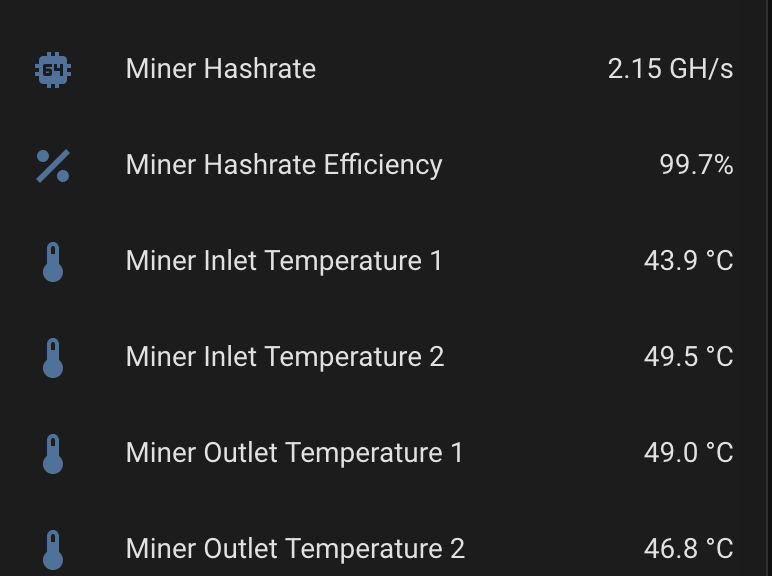
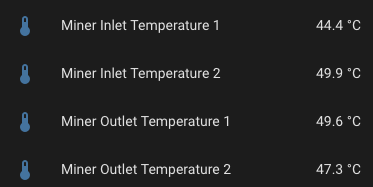
Temperature Monitoring
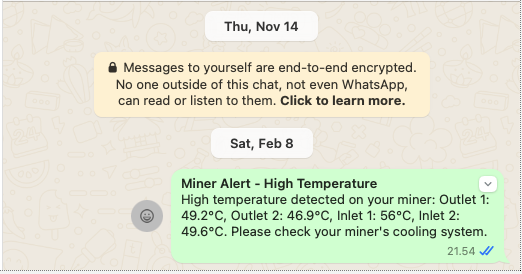
I monitor various circuit temperatures. If any exceed 55°C, an event triggers notifications via email and WhatsApp, giving me time to intervene before an automatic shutdown.
Example of WhatsApp message when any of them go above 56C:
Above is done with following snippet on my automations.yaml:
- id: miner_whats_app_temperature_alert
  alias: WhatsApp alert when miner temperatures are high
  trigger:
    platform: numeric_state
    entity_id:
    - sensor.miner_outlet_temperature_1
    - sensor.miner_outlet_temperature_2
    - sensor.miner_inlet_temperature_1
    - sensor.miner_inlet_temperature_2
    above: 55
  condition:
  - condition: template
    value_template: "{% set temps = namespace(high=false) %} {% for sensor in [\n
      \    'sensor.miner_outlet_temperature_1', \n     'sensor.miner_outlet_temperature_2',
      \n     'sensor.miner_inlet_temperature_1', \n     'sensor.miner_inlet_temperature_2'\n
      \  ] %}\n  {% if states(sensor) not in ['unknown', 'unavailable'] %}\n    {%
      if states(sensor) | float > 55 %}\n      {% set temps.high = true %}\n    {%
      endif %}\n  {% endif %}\n{% endfor %} {{ temps.high }}\n"
  mode: single
  action:
  - service: persistent_notification.create
    data:
      title: 'Debug: Miner Temperature Alert Triggered'
      message: 'Current temperatures: Outlet 1: {{ states(''sensor.miner_outlet_temperature_1'')
        }}°C, Outlet 2: {{ states(''sensor.miner_outlet_temperature_2'') }}°C, Inlet
        1: {{ states(''sensor.miner_inlet_temperature_1'') }}°C, Inlet 2: {{ states(''sensor.miner_inlet_temperature_2'')
        }}°C'
  - service: notify.email_notify
    data:
      title: Miner Alert - High Temperature
      message: 'High temperature detected on your miner: Outlet 1: {{ states(''sensor.miner_outlet_temperature_1'')
        }}°C, Outlet 2: {{ states(''sensor.miner_outlet_temperature_2'') }}°C, Inlet
        1: {{ states(''sensor.miner_inlet_temperature_1'') }}°C, Inlet 2: {{ states(''sensor.miner_inlet_temperature_2'')
        }}°C. Please check your miner''s cooling system.'
  - service: notify.whatsapp
    data:
      title: Miner Alert - High Temperature
      message: 'High temperature detected on your miner: Outlet 1: {{ states(''sensor.miner_outlet_temperature_1'')
        }}°C, Outlet 2: {{ states(''sensor.miner_outlet_temperature_2'') }}°C, Inlet
        1: {{ states(''sensor.miner_inlet_temperature_1'') }}°C, Inlet 2: {{ states(''sensor.miner_inlet_temperature_2'')
        }}°C. Please check your miner''s cooling system.'
      target: 14164327184@c.us
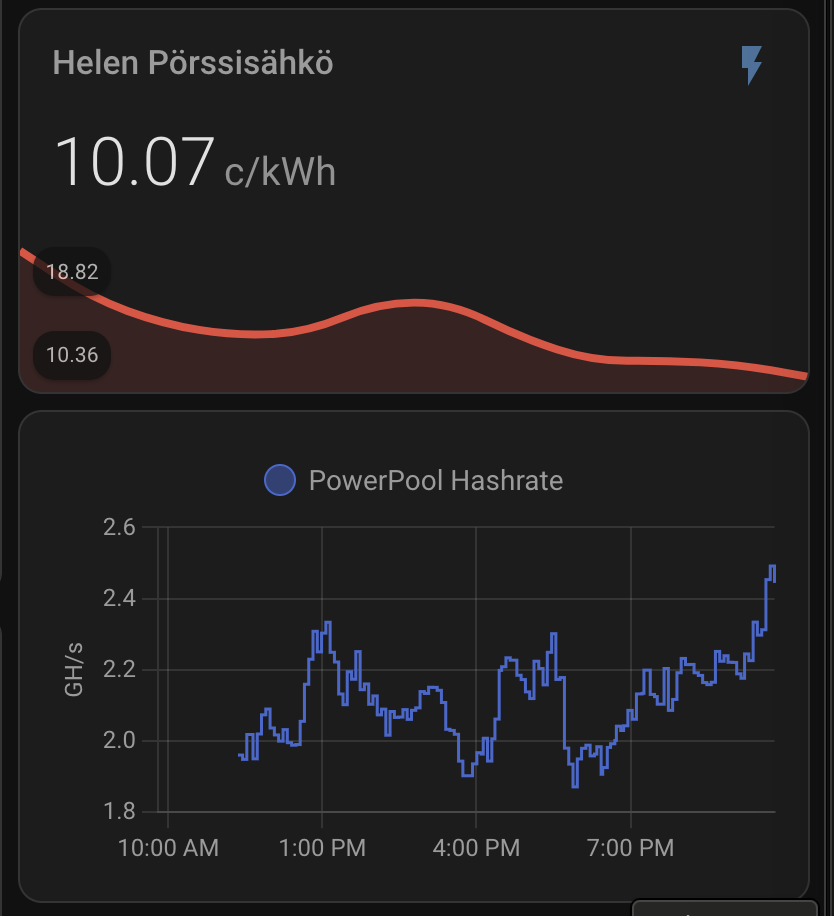
Electricity Price Monitoring
Mining is only profitable below a certain electricity cost. Based on AI-assisted calculations, I set my limit to 62c/kWh. If the price rises above this, Home Assistant turns off the miner:
- id: 634d0fe360ec41c3ac1ea0f3473ad603
  alias: Turn Off Miner When Electricity Price Is High
  description: Turns off the miner when electricity price goes above 62c/kWh
  triggers:
  - entity_id:
    - sensor.electricity_cost_in_cents_per_kwh
    above: 62
    trigger: numeric_state
  actions:
  - target:
      entity_id: switch.shellyplug_s_3ce90ee04b97
    action: switch.turn_off
    data: {}
- id: 9c4564819e404cff95fcc447532bd19b
  alias: Turn On Miner When Electricity Price Is Low
  description: Turns on the miner when electricity price goes below 62c/kWh
  triggers:
  - entity_id:
    - sensor.electricity_cost_in_cents_per_kwh
    below: 62
    trigger: numeric_state
  actions:
  - target:
      entity_id: switch.shellyplug_s_3ce90ee04b97
    action: switch.turn_on
    data: {}
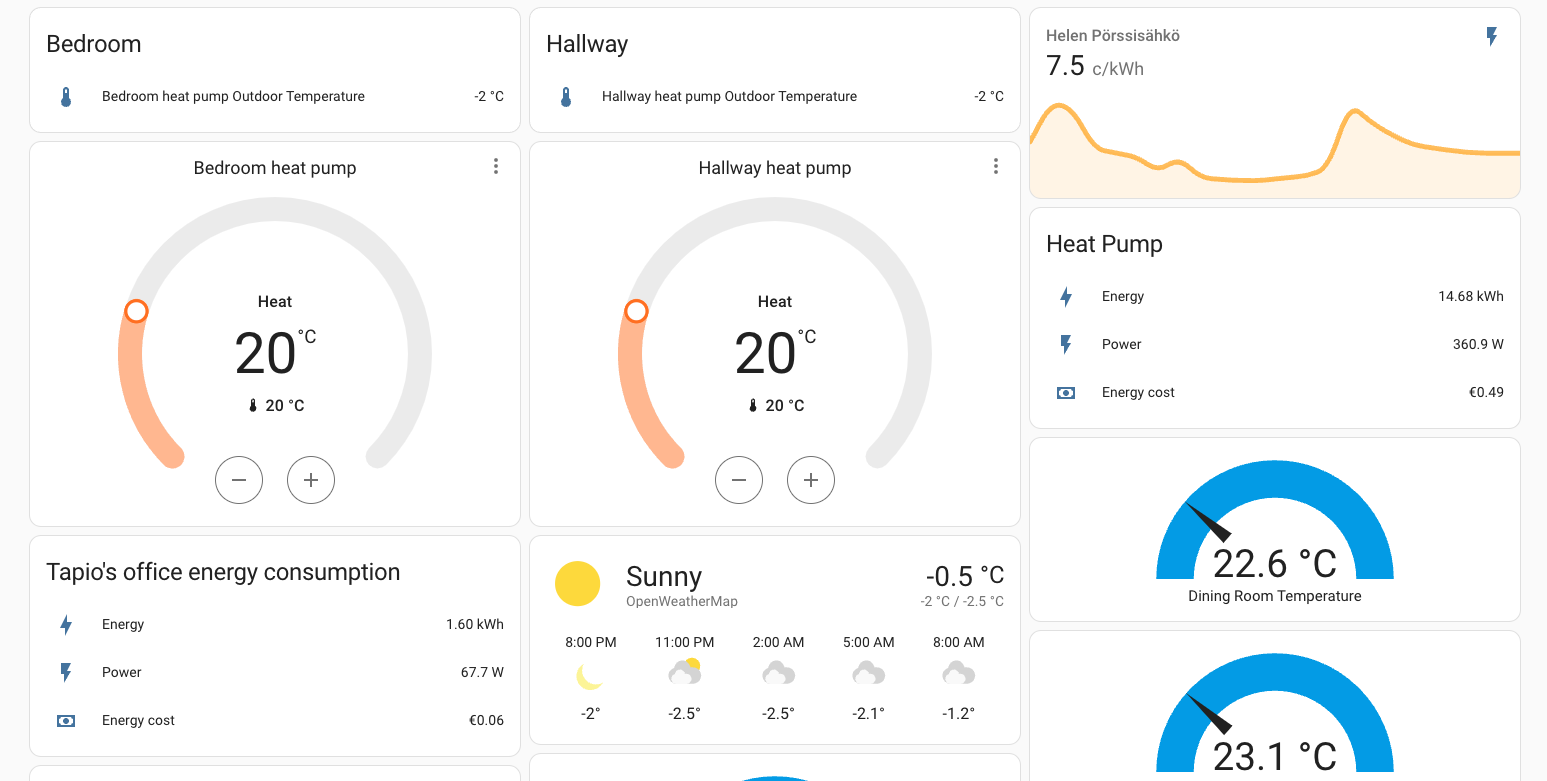
Room Temperature Monitoring
Since I also use a heat pump, I monitor indoor temperatures. If the bedroom temperature drops below 20°C, the heat pump turns on:
- id: bedroom_temperature_control
  alias: Bedroom Temperature Control
  description: Control bedroom heating based on temperature between 9 AM and 7 PM
  trigger:
  - platform: numeric_state
    entity_id: sensor.temperature_bedroom
    below: 20
  - platform: numeric_state
    entity_id: sensor.temperature_bedroom
    above: 20
  - platform: time_pattern
    minutes: /15
  condition:
  - condition: time
    after: 09:00:00
    before: '19:00:00'
  action:
  - choose:
    - conditions:
      - condition: numeric_state
        entity_id: sensor.temperature_bedroom
        below: 20
      sequence:
      - service: climate.set_hvac_mode
        target:
          entity_id: climate.ac_12488762
        data:
          hvac_mode: heat
      - service: climate.set_temperature
        target:
          entity_id: climate.ac_12488762
        data:
          temperature: 20
    - conditions:
      - condition: numeric_state
        entity_id: sensor.temperature_bedroom
        above: 21
      sequence:
      - service: climate.turn_off
        target:
          entity_id: climate.ac_12488762
  mode: single
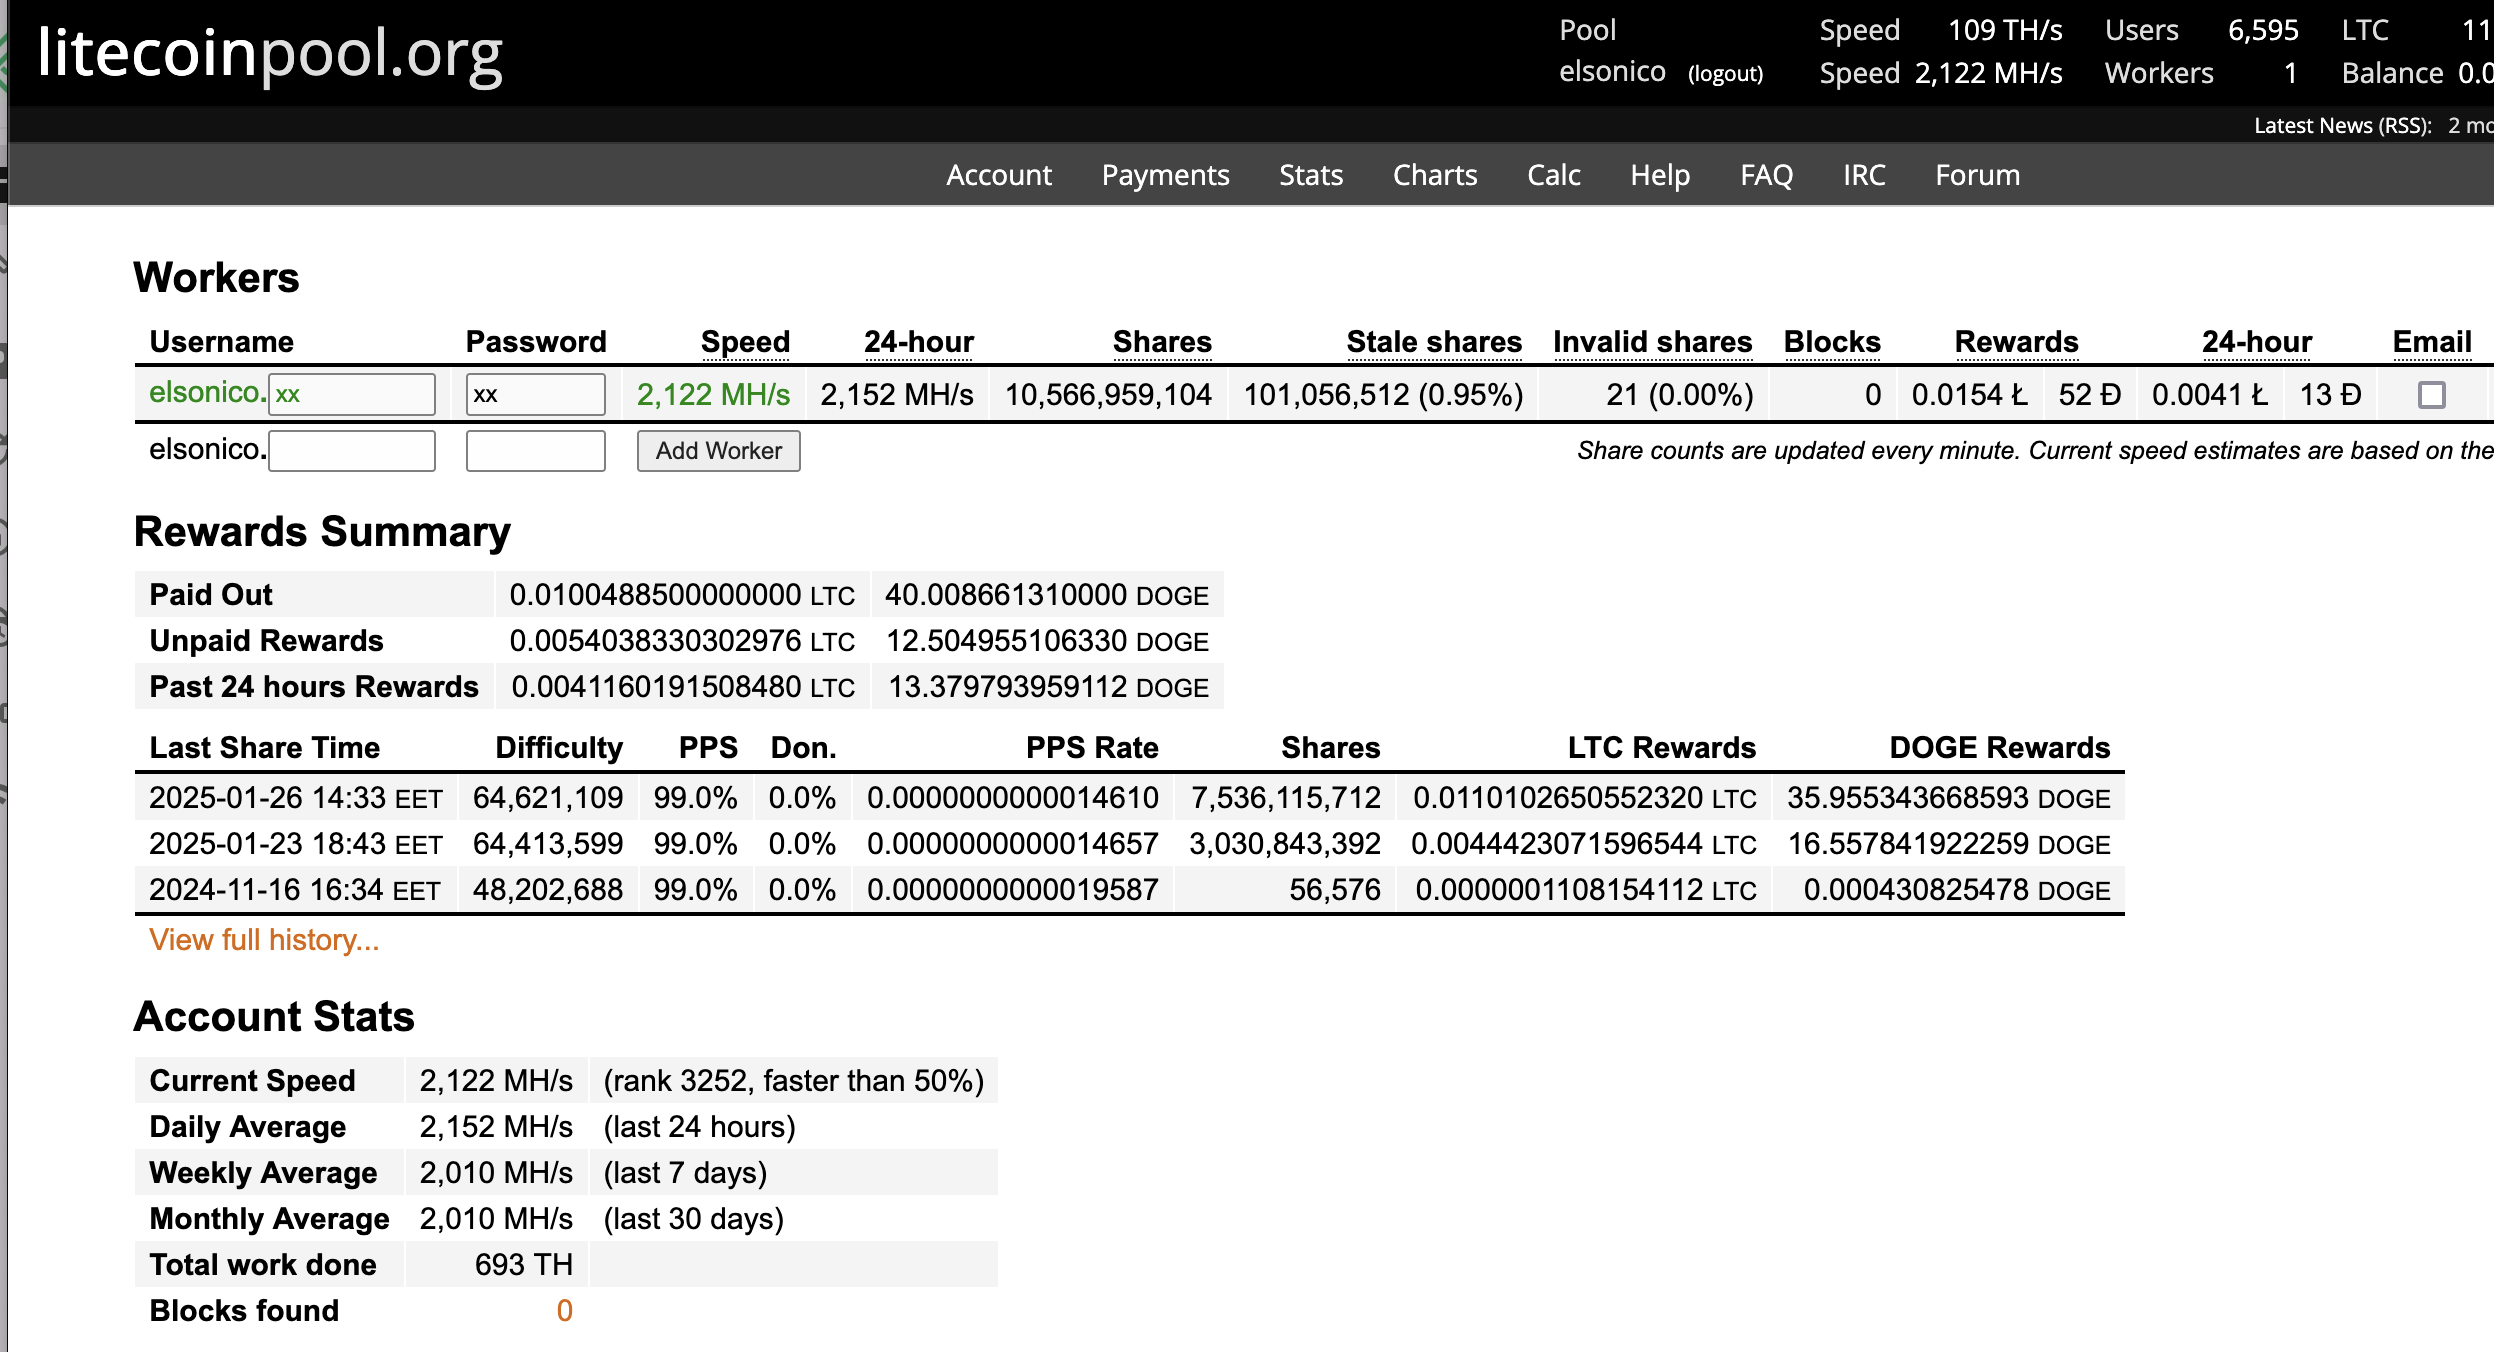
Rewards and Taxation
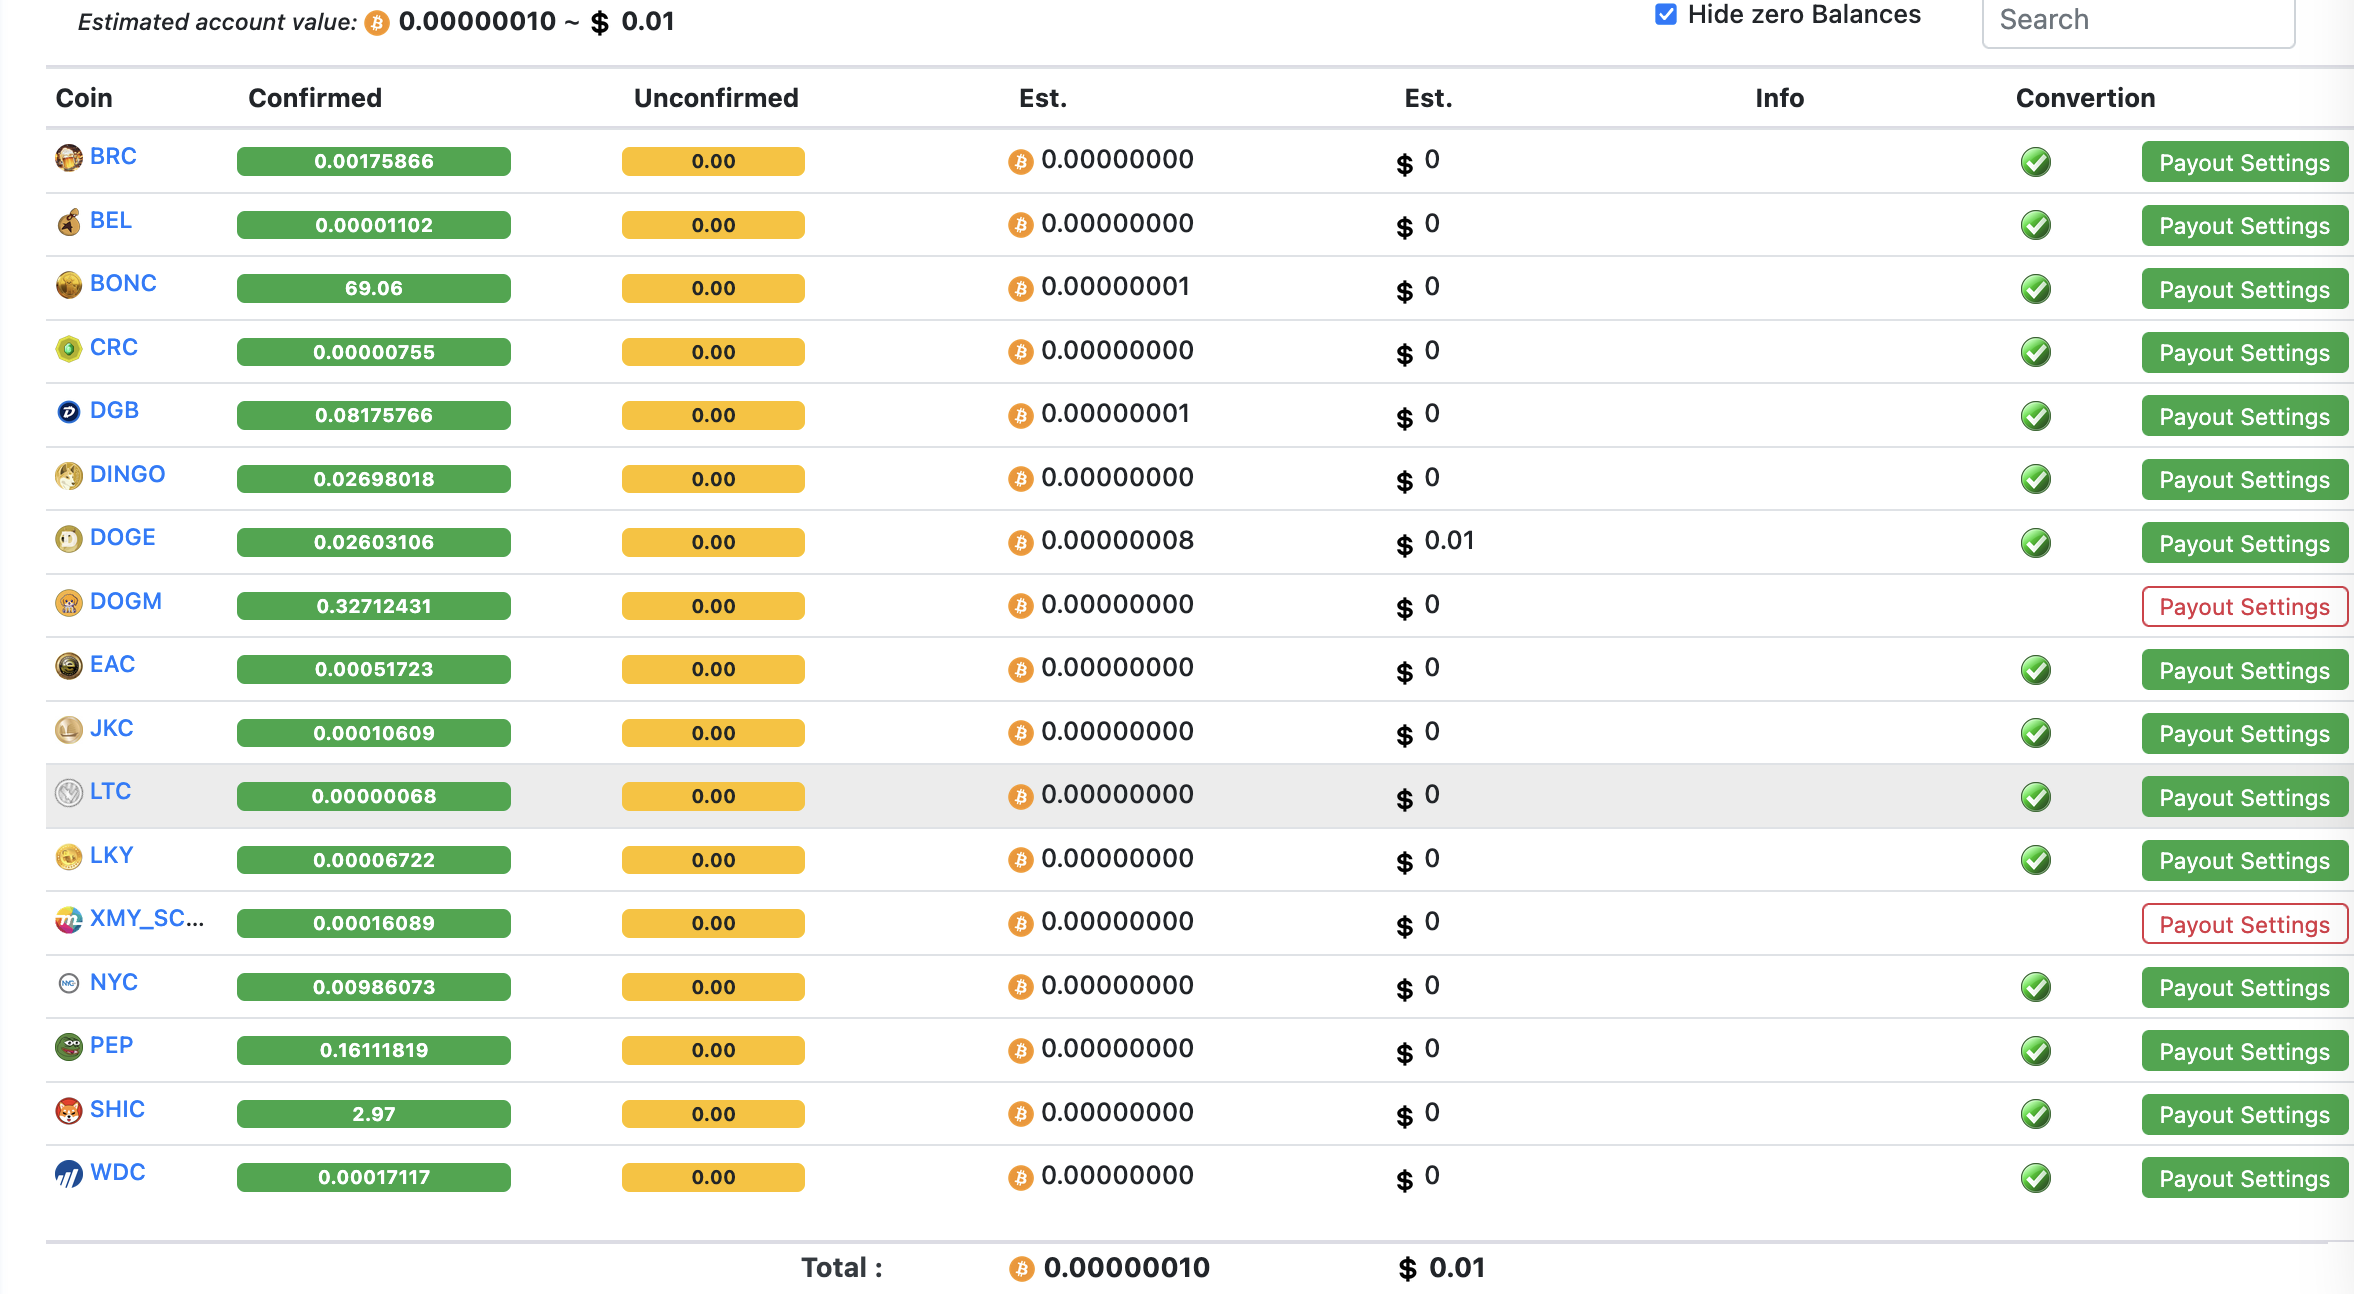
Initially, I set my mining rewards to be paid in BTC. However, I now distribute them as 1/3 BTC, 1/3 DOGE, and 1/3 LTC, balancing risk and market fluctuations.
For tax reporting, I direct rewards to Binance to simplify tracking. Home Assistant helps by exporting electricity costs directly from its database, making expense calculations easier.
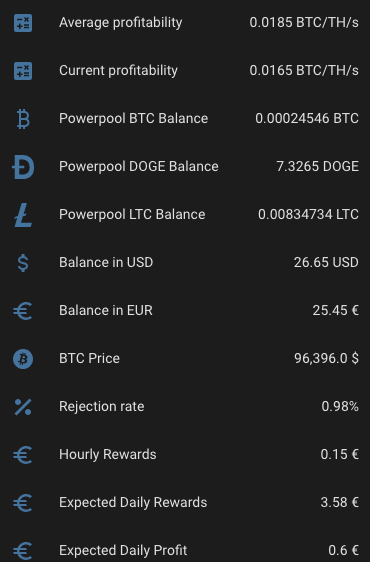
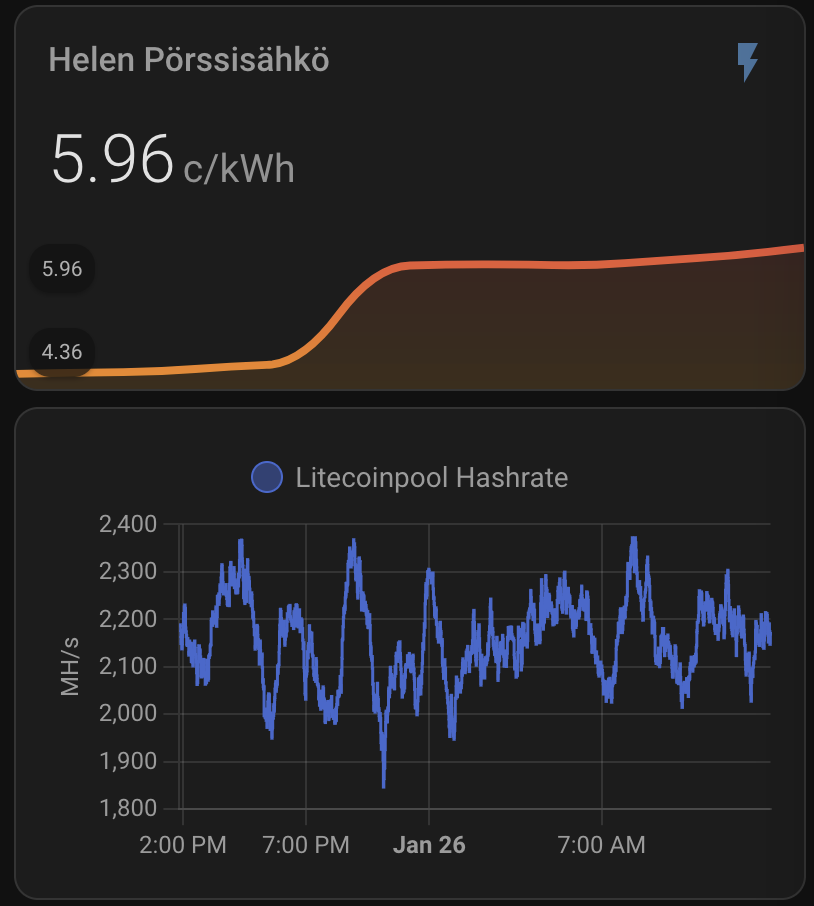
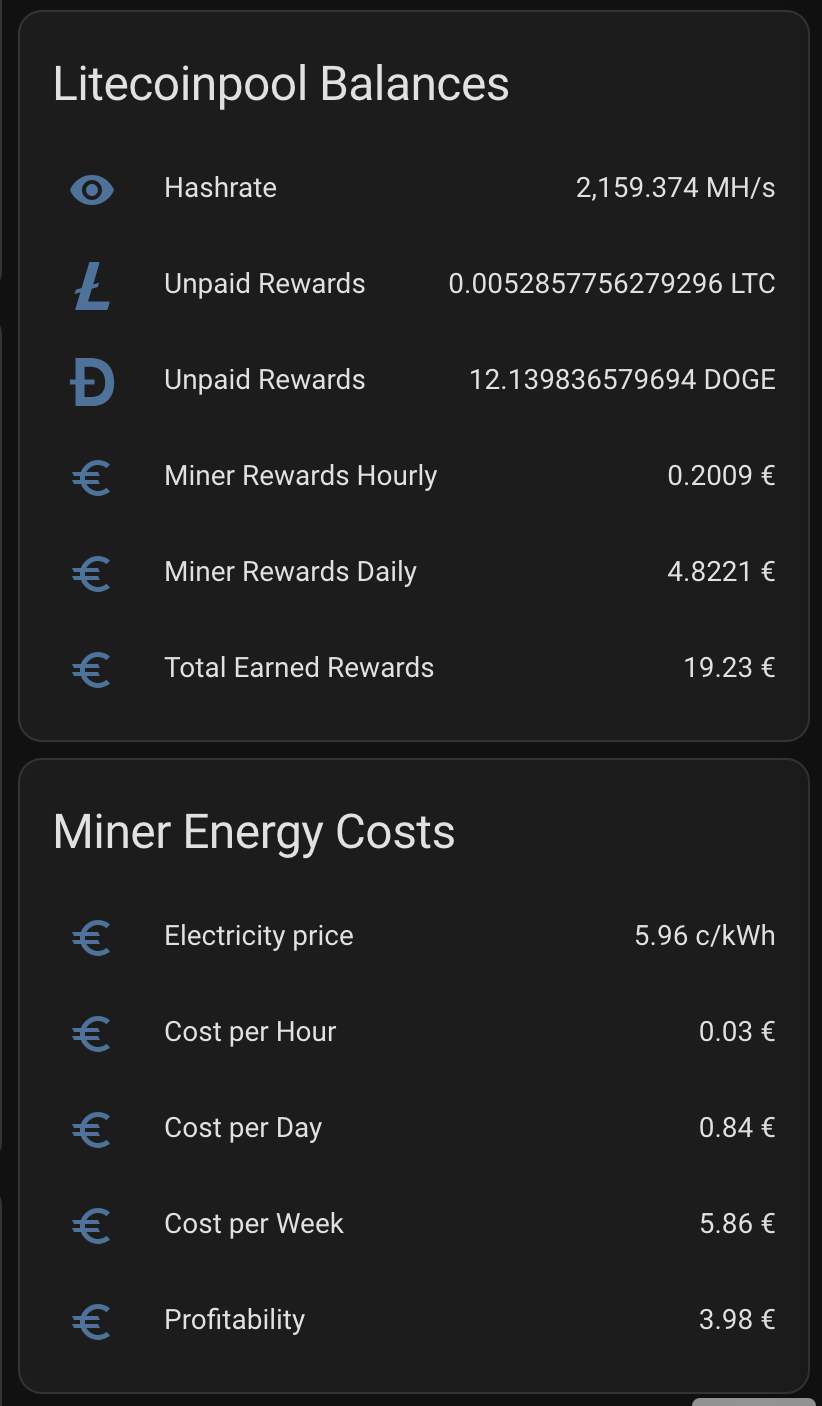
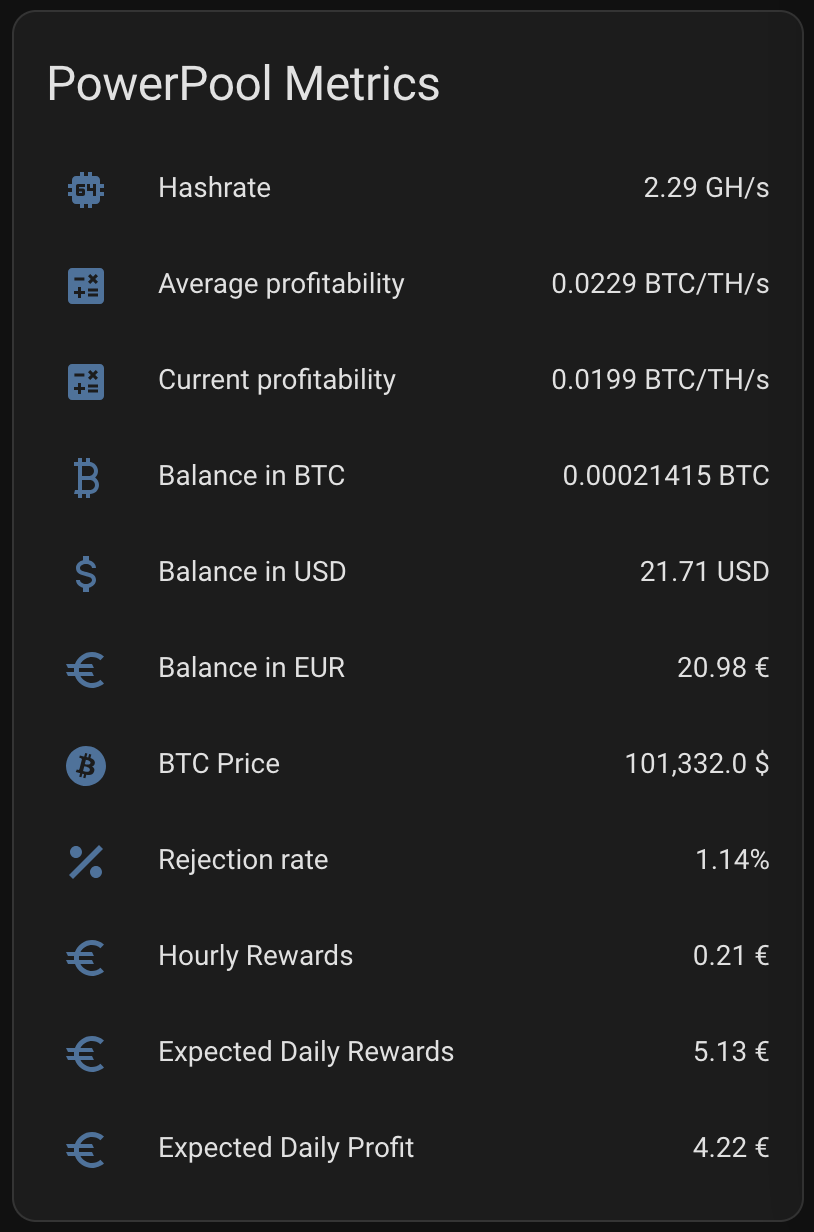
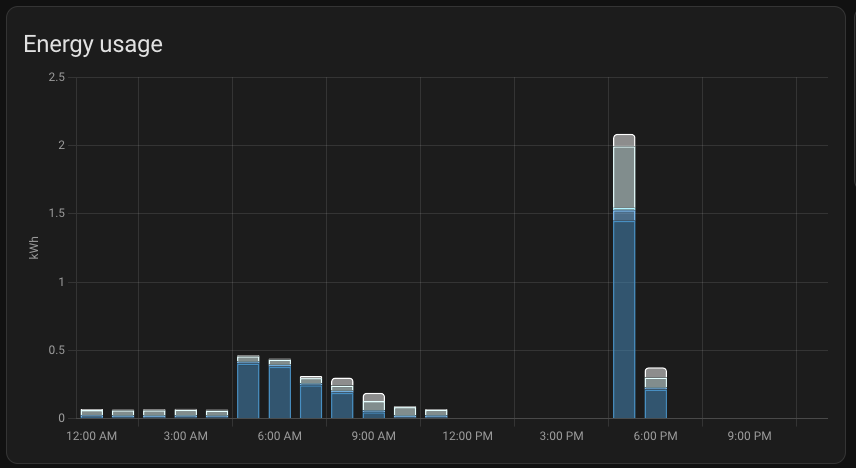
I want to see plenty of things with one look from my mobile Home Assistant Companion App. Expected Rewards, current expenses, temperatures, unpaid rewards in BTC, DOGE, LTC, USD and EUR. I want to see current electricity price with everything including transfer tariff and taxes. Some of the things I want see in graphs, some in numbers. The one thing I want to add is uptime, but other than that I’m cool with my current setup.
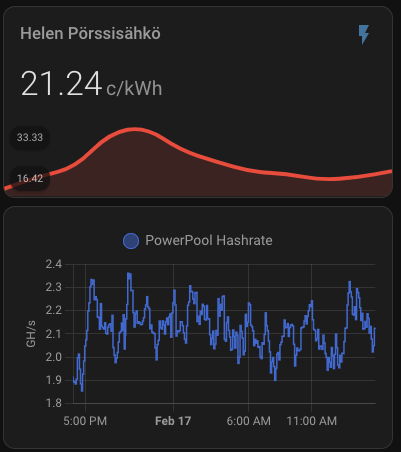
As you can see, the current expected profit for whole day is only 0.60€. This does not take into consideration that I also heating the whole house with the miner. As you can also see, the current electricity SPOT price is way higher than average. Same time DOGE is valued significantly lower than the average which lowers the expected rewards.
Reward payments and taxation
When I initially setup the miner and payments I decided to have them on de-centralized wallet. But then the conversion fees there are way higher than on Binance for example. I decided to to get the rewards paid directly to Binance for that reason.
Maybe later when I’m doing millions with this I might consider de-centralized wallet, but at the moment when it seems the miner is not going to be paying itself within next two years if ever I don’t feel pressure to get the little I earn from this to anywhere outside Binance.
I feel also that it is easiest to do tax return when everything I earn is on Binance. Home assistant certainly helps in regards calculating the expenses since I can export monthly electricity costs directly from Home Assistant database tables. I’ve already created few views there to make that part of the mining easier.
Final Thoughts
This setup provides an efficient and automated mining operation while reducing downtime. Let me know if you have suggestions for improvement or spot any flaws in my approach!
 |  |  |