Tag Archives: linux

Building a DIY AI Chatbot: Control Your Conversations

Introduction

A self-built AI chatbot is crafted entirely by an individual or team from scratch, without relying on pre-existing templates or platforms. This approach gives developers complete autonomy over the coding, features, and functionalities of the chatbot.

Creating a self-built AI chatbot demands a blend of programming expertise, a deep understanding of artificial intelligence, and inventive thinking. Developers can use a variety of programming languages, including Python, Java, or JavaScript, based on their preferences and the chatbot’s intended application.

One of the standout advantages of a self-built AI chatbot is its high level of customization. Developers can fine-tune the chatbot’s responses and functionalities to meet specific needs and objectives. Moreover, they can continually refine and enhance the chatbot on their own timetable, independent of external updates or support.

Getting started

Building a chatbot from scratch might seem daunting, but it’s quite feasible with the right tools. I used the OpenAI API and the Python openai library (version 1.23.2 as of this writing). While GPT-4 typically suggests using openai==0.28, the transition to versions above 1.0 signifies substantial changes and necessitates thoughtful consideration. However, this doesn’t mean that ChatGPT cannot assist in coding—it can, though it requires precise instructions.

Technical setup

For my project, the technical foundation included:

  • Python 3.9.x or higher: I chose Flask as the application server.
  • Access to the OpenAI API: Essential for integrating the AI logic into the chatbot

This setup is sufficient to establish a testing environment for the AI logic, connecting the Python code to the OpenAI API.

Advanced configuration

After thorough testing, I moved on to production. I continued using Flask for its simplicity, but also added Gunicorn as a frontend server. The application runs either as a standalone version or embedded within a WordPress blog.

I explored different operational models, including storing interactions in a database and the Bring Your Own Data (BYOD) model, although the latter’s impact on performance is still unclear. Initially, I deployed the gpt-3.5-turbo-instruct model for its speed and contextual retention. However, for superior output quality, I ultimately chose GPT-4 despite its slower response time.

The AI Bot Herself

The embedded ChatBot is utilizing gpt-3.5-turbo-instruct whereas the one on below links is utilizing gpt-4 model. The later needs a bit time to think, but she will get there… You can compare the results.

Conclusions

A self-built AI chatbot can serve myriad purposes—customer support, entertainment, educational assistance, or personal aid, and can be integrated across websites, messaging platforms, or mobile apps.

For me, the project was primarily an exploration of AI technologies and the OpenAI API. It was also an invaluable learning experience in Python, application servers, and container technologies.

Building a self-built AI chatbot is undoubtedly a complex, resource-intensive endeavor that necessitates ongoing updates and maintenance. Yet, the potential for continuous learning and improvement through natural language processing and machine learning algorithms makes it increasingly efficient and precise over time.

From a Friday morning start to a productive Monday evening, my journey with this project underscores the potential and versatility of AI technologies, making a self-built AI chatbot a potent, customizable tool for any tech-driven initiative.

References

Five easy steps for setting up SSL on HomeAssistant utilising Let’s Encrypt Certbot

Securing your HomeAssistant setup should be a priority, especially if you plan on accessing your system remotely. One of the best ways to do this is by setting up an SSL certificate. This article guides you through five easy steps to set up SSL on HomeAssistant using Let’s Encrypt Certbot.

Understanding the Importance of SSL for HomeAssistant

Secure Sockets Layer, popularly known as SSL, is a security protocol that encrypts the connection between a web server and a client. When implemented on your HomeAssistant, it prevents eavesdropping and tampering of your data by encrypting all communication between your HomeAssistant and your devices. This is crucial, especially when accessing your HomeAssistant remotely over the internet where your data could be intercepted.

Moreover, SSL also provides authentication, ensuring that you’re communicating with the right server and not a malicious one. This is achieved through the use of SSL certificates issued by trusted Certificate Authorities (CAs). These certificates also provide visual cues, such as a padlock symbol, giving end-users confidence that their connection is secure.

An Overview of Let’s Encrypt Certbot

Let’s Encrypt is a free, automated, and open Certificate Authority. It provides digital certificates needed to enable HTTPS (SSL/TLS) for websites. The Certbot is an easy-to-use client that fetches certificates from Let’s Encrypt and configures your web server to use them.

By using Let’s Encrypt Certbot, you can easily acquire and renew SSL certificates for your HomeAssistant. It automates the process of obtaining and installing SSL certificates, thereby saving time and eliminating the risk of manual errors. Moreover, it also handles the renewal of SSL certificates, ensuring that your connection remains secure.

Contrary to what seems to be the case for many, if not most, I find the use of third-party VPN solutions for accessing an otherwise cloud-free HomeAssistant setup to be illogical. Moreover, the notion of implementing the HomeAssistant Cloud service, Nabucasa, doesn’t appeal to me at all. The core of my philosophy is to maintain a smart home solution that is independent of both third-party and cloud services.

Step 1: Installing Let’s Encrypt Certbot

The initial step to enable SSL for your HomeAssistant involves installing Let’s Encrypt’s Certbot. The installation method differs across operating systems. On Linux systems, it’s straightforward to install Certbot using the package manager. For example, Ubuntu users can execute the command sudo apt-get install certbot.

My setup took a slightly different route. As previously mentioned, my HomeAssistant operates within a Docker container, and I also host several websites, including the one hosting this blog post, on a virtual machine. This VM shares the same server as the HomeAssistant Docker container. Installing Certbot on CentOS Stream, the operating system of my VM where SSL is primarily needed, was a breeze by simply following the guided instructions available on the Certbot website.

You can confirm the successful installation of Certbot by executing certbot --version in your terminal. This command should return the version number of Certbot installed on your machine. Should you encounter any issues, indicating that Certbot hasn’t been installed properly, you may need to address the installation process or attempt reinstalling it.

Step 2: Generating an SSL Certificate

With Certbot installed, the subsequent step involves generating an SSL certificate for your domains. In my experience, executing the command certbot --apache was a straightforward process. Certbot intelligently scanned all my Apache virtual hosts, generating certificates for each. Interestingly, it selected the first domain in the list as the root certificate for all others—a decision I wouldn’t have made intentionally, but one I’m content with nonetheless.

Aiming to secure a certificate for HomeAssistant as well, I introduced fake virtual hosts within Apache and initiated certbot --apache once more, this time specifying the addition of the exclusive HomeAssistant domain, which for me is ha.auroranrunner.com.

An alternative method involves the command certbot certonly --standalone. This approach instructs Certbot to secure a certificate by functioning as a temporary web server (standalone) to authenticate domain ownership—useful for situations requiring a more hands-off approach.

However, my objective was for Certbot to manage the certification updates for all domains collectively, thus I adopted a slightly different strategy.

Opting to exclusively focus on HomeAssistant, without intertwining Apache configurations, prompts a straightforward process. You’ll be asked to input your domain name along with your contact details. Upon submission, Certbot seamlessly liaises with the Let’s Encrypt Certificate Authority (CA), generating an SSL certificate for your domain. The newly minted certificate and its private key are securely stored in the directory /etc/letsencrypt/live/your_domain_name/.

Step 3: Setting SSL sync between primary host and secondary host

In my situation, it was necessary to establish a method for synchronizing the SSL certificates between the virtual machine hosting the Apache web servers and the server operating the HomeAssistant Docker container. To accomplish this, I undertook the following steps:

  1. Established passwordless SSH authentication between my Apache hosts and the server hosting HomeAssistant to ensure a seamless connection.
  2. Created a script located at /usr/local/bin/sync_lets_cert designed to facilitate the synchronization of Let’s Encrypt certificates.
  3. Developed a systemd service aimed at automating the daily synchronization of Let’s Encrypt certificates between the two hosts, ensuring that both systems always use the latest SSL certificates.
  4. Configured a dedicated volume for the HomeAssistant Docker container mapped to /etc/letsencrypt:/etc/letsencrypt. This setup allows the HomeAssistant container direct access to the synchronized SSL certificates, simplifying the process of securing communications.

The script located at /usr/local/bin/sync_lets_cert is responsible for synchronizing the SSL certificates between servers. Its contents are as follows:

#!/bin/bash

# Variables
SECONDARY_SERVER="my_vm_host_server"
DOMAIN="ha.auroranrunner.com"
LIVE_PATH="/etc/letsencrypt/live/$DOMAIN"
ARCHIVE_PATH="/etc/letsencrypt/archive/$DOMAIN"
DEST_LIVE_PATH="/etc/letsencrypt/live/$DOMAIN"
DEST_ARCHIVE_PATH="/etc/letsencrypt/archive/$DOMAIN"

# Sync the live directory
rsync -avz -e ssh $LIVE_PATH/ $SECONDARY_SERVER:$DEST_LIVE_PATH

# Sync the archive directory
rsync -avz -e ssh $ARCHIVE_PATH/ $SECONDARY_SERVER:$DEST_ARCHIVE_PATH

This script ensures that the certification files are kept in sync between the hosts. The next step involves setting up a systemd service to schedule this script’s execution, which proved to be slightly more complex but was successfully achieved as follows:

  1. Create a timer file at /etc/systemd/system/sync_lets_cert.timer with the following content to establish a daily execution schedule:
[Unit]
Description=Daily timer for Let's Encrypt certificate sync

[Timer]
OnCalendar=daily
Persistent=true

[Install]
WantedBy=timers.target
  1. Then, create the service file /etc/systemd/system/sync_lets_cert.service to define the synchronization task:
[Unit]
Description=Sync Let's Encrypt Certificates

[Service]
Type=oneshot
ExecStart=/usr/local/bin/sync_lets_cert
  1. Finally, start and enable the service and timer with the following commands:
systemctl start sync_lets_cert.service
systemctl enable sync_lets_cert.timer

With these steps completed, the SSL certificates will not only be renewed every 90 days but also synchronized between servers daily, ensuring seamless security and authentication continuity.

Step 4: Setting up SSL on HomeAssistant

With the SSL certificate secured, the following step is to integrate SSL into your HomeAssistant setup. This process entails adjusting your HomeAssistant’s configuration to recognize and utilize the SSL certificate. Achieve this by appending the below entries into your HomeAssistant’s configuration.yaml file:

http:
  ssl_certificate: /etc/letsencrypt/live/ha.auroranrunner.com/fullchain.pem
  ssl_key: /etc/letsencrypt/live/ha.auroranrunner.com/privkey.pem
  base_url: https://ha.auroranrunner.com:8123

These lines instruct HomeAssistant on the locations of the SSL certificate (fullchain.pem) and its corresponding private key (privkey.pem). Post addition, a restart of your HomeAssistant is required for the adjustments to be applied.

Initially, setting up SSL without specifying base_url sufficed for web browser access. However, to ensure the mobile application functioned correctly, including the base_url became necessary.

Regarding domain registration, I own auroranrunner.com and manage its DNS settings via the AWS console. Given the dynamic nature of my IP address, I employ the dy.fi service to update the DNS record for my dy.fi domain automatically. On AWS Route 53, ha.auroranrunner.com is configured with a CNAME record pointing to sirius.dy.fi, a nifty setup. Thanks to my router’s dy.fi support, any alterations to my external IP are automatically synchronized.

Step 5: Troubleshooting Common SSL Setup Issues

While setting up SSL on HomeAssistant using Let’s Encrypt Certbot is straightforward, you might encounter some issues along the way. One common issue is the “Failed authorization procedure” error. This usually occurs when Certbot is unable to verify domain ownership. To resolve this, you need to ensure that your domain name is correctly pointed to your HomeAssistant’s IP address.

Another common issue is the “SSL connection error”. This usually occurs when HomeAssistant is not correctly configured to use the SSL certificate. To resolve this, you need to ensure that the paths to the SSL certificate and its corresponding private key in your HomeAssistant configuration file are correct.

Setting up SSL on HomeAssistant using Let’s Encrypt Certbot is a good way to secure your system. While the process might seem complex, it can be broken down into five easy steps: installing Certbot, generating an SSL certificate, setting up SSL on HomeAssistant, configuring HomeAssistant with the SSL certificate, and troubleshooting common SSL setup issues. By following these steps, you can secure your HomeAssistant and ensure that your data remains safe and private.

Conclusion

Implementing SSL with Certbot is relatively straightforward for those who are well-acquainted with their network setup. This approach offers a security advantage over depending on third-party VPN solutions, which merely introduce an additional layer to your existing infrastructure. Leveraging third-party services to manage your smart home system does not enhance security; rather, it compromises it. While VPNs can serve as a viable security measure for those lacking the expertise to properly configure their home networks, the assertion that third-party VPNs inherently bolster security is misleading.

For those considering a VPN, I advocate for hosting your own. In my experience, OpenVPN has been fully compatible with HomeAssistant, offering a cost-effective solution without the need for extra expenditures. Like the SSL setup, OpenVPN requires dynamic DNS unless you have the luxury of a static IP address, ensuring reliable and secure remote access to your smart home systems.

Running benchmark: Comparing Ubuntu 20.04 and RHEL 8.5 performance

The claim

I found a claim on Quora that Ubuntu is slow compared to RHEL. I never thought about it. Is it really? It seemed like a sentimental statement with nothing to prove it. I questioned the claim and found out, that many people tried to support the claim still without providing any kind proof.

Instead of continuing to asks any evidence, I decided to dig the evidence my self.

Is there any difference in the performance between the two? I don’t really know, but if you think about default server install with nothing extra, I doubt there could be any significant performance difference.

Ubuntu 20.04 has currently kernel 5.4 where as RHEL 8.5 has 5.13. Libraries and software are pretty much the same. File system by default is XFS on both. I always enable LVM although that could affect performance – certainly not by improving it, but there are other advantages. I don’t think LVM reduces performance much either and as said I always set it up anyway.

In this case I have two virtual machines both having 4GiB RAM and two 3.3GHz CPU cores running on qemu/kvm. The host OS is, yes you guessed right, Ubuntu 20.04 , because on desktop it has certain software I need. And, it works well as virtual host too. That does not affect the results anyhow, since the guest OS has no idea of host OS.

I haven’t tuned either of the guests OS at all except for one thing. I set tuned profile to virtual-guest for both, which makes sense. It is the recommended profile when I run tuned-adm recommend on both of the guests machines.

Put the HammerDB down

Last I ran HammerDB I had to settle with text based version, but this time it had a nice working GUI. But even before quick HammerDB installation, I downloaded Db2 11.5.7 Community Edition. Installed it on both Ubuntu and RHEL. I created SAMPLE database with db2sampl and took timing for that: no difference really. I knew it. Ok that doesn’t prove anything.

But, the real test does. HammerDB.

Ubuntu 20.04

Let’s start with Ubuntu. I read a tutorial on how to run time based benchmark with HammerDB. I want to do this fast. One virtual user only. Looks good.

Ubuntu 20.04

The process goes:

  • Choose Engine and configure it (Db2)
  • Build schema
  • Configure and load driver
  • Configure virtual user
  • Create virtual user(s)
  • Run virtual users
  • Monitor and wait
Here are the results for Ubuntu.

The results for Ubuntu 20.04

System achieved 5178 NPM from 22865 Db2 TPM

RHEL 8.5

Then same thing for RHEL. The machine crashes twice. Reminds me of kernel parameters. We have only 4GiB, so might be I need to tune them. But no, it run all good the third time. In my previous job though, servers with low memory running Db2 on RHEL crashed always without tuning the kernel parameters. There’s a simple formula based on RAM to calculate correct values for Db2 here. That said, I did not change anything from defaults for Ubuntu nor RHEL. It wouldn’t be fair comparison, if I started to tune the kernel parameters for one and not to the other.

Running on RHEL 8.5
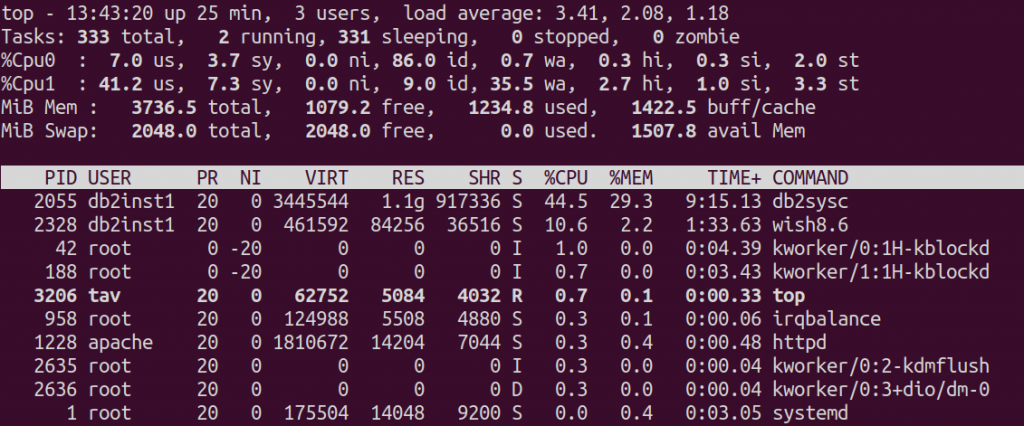
There’s finally some I/O wait
The winner is RHEL 8.5 by two New Orders Per Minute (NOPM)

The results for RHEL 8.5

System achieved 5180 NOPM from 22815 Db2 Db2 TPM

First conclusion

There is really no difference between Ubuntu and RHEL what comes to achieved performance results. The two new orders per minute makes 0.04% difference which I’m pretty sure no one can notice just by “using the server a bit”.

Comparison between database engines

Since I already started playing with HammerDB, why not try some more tests. I have earlier installed Db2 on the host machine itself as well as MS SQL Server. I also have virtual machine running Oracle Linux 8 on it with the same 4GiB RAM and two CPU core setup. MySQL and PostgreSQL I have running on the host itself.

The hosts OS, as said, is running Ubuntu Desktop 20.04. It has 4 x 3.3GHz cores and 32GiB RAM and fast NVMe 500GiB M.2 PCIe SSD. This is small form factor machine suitable for industrial use as a headless server running for example Linux. Or you can use it as desktop computer as well. My idea for it was to use it as a platform for several virtual guests, but I wanted to see how it works as a Linux desktop computer as well.

Let’s do few quick tests on the host itself for various database engines. More of a test of HammerDB itself than real comparison between the engines.

Db2

TEST RESULT Ubuntu 20.04 Desktop: System Achieved 6651 NOPM from 2928 TPM.

I’m a bit surprised it didn’t achieve more. Need to test more. It takes time for bufferpools to warm up with automatic memory tuning and with 32GiB memory I’m pretty sure we could get much better results.

MS SQL Server

But let’s check with MS SQL Server I have running on the same machine. Certainly Db2 beat MS SQL Server, right?

MS SQL Server gets higher TPM numbers compared to virtual machines
Obviously the benchmark is somewhat different between the engines,

The winner is… oh no, MS SQL Server

8394 New Orders Per Minute with 19243 SQL Server TPM

Oracle

I have one Oracle 21c Server running on VM running Oracle Linux 8. Oh but Oracle – I’m so lost with it. HammerDB asks too much questions and it seems I need to create another pluggable database. I will do that – later.

PostgeSQL and MySQL

Out of curiosity I ran the test for PostgreSQL and MYSQL:

PostgreSQL: TEST RESULT: 11607 NOPM from 26880 PostgeSQL TPM

MySQL: TEST RESULT: 1739 NOPM from 5252 MySQL TPM

I have no idea why the difference between above two is that significant. Might be for various reasons. I wouldn’t pay much attention on the difference since running the test on host OS and not on virtual machines with proper setup doesn’t make much sense – unlike the more serious comparison I did for Ubuntu Server and RHEL.

Final Conclusion

Without official test for Oracle we cannot make any other conclusion than Oracle is the slowest from these three DB Engines: Db2, MS SQL Server and Oracle. I’m kidding of course; I’m no Oracle expert and just too slow myself to set a proper test for Oracle. That might change once I have enough time to dig deeper on Oracle. For MySQL and PostgreSQL the test was also too quick; more of a test do they work similarly in comparison to Db2 and MS SQL what comes to HammerDB.

What comes to the original claim about Ubuntu being overall slow and which surprisingly many is willing to believe, I think I have busted the claim.

We can speculate how about real server environments and please do, but before you actually have any benchmarks to show otherwise, I take it proven that Ubuntu and RHEL are equally slow or fast.

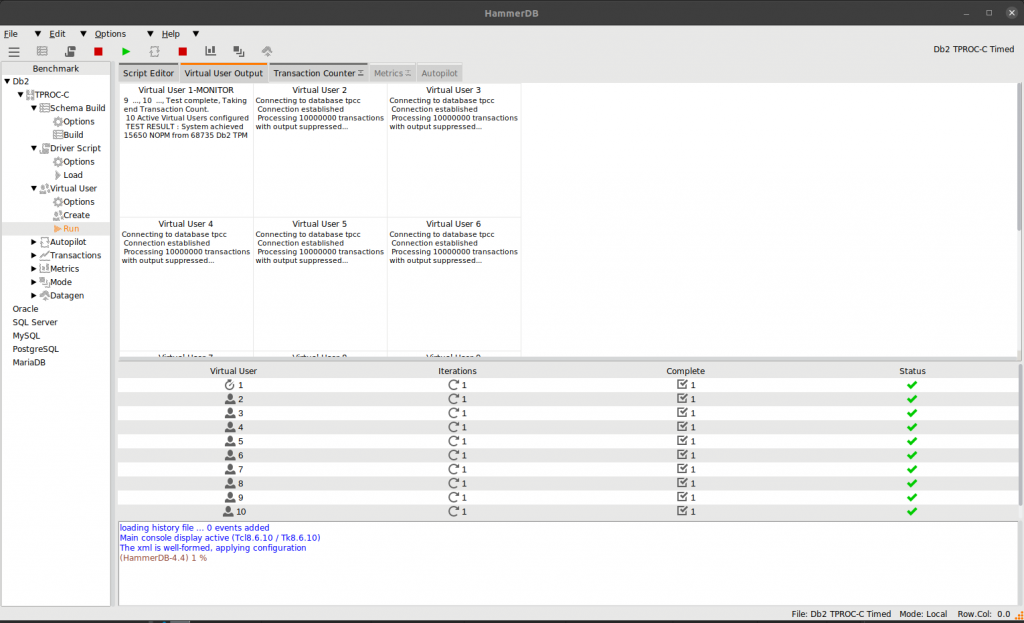
Also, what comes to MS SQL Server performance compared to Db2, obviously this was not the last word. Let’s try with 10 virtual users beating Db2 for a bit longer.

Db2 with 10 Virtual Users

Final results for Db2 running on this tiny Asus Mini PC PN41 were:

TEST RESULT: System achieved 15650 NOPM from 68735 Db2 TPM.

So we have a winner: Db2 11.5.7?

In a sense Db2 won that it did get the highest number of new orders per minute yes. But in comparing with other database engines I didn’t really organise any meaningful tests between them this time.

Want to test yourself?

Prove me wrong. Run your own tests and provide me your data and conclusions. I have serious doubt Ubuntu Server and RHEL differs much what comes to performance. There certainly is plenty of other things which makes the difference when choosing the distribution. Things like support, cost, platform you are running on and so on. Red Hat certainly has it’s advantages on enterprise level support whereas Ubuntu started strong on desktop, but it is easy to deploy for example on Azure and fully supported.